Monthly Archives: October 2010

Purplicity

A SHORT POP QUIZ

  1. Can one really have too much purple in their wardrobe?  A: I think not!
  2.   What do my recent wool coat and my soon to be new sheath dress have in common? A: Plum thread.

 A pleasant happenstance this evening, while choosing thread for my new sheath dress, was that I didn’t need to rethread my sewing machine.  Why?  Because the thread I used for my coat was just the right shade for my new sheath dress.  I think I have just enough thread for the project too.  How cool is that?! 

I don’t know if I’ve admitted it before, but purple is my favorite color.  And while I haven’t indulged that much in it in my wardrobe in the past, I have begun to notice a purple trend in my stash lately.  Oh, I may have conveniently forgotton that one of my winter coats is purple.  And did I mention that I recently bought purple corduroy to duplicate my father’s jacket?  I don’t think I am going to use that corduroy for this jacket now though.  I mean, how can I get away with 3 jackets/coats that are purple???  That’s just a purple overload. 

I may need to join Purple Lovers Anonymous.

I made decent progress on my dress tonight.  I could have pushed my limits and finished all the darts on the lining too tonight, but I am sensibly knocking off early.  I don’t really have any thread that matches my lining and I need to buy a zipper, so I will just wait until I can pop over to P&S tomorrow and check out their selection of thread and zippers.  I like to be matchy matchy like that.  That’s just how I roll. 

Happy purplicity everyone.

Project Runway no more

image from Project Runway on Lifetime TV

My friends, I am so disappointed with the choice of Gretchen last night, that I don’t think I can watch another season of Project Runway again.  There’s no denying that she came out strong with in the first two challenges, but week after week thereafter, she sucked.  The judges thought she sucked too.  Or so I thought.

I was really surprised when she made it to fashion week and from that point on I suspected that there was a plan in place for her to win the whole shebang.  Well, my suspicions were proven last night.

I think Michael C should have been in the final 3, not Gretchen and then she wins???  Her runway show was boring.  She used the same tired old print over and over again.  Her designs made me yawn.  There was no excitement, no ideas, no future.  All of her clothes looked RTW. 

Correct me if I’m wrong, but this show is about Design right?  Design with a capital D?  Nowhere in the word Design do I see the letters RTW.  Why on earth did they pick her???

On the Project Runway Facebook page last night there were thousands of comments deriding the choice of Gretchen as the winner with many, many people saying they would never watch again.  I think they made a serious misstep last night.  I can’t fathom why they would choose her.  What was the strategy behind it?  What was the ulterior motive?  What do they gain by choosing Gretchen?

I just don’t get it.  And they have lost me as a viewer.

Rant over.

A public service announcement

Do you see that big X on my new suit skirt’s vent?  What do you think it’s there for?

  • If you said it is an embroidered embellishment, YOU’RE WRONG!
  • If you said it is to keep your vent closed for modesty’s sake, YOU’RE WRONG!
  • If, instead, you said it’s to keep the skirt looking nice in the store and that one should remove the stitching after purchasing the skirt so that you can wear the skirt as it is meant to be worn, well then, YOU ARE CORRECT!!!

My friends, I can’t tell you how many times every week, I see some poor deluded soul with their skirt or coat vents still stitched up.  I just can’t believe that A) no one has told them to remove the stitching, and B) that they actually think it’s supposed to remain there. 

So, please pass along this apparently much-needed service announcement to as many people as possible.  We have an epidemic on our hands!!!

P.S.  If you deduced that I bought a RTW suit recently by the picture above,  you’re correct.  I really needed a brown suit in my wardrobe since apparently I’m still a growing girl (unfortunately).  And I found the perfect brown suit at Ann Taylor recently.  It went on sale, so I just snapped it up.  Since I haven’t perfected a TNT suit jacket yet and don’t have time to do so right now, I had to buy a suit.  This is, in my opinion, a perfect suit for me.  It’s fitted without being tight, has great yet subtle seam details, and is very slimming.  I have discovered that 2 or 3 button suit jackets are the way to go with a larger bust.  1 button jackets don’t give you waist definition and just plain make you look 20 lbs heavier than you are.  (How do I know this?  Because my last two suit purchases were 1 button jackets.  Argh!)  I feel really great in my new suit today.  🙂

A TNT it is then

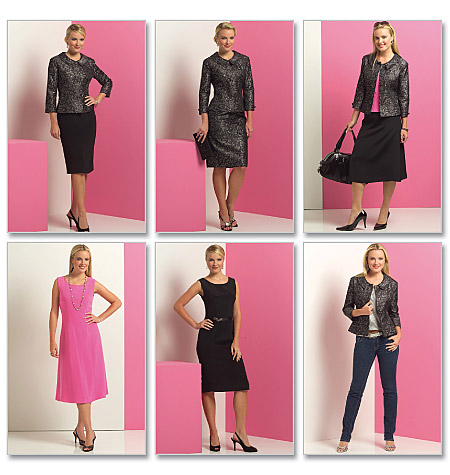
And so my next project will be my TNT sheath dress, B5147.  Are you guys bored yet?  😉

Butterick 5147


This time I am using a tweed I purchased from Paron’s at the NY Shopping day.  I loves me a good tweed.  Remember my tweed Burda skirt and how I enjoyed pressing that tweed and what great pleats it made?  Ahhhhh….  This tweed is in the mauvish/purple family.  I know you all are shocked by this color choice, right?

I cut it out on Monday night, but was sick yesterday.  Unfortunately, I won’t be able to get to it again until Thursday, so this won’t be the quick palate cleanser I thought it would be.  But it will still be easy.  This time around I plan on making a few more changes to the TNT:

  • I added back some of the armscye that I had taken away on the dress for the wedding and will sew the side seam a little tighter right under the arm.  If you’ll remember, I showed a little too much fat in that area.  I was trying to take out the gaping there, which I did, but then ended up with a bit of a freak show as well.  I will just tighten it up at the side seam instead, thank you very much.
  • I am putting back some length to the bottom hem.  I just feel more comfortable with longer skirt. 
  • I am definitely keeping the lower neckline though.  I like it on me.  It’s still office appropriate, although I will most likely wear this with the Burda turtleneck I plan on sewing next.
  • I am also going to reduce the width of the front fish eye darts that I increased for the dress for the wedding.  Since I know I will be wearing something underneath the dress, I don’t want it hyper-form-fitting.

It feels good to be sewing again. 

Happy sewing everyone!

Decompression

image from wikimedia.com

or intimidation?

I can’t tell which it is that I am experiencing right now.  It’s been a week since I finished my coat and I still haven’t started my next project.  Or any project for that matter. 

My first excuse was social engagements, but then the weekend came and I couldn’t get motivated to start anything.  Was I resting after a long project or was I just plain intimidated?  I think I am always most intimidated by a project right before starting it which leads to major procrastination on my part. 

But mama needs some fall/winter clothes and stat!  I really want to make more sheath dresses as I now know that I love wearing dresses and always have apparently.  My quandary with the sheath dress though is: do I make B5147 again since I’ve worked out the fitting issues?  Or do I start the TNT process all over again with a princess seam sheath dress which I suspect will be more flattering?  *sigh*

I also want to make some turtlenecks to wear underneath them.  And let’s not forget that work wardrobe staple, the pencil skirt. 

So, what do you find is the most intimidating part of the sewing process?  Just starting?  Certain difficult design details/skills like welt pockets?  Finishing it up so it doesn’t become a UFO?

Tell me!

Daydreaming

Thank you so much for all of the wonderful compliments on my coat the last two days.  You are all so sweet to take the time to comment.  I really appreciate it!  I am still in the honeymoon period with my coat, having worn it three days straight and still in love.  My eagle eye has not detected any flaws and my body feels super comfy and warm in its sweet embrace. 

But now that massive coat endeavor is over, what next?  A few posts back when I spoke of how fabric stash is in actuality theoretical clothes, I included my sewing list through the end of the year (I’ll recap again here):

  • Knit Jack’s mittens
  • Knit Jack’s annual sweater (maybe)
  • 6 lined tote bags for gifts
  • Finish my fall coat  COMPLETED
  • 5 kids pj’s for Christmas gifts
  • Find, fit and make TNT pants and jacket for a suit POSTPONED —  2011

Now that fall is here, I am yearning for my own sewn clothes to permeate my fall wardrobe.  I want tweedy goodness like tweed sheath dresses worn over turtlenecks.  How about  some suit jackets to mix and match?   Maybe a plaid skirt thrown in. 

Right now, I am considering the turtlenecks (BWOF 9-2010-121 turtleneck) from one of the last two issues of Burda that Karen made up.  And using my B5147  sheath dress pattern for a tweed and maybe a suiting. 

Mama needs some clothes!

Oh and I’ll probably get to all the other stuff on the list except for the pants.  That project is probably going to be complex like the coat.  And I will need a vacation and some wine fortification before trying that.  I’m still on the fence about Jack’s sweater.  Not sure if there’s enough time. 

Pattern Review: Simplicity 2311

S2311


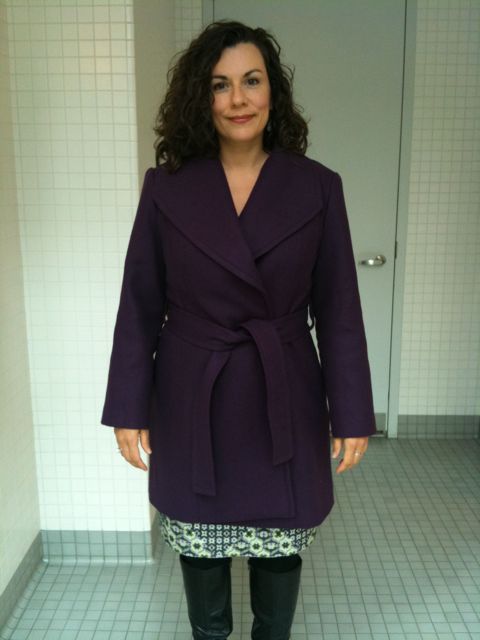
Here’s my pattern review for Simplicity 2311, my beloved purple coat pattern.  I’m officially in love.  🙂  

Pattern Description:  Misses’ Coat in two lengths with collar, sleeve and belt variations.  I made Coat B in the shorter length with the tie belt and wide collar.  I did not include any buttons as my fabric was grabby and the belt was sufficient to keep the coat closed.

Pattern Sizing:  14-22.  I made the sz 14 and found it very true to size with little fitting adjustments needed.

Did it look like the photo/drawing on the pattern envelope once you were done sewing with it?  Yes!  Yes!  Yes! (aside from the different color fabric)

Were the instructions easy to follow?   The instructions were easy to follow if you read carefully.  I found myself skipping on ahead thinking I understood everything perfectly.  It really pays to read and follow along one or two sentences at a time before moving on to the next step.

What did you particularly like or dislike about the pattern?  I LOVED the pattern; it is drafted so well.  The collar did not need any pad stitching to retain its shape.  My teacher said that most RTW collars don’t have any pad stitching, especially when using a fusible interfacing, and I took the excuse and ran with it; the collar came out great. 

The princess seams and CB seam allowed for great fitting opportunities.  I love the multiple opportunities for top stitching, which takes this coat from plain jane to a gorgeous model in heartbeat.  My Emerald 183 has a special topstitching stitch that made my topstitching look so professional.  I recommend loading up on matching thread if you plan to topstitch most of the seams.  I used 3 and a half spools of Gutterman thread for this project.  Top stitching accuracy is easy, if you take it slow. 

FYI: I did not find there to be excess ease in the sleeve head.  Yes, you had to gather, but with a wool fabric, I would expect that.  In fact, I found the amount of ease needed to be gathered quite minimal.  I did not have any problems with puckering nor did I end up with a poofy sleeve.  Love that!

The only dislikes I have, which are minor, are that the hem with the lining attached needs to be tacked to the shell.  That instruction was not included in the pattern sheets.  I think its necessary or else the hem will sag and show the lining.  I will tack my hem down tonight. 

Also, I think some kind of hand stitching in the ditch is needed to join the upper collar/lining/under collar together at the shoulder/neck area so that they act as one piece instead of two pieces that can pull away from each other as you take the coat on and off.  But these are minor points and would probably be obvious to advanced sewists.

Any difficulties encountered?  The most difficult part of this pattern is when you attach the shoulder and collar to the back yoke.  The shoulder and collar form a U when sewn together and sewing that U shape to the squarish yoke is a bit tricky.  You have to pivot at just the right spot making sure not to catch the shoulder in the seam you’re creating.  And then after the pivot, you have to move the collar out of the way to continue.  Just make sure you sew this part slowly and carefully and you will be fine.  I even needed to do one pivot over again, and it was actually easier to do the second time, because the stitching from the first pass allowed me to hold the pieces together better for more accurate sewing.

Fabric Used:  I used an imperial purple wool purchased from FabricMart in Sept 2009 and a silk charmeuse in a coordinating purple color from Metro Textiles purchased in August 2010. 

Both fabrics were a dream to sew.  The wool pressed beautiful.

Pattern alterations or any design changes you made:  The only fitting change I made to the pattern was to sculpt the CB seam to take some of the squarishness out of the fit and give it a more fitted and tapered look from the shoulder blade to waist area (in total I took about .75 inches out tapering to the yoke and waist).  I thought I might need to fiddle with the princess seams in front, but left them as is so I could wear suit jackets underneath if need be.

I did add some interior structure changes to the pattern such as a interfacing all the pattern pieces, and adding a back stay and sleeve heads.  The pattern already called for shoulder pads which I included, but I decided to make my own since I didn’t like the store bought ones that I had bought for this project which were made out of foam.  I just looked at my RTW winter coat to see how its shoulder pads were constructed and did the same.


fused shoulder pad from bottom

Would you sew it again? Would you recommend it to others?  I honestly can say that I would sew this again.  I tend to do only one complicated project a year, so I won’t probably make this again anytime soon, but I love this pattern.  When I make it again, I might place the carriers lower on the coat as I am long waisted.  As they are indicated on the pattern, they fall about an inch or two below an empire waist.  I would like them about an inch lower.  So be sure to check placement for yourself before blindly following the pattern’s placement.

I definitely would recommend this pattern. Maybe not to a beginner as it is a long and involved project (although a beginner could definitely make this pattern; I just think it’s a complicated process to make a coat with many opportunities for frustration), but an intermediate or advanced beginner would definitely enjoy making this pattern.  I think an advanced sewist would enjoy the excellent drafting and fit of this coat and could add more structure and couture details to make it their own.

Conclusion:  Great pattern!!!!  I love my coat and am so proud of the work I put into it and all the interior structure details I included.  I received so many compliments today on my coat.

Sneak peek: Simplicity 2311 Fall Coat

Overall, I am pleased as purple punch with this coat.  I really took my time with the construction.  I love the fabric and color.  I love the pattern, Simplicity 2311; it’s really well drafted and the instructions are excellent!  I love the topstitching.   I went through 3 and a half spools of Gutterman thread, but it was sooo worth it.  With my structural additions of shoulder pads, sleeve heads, and interfacing, it really does feel like a real coat! 

After wearing it to work today, I might add some more hand stitching to the hem of the coat and maybe hand stitch in the ditch around the collars and shoulders where I am able to meld the two layers (the under collar and the upper collar) together better so they move as one.

The only thing that could be improved on this coat is a personal label.  I would love to order some, but just can’t decide on how my label should read.  Sew A Beginner is too cumbersome (and not really accurate anymore).  Sewn by Elizabeth seems so loving hands at home-y.  I need something with a little more oomph and style.  Any suggestions?

Full review of this awesome pattern to come in the next couple of days.  I need to take some more interior photos.

Happy sewing everyone!!!!

Personal Style

I have been ruminating about personal style the last few weeks.  You see, I don’t think I really have a personal style.  I’ve kind of drifted from one trend to the next, never deeply investing in a particular look, choosing maybe just one aspect of that look to wear.  Here’s a little mini walk through history, my own, to give you a taste of personal style evolution, or lack thereof.

Childhood:  Dresses, and more dresses.  Apparently my mom dressed me in lots of dresses.  I have no recollection whether this was her wish or mine or a cultural thing (being Mexican).  But when I went to Jr High (where in my town all the grade schools funneled into one jr high) and met again some kids I had gone to kindergarten and first grade with, one of the girls exclaimed, “You’re the girl who wore all the dresses!”  I guess it made an impression.

High School: As most kids in high school, I became obsessed about music.  I loved alternative music before it was called alternative music.  It was in high school that I think I was most faithful to what I wanted to be personal style-wise.  I had a blonde tail, and my bangs were purple. Hey, it was the 80’s!  I also never wore sneakers.  I always wore leather shoes.  And they were always rather unique. I would make my mom drive me to far off suburban malls to find my shoes. 

And after high school is where things take a turn for the worse.   I know, you’re thinking how could it get worse than a blond tail and purple hair.  But what I mean is, I started to “find” my style in high school, or at the very least explore.  But afterwards, style was either not something I thought about much or was proscribed to me rather than a personal choice.  I worked in conservative offices, went to college to study opera, and had an engineer boyfriend.  Need I say more?  Conservative offices don’t like tails and purple hair.  Engineer boyfriends don’t like tails and purple hair.  And opera definitely doesn’t like tails and purple hair.  I grew my hair out, bought audition and recital dresses and basically dressed more conservatively.  My style explorations were over.

Then I left the opera world and entered the world of high finance in NYC, land of the black suit.  My first NYC boyfriend made a comment once that I really liked prints, meaning that I wasn’t conforming.  I guess, as much as I tried to wear the finance uniform, the girl with the purple hair could not be tamped down all the way. 

Are you curious about how people who know me IRL think of my style or lack thereof?  Yesterday, I asked these people what they thought my personal style was, if I had one.  This is what everyone had to say…

Close friends and family:  My sister said, “Urban, conservative, uptown, with a side of crafty, and an occasional flash of your ‘inner Mexican’.”  (Inner Mexican is an inside family joke.)   My sister oozes style.  She can dress in jeans and a t shirt and look like she just stepped off a runway.  Very annoying.  😉  

My best friend of 18 years said, “Playful, crafty, luxurious.”  What can I say, she’s my best friend.

Friends from work past and present: Victoria said, ” I think you tend to play it a little “safe”, leaning toward the conservative.”  I would love to have just one ounce of Victoria’s style.  She’s fabulous.

Jen said she thought I had an Ann Taylor look.  That’s so funny, I used to work for Ann Taylor in a previous life.

Sewing friends who have seen me often in the last two years:  Lindsay T exclaimed, “Yummy mummy!”  Aww, thanks Lindsay T.   I have always been a fan of Lindsay T’s understated elegance.  Very chic woman!

Carolyn had a lot to say that jived with what I think, “You do a lot of flitting.  I don’t think you’ve taken the time to sit down and define what look you want to project to the world.  I think you will enjoy your sewing even more than you currently do once you’ve defined what you want to look like and work on making that come to pass.”  So true!  I think that’s why my TNT quest is so interlocked with my search for a personal style.  It isn’t a coincidence that Carolyn is the undisputed queen of the TNT.

Claudine said, “grown-up bombshell.  This is mostly due to your preference for fitted styles in shiny, luxe fabrics.  The grown-up part comes from taking fitted silhouettes and gorgeous and making them work in your work life.”  That’s quite a compliment coming from a stylista like Claudine.

Long story short, I am still searching for my personal style.  As I mentioned in a previous post, when I first started buying patterns, I was attracted to clothing with architectural details and tricked out seam work without thinking about how they would look on my 40+ year old, post-baby body.  But I have discovered a few things on my sewing journey:

I love wearing dresses and skirts.

I love prints.

And I love wearing color.

Anyhoo, this post has gone on long enough, if I haven’t already put you to sleep already. 

Have you found your personal style yet?

Look Ma, should-a-ma-pads!

Yesterday I boldly stated that I would not be pad stitching my lapels.  Anita C commented that I might want to reconsider that decision.  So, with an entire evening to myself dedicated to sewing, I decided to do a little research.  I took out all my books that had the slightest mention of jackets and coats and looked through them.  Interesting things of note:  not one book called it pad stitching.  One called it slant basting.  The only book I owned with great instructions was the Reader’s Digest sewing bible.  So I thought about it long and hard.  I knew if I went ahead with the pad stitching I would be adding on one or two days of more construction to my already late coat.  I put on my shell one more time to check the drape of the interfaced undercollar.  I looked in the mirror and…

It looked fine.  I called Carolyn and asked her opinion.  And she said to ditch the pad stitching.  Since I was leaning in that direction already, I decided to let it go.

I was almost to the point where I needed to add shoulder pads.  I had bought some from P&S Fabrics, my neighborhood sewing stuff store last week. 

P&S shoulder pad

I knew at the time of purchase that there was something off about these pads.  The insert was made of foam and the outside was made of some synthetic fabric.  It just seemed too poofy and retained its shape too well.  I have niggling feeling that this shoulder pad will not decompose for a millenia it’s so unnatural. 

Anyhoo, I snuck a peek at my RTW winter coat to see how big its shoulder pads were.  And I found out some very interesting things.   It’s shoulder pads were made of four layers of cotton fleece batting that were fused together with no outer fabric encasing them.  They were sewn into armscye/shoulder seam allowance and tacked to the shoulder seam, then the lining was tacked to the pad itself.  Very cool.  The sleeve head was sewn into the same armscye/shoulder seam allowance but on the bottom and was made of polyester fill batting.  I thought to myself.  I can do that and got out my measuring tape.

The measurements of my winter coat’s shoulder pads were pretty much dead on for the P&S shoulder pad, even down to the thickness, but I liked the feel and malleability of the winter coat shoulder pads so much more.  I happen to have cotton fleece batting in my stash from when I made my one and only quilt.  I just used that and measured out all the pieces of the winter coat shoulder pads and steam a seamed them together.  And presto change-o, I had me some should-a-ma-pads!

Interior of shoulder pad

fused shoulder pad from top

fused shoulder pad from bottom


Isn’t that cool?!?!  I forgot to take pictures of my sleeve heads, but they’re just rectangular pieces of polyester fill batting measuring about 8 inches by 2.5 inches.

I worked on my sleeves next last night.  One detail that I absolutely adore about this pattern is the ease provided for the elbow at the back of the sleeve.  That is sooo cool.  Love it.   Here’s a pic of my unattached sleeve with ease stitches already gathered for ease of insertion (see the elbow ease added to the left of the seam allowances?  Despite the gathers shown there, there was no puckering at the seam).

I cannot wait to work on my coat again tonight.

Happy sewing everyone!