Monthly Archives: March 2010

“Quick” gift for Nanny

So my son’s nanny’s birthday was this weekend.  Stupid Yahoo calendar did not remind me in time and I had to think of a quick gift for her.  She is the most amazing nanny.  She is loving to my son and my son just adores her.  I get stopped on the street by complete strangers all the time who have seen her with my son during the week and who tell me how awesome she is.  Really!

Last year, I made her this scarf. 

Anne's Scarf


Scarf, end detail

This year I wanted to do something a little different and this silk charmeuse remnant from Kashi remnant bin at Metro Textile was just the thing.   This remnant was just a little over 1 yd at about 45 inches wide, a perfect scarf size, and it feels so luxurious.

The only problem was…  I do not own a rolled hem foot.  How to do a rolled hem without a rolled hem foot?  Hmmm…   Well, that’s where Pattern Review comes in.  I posted a question on the message board at 4:30pm today and received answers right away.  Both respondents told me to stay stitch 1/2 inch in from the edge of the scarf, press a crease at the stitching line on the inner side, cut close to the stitching line and roll the hem in.  Then stitch the hem closed, rolling as you go. 

So I was all set tonight to work on the scarf after Jack went to bed.

The only other problem was…  I did not have any scraps on which to practice this new to me technique.  What to do?  Thankfully, my remnant had a rather wide selvedge, so I practiced a couple of times on the selvedge and thought to myself, “no time like the present.”  And I just started my rolled hem.

I changed only one thing to the method described above: I pressed the rolled hem so that it would be easier to sew.  I pressed one side at a time and then sewed that side.  I used silk thread and can I just take a moment to say that working with silk thread was just divine?  My sewing machine loved it.  She just purred along the entire time.  Lovely!

So here are some pictures…  Nothing too exciting, but I am quite pleased with an evening’s research and work.  Now I just need to get her a pin to go with it!

finished scarf for the nanny

rolled hem detail


Happy sewing!

And a fabulous time was had by all

So I finished my dress at 2am Thursday evening/Friday morning and was so excited about it that I couldn’t get to sleep until 3am.  I manically sewed from 8:20pm until 2am.  There were no breaks.  There was no TV or computer.  (ok, maybe I checked my email a couple of times, but honestly I was a slave to this dress)

I wore it to work and everyone there loved it. 

And then I wore it out to lunch with fellow sewist Trena and her entourage, Peter, Mikhaela, and Clio.  It was a cold and blustery day, but I was determined to wear my trench coat and dress.  I froze my assets off but it was worth it.  Fashion is always worth it.   😉

Then we attacked the garment district with a vengeance.  Everywhere we went, people snapped our pictures.  Ok, it was really Peter, but we felt special nonetheless.  We started out at Paron’s.  As I had just been there a couple of weekends ago with Karen, I did not purchase anything there.  Next we strolled over to SIL Thread.  Boy do they have a lot of thread and lots of other notions.  I snared myself some snaps and paint for Thor’s camp shirt.

Then we ambled over to Spandex House.  As usual I was blinded by the dayglo selection of the performance fabrics.  But I did walk out of there with this cute brown print.  I loves me some prints, I sure do.

Next on the agenda was the fabric extravaganza known as Kashi of Metro Textiles.  I raided Kashi’s remnant bin and snagged some choice fabrics.  The silk charmeuse will be a new scarf for Jack’s nanny.  Her birthday is this weekend.  The pink pique seems perfect for a little girl, as does the floral cotton voile.  The fuschia print will be another addition to the work wardrobe. 

silk charmeuse remnant

pink cotton pique

floral cotton voile

fuchsia print knit

My main purchase at Kashi’s were 3 yds of the black with pink/gray floral knit.  This will finally be the fabric for the DVF wrap dress I’ve been dying to make, V8379

After I had already paid for my loot, I fell for one of Trena’s purchases, a cherry red stretch twill.  Every woman needs a red pencil skirt in her wardrobe, right?

It was a fun day of shopping and walking around in my fabulous new dress.  Trena and I finished off the day with a great dinner at a super delicious Indian restaurant in my hood.  I was stuffed.  We forgot to take pictures, but I think there are enough pictures out in the blogosphere documenting the day already.

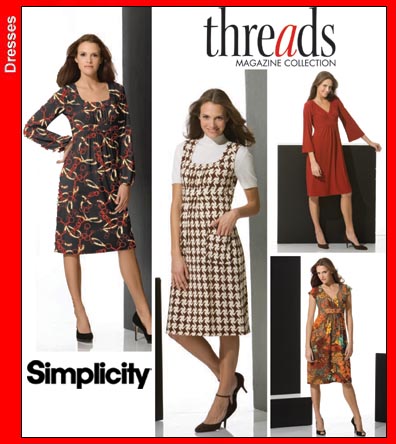
I asked my sister to snap a couple more pictures of my dress today.  I hope you won’t mind indulging me.  This is my third rendition of Simplicity 3678.  You might recall I was going to use view B’s three quarter length sleeves.  Yeah, well, I remembered that after I cut out the short sleeves.  Instead of gathering, I used pleats on the front of the dress.  And apparently I did not use the modified back skirt pattern as I needed to add an inverted pleat on the back too in order to match the length of the back empire waist band.  But despite these glitches (and nearly serging off a piece of the midriff band), I really like my dress.  I love the print and color palette.  Of course, as I am wont to do, I am second guessing my pattern placement with the border print, but what’s done is done.  I still can’t believe I sewed it all in one night.

Anyway, I had a great time seeing Trena again and meeting up with her entourage.  Very fun day!

Happy sewing everyone!

I picked the red border print

But not just because my mom chose it.    😉

I thought the pattern of the border print fit my dress style better and was more user-friendly.  I cut it out last night and am ready to sew all night tonight.  I may be tired tomorrow, but it will be worth it.  I had to laugh when Carolyn asked if I had a date tomorrow.  I do have one, but not the kind she was asking about.  Although if we’re all being honest here, I think I may be ready to dip my toe into those waters yet once again.  Maybe in a month or two. 

I’ll tell you all about Friday sometime this weekend.  Patience is a virtue my friends.

And more from the honesty corner…  I was happily cutting out my dress last night and contemplating how I placed the border print and making sure there were no “bull’s-eyes” and all when I decided that I wanted a different motif on my sleeves.  I thought what the heck, I have enough fabric, I’ll cut a second set out to highlight the border part of the border print.  I was all proud of myself for my design genius when I realized that I used the short sleeve pattern pieces and had completely forgotten about using the view B 3/4 length sleeve pattern pieces.  Doh!  Well, guess I am making the same exact dress as the last two after all. 

Although I think it will look completely different using a border print, so I don’t think anyone will notice it’s the same pattern.  At least I hope so.  I am also going to make one teeny tiny change to the pattern, courtesy of the genius of Patti: I am going to change the gathering on the front (underneath the empire band) to pleats to reduce the maternity look of the dress. 

I can’t wait to sew tonight!!!  I set up my serger and my sewing machine last night with the right threads and needles so I can just start sewing right away.  I’m going to stay away from the computer and the tv and just get to work.  And hopefully, momma will have a new dress for Friday!

Happy sewing everyone!

Still here, but…

I had a minor catastrophe with Thor’s shirt and my serger.  It stopped me in my tracks for a while, but I think it’s pretty minor and will not be noticed in the end. 

However, momma needs a new dress for Friday (I’ll tell you why afterwards — don’t want to spoil the surprise) so I am going to revisit Simplicity 3678 again.  But this time with a killer border print and using view B’s (top right) sleeves.  I will again take out the back gathers and I am going to try to take out some of the maternity look inducing front gathers.  As Karen and Carolyn know, I have been racking my brains and my pattern stash for a new knit dress pattern.  However, I kept coming back to the sleeves on this pattern and because I have made it 2.5 times before, I hope it will be a quick and fast project.  *fingers crossed*

Simplicity 3678

this one?

or this one???

Keep me in your thoughts tonight and tomorrow night.  Happy sewing everyone!

Lots of progress!

Wow, either I am getting better at this sewing thing or this is just a speedy project.  After all it is a teeny tiny little shirt.  Did I mention that it was small too?  Tonight I assembled the collar and stand.

Then I attached it.

Then I attached the sleeves and sewed up the side seams.

Thank you for all your kind comments and suggestions on my last post about the matching.  I actually feel a lot better about my matching today.  Sometimes you just need some time to get some perspective.  Right?

I changed the order of construction a little bit.  (Aren’t I all grown up now?)  The instructions said to sew the shirt hem before sewing up the side seams and I thought that was silly.  Of course, now that I am typing this, I am worrying that I got too cocky and maybe should have followed the letter of the law.  Oh well, I can’t worry about it now.   😉

I still have to have to serge the side seam SA’s, make the buttonholes, attach the buttons, and hem the sleeves and bottom of the shirt.  I actually feel pretty confident that I can do all that Friday night.  Am I nuts???

Some more pics just because I can…

check out that pattern matching with the pocket!

my FIRST collar with stand!

I do have an idea to add an embellishment to the shirt, but it’s a secret as I think my sister reads my blog sometimes.  If she doesn’t she’s in big trouble.  Hahahaha!

Happy sewing everyone!

P.S.  Carolyn pointed out to me that I neglected to mention the store that was having a great sale in NYC.  It’s P&S Fabrics on Broadway below Canal and above Worth.  I’m a dork.  What can I say?

Progress on Kwik Sew 3146

I may have mentioned this already, but I had jury duty this week.  My first time ever, and I wasn’t even asked to serve.  I only sat there and read sewing/crafting books.  Poor me, right?  😉 

One of the books I read was David Page Coffin’s Shirtmaking.  It’s a great resource and you should definitely own this book if you ever consider making shirts.  It was highly read-able.  I have a tendency to fall asleep with technical books and I didn’t fall asleep once with this book.  I took some notes while I was reading of things I was surprised to find out among other things: 

  • Iron your shirting fabric, don’t just press it.  Stretch it out in the same direction as the selvedges.
  • Use sew in interfacing not fusible since you wash shirts often.
  • Use a flat fell foot for superior flat fell seams.
  • Insert arms flat and then sew side seams.
  • Match the lightest thread color present in your shirting for your thread.

The first point is something Thea had already mentioned to me when I had problems with my Alhambra clover print fabric.  The sewing the arms flat first thing was a surprise to me as well as the match the lightest thread color.  And actually I disagreed with that last point for my specific fabric print.  I, unfortunately, do not own a flat fell foot as it did not come with my machine, but will consider getting one for the future.  But fortunately, my little boy’s shirt pattern does not require flat felled seams as the seam allowances are only a 1/4 inch, much too small for a flat fell seam finish.  

I had my sewing lesson with Thea last night and we started work on the shirt.  When I cut out the fabric, I cut in a single layer so as to match the print as much as possible.  I am using a check fabric, or is it gingham?  I can’t see what the difference is between the two.  But despite my careful cutting, I still did not get a perfect match.  I’m kind of bummed about that.  The feed dogs just didn’t want me to match I guess.  Not sure what else I can do to counteract this, except to whip out the walking foot.  Any suggestions?   I pinned the heck out of it.  

Matching fronts, left and right, with button placket


back yoke seam, almost matching


As for thread choice, I went with a navy thread even though David Coffin suggests white when white is present.  I just thought it blended better.  Here’s my test swatch. 


So far I have interfaced the parts that needed interfacing, the collar and stand, and the button hole placket.  I used Pam Erny’s interfacing.  I really like her interfacing but can’t speak to competitor stuff as hers is the only kind I have ever used.  For the placket, I probably should have cut the interfacing in half because you double the placket over itself, thereby doubling the interfacing and it became too stiff.  Live and learn. 

I opted not to interface the pocket and am pretty proud of my placement.  It’s perfectly matching on one side, and just a little off on the other.  The topstitching isn’t too bad either, but again, not perfect. 

pocket placement


That’s where I left off last night.  I have to attach the yoke to the fronts now.  Working on that tonight.  Wish me luck! 

Happy sewing everyone.

Didn’t mean to disappear…

Life has been busy with jury duty, lack of time, being rained on incessantly, etc.  You know… LIFE.  I have managed to cut out the camp shirt for Thor, but that is all.  I hope to start sewing it Tuesday night. 

In other sewing news, I did sneak in some fabric shopping lately.  As Karen already mentioned, we met up during the “hurricane” and shopped at Paron’s.  I bought only three things, but I love them.  Have no idea what I am making with the striped fabric, but I loved the colors and the hand of the knit.  The tissue weight knit jersey in lilac/lavender will most likely be a cardigan cozy (which will most likely go with nothing else in my closet, but oh well).  And the purple plaid will be a pencil skirt (if I ever get back to my tnt’s again). 

Then today, I had my first day of jury duty and what do you know, but it’s two blocks away from my neighborhood fabric store.  Shucky darn!  They are moving to a bigger space across the street in a week and are having a major sale.  Look what I scored for under $30!!!!  Most of it is for kid sewing, knits for jammies and the like.  There’s a cordoruy for little boy pants too and a grey chambray for a little boy’s shirt.

mustard yellow and teal blue knit

olive and turquoise knit

blue cordoruy and gray chambray


So if you live in NYC, you should check out their sale before they get all high falutin’ and raise their prices to pay the new rent.

Happy stashing!

New Look 6821 Complete!

So I finished Katie’s dress on Saturday during Jack’s nap.  Here’s the review I just put up on PatternReview.com with some added bits:

This is my second time making up this pattern.  I thought it worthwhile to write another review as my skillset has dramatically improved in the last year, hopefully, thereby improving my reviewing abilities as well.  Also, the view I made up this time was so different from my first, almost like a completely new pattern.

Pattern Description: Kids!  Design your look with mix and match pattern pieces.  Girl’s tops, tunics and dresses. Six sizes in one.

Pattern Sizing: 3-8.  I made the size 4 but should have made the size 3 again.

Did it look like the photo/drawing on the pattern envelope once you were done sewing with it? Yes, except for my fabric choices.

Were the instructions easy to follow? Easier than the first time I read and used them.  What a difference a year makes, right?  😉   I do have one problem with them though: for each bottom piece, the instructions tell you to make a hem, completely ignoring whether you are adding any more pieces, like a gathered ruffle or a contrast band.  Basically, they are giving you the finishing instructions for that piece.  So, if you are going to add other pieces on to skirt, DO NOT hem the skirt first.  You will add unnecessary bulk to the seam and stiffness to that seam, thereby ruining the drape. Maybe this is obvious to more experienced sewists, but to a beginner or advanced beginner, this could be a major trip up.

back of the dress

What did you particularly like or dislike about the pattern? I love the mix and match aspect of the different pieces.  Each look is a great little girl look and totally age appropriate.  If I had to complain, the sizing became less true the larger the size.  My size 4 bodice was ginormous on my size 4 niece.  She can grow into it, but I wasn’t expecting that kind of ease (vanity sizing?) for a little girl.

bodice too big

Fabric Used: I originally bought these fabrics for myself for summer tops, but never got around to making them, so they are not juvenile fabrics.  The floral print is a gorgeous cotton voile that has the most beautiful sheen, feel and drape, and is slightly sheer.  The solid purple cotton is batiste weight.  I used a cream ivory batiste to line the bodice. I thought I might use the purple to line the bodice, but when I layed it behind the print, it turned the cream sections of the print grey.  A subtle but important difference.  I love these fabrics and am thankful I have a lot leftover for myself.  They were a pleasure with which to work.

cotton batiste lining to create a finished look on the inside

Pattern alterations or any design changes you made: I changed a few things to the pattern namely how the bodice lining is finished, and how I treated the gathered ruffles.  For the bodice: the instructions tell you, after attaching the lining to the front bodice at the top, to baste the sides and bottom together.  Why? How are you supposed to create a finished look on the inside of the bodice/skirt seam?  So I completely ignored that instruction and left the lining open until I attached the skirt to the front bodice and inserted the zipper.  I then turned under the seam allowance of the lining, hand slip stitched it to the zipper and then stitched in the ditch on the outside of the skirt/bodice seam to attach it.  Does that make sense?  For the ruffles: If you have a ruffler or gathering foot people, USE IT!!!  This foot is my new boyfriend.  I want to gather everything now.  I might make this dress for myself (since the size 4 will probably fit me – see above notes on sizing).  No more basting two lines of stitches only to gather unevenly.  Nope!  Just strap on your new boyfriend and go to town gathering and ruffling to your heart’s content.  The major change I made to the gathered ruffles though is that I did not sew a narrow hem at the top of each ruffle so that it “sticks out” (fancy sewing technical term) at the top.  I thought that was just a little over the top.  I just gathered and attached each ruffle sans “sticky outy thingy” at the top.  One other note I’d like to make on construction: if you have a serger, remember, as I did not, to serge your seam allowances on the side seams before you attach the ruffles because you won’t be able to afterwards.  I ended up pinking those seam allowances awkwardly.  I did however serge the ruffle seams.

serged ruffle allowances

Any problems encountered?  Yes, unfortunately, but nothing having to do with the pattern itself.  I could not get my invisible zipper to match up in the back.  I tried four times and just accepted it as is because the fabrics I used were so delicate and were starting to look a little forlorn.  I tried all my tricks: pinning then basting (constantly checking the line up of the seams), marking the seam on both sides of the zipper, easing in one side, etc.  Nothing worked.  At least there was no puckering at the start of the zipper in the end. 

Inside back with slightly bumbled zipper insertion

Would you sew it again? Would you recommend it to others? I will sew it again and again, especially since my niece Haley’s birthday is coming up this summer.  Since I was making this as a gift, I really didn’t have a chance to fit it, but I highly recommend checking fit if you can.

perfect pintucks (the next best thing to pleats!)

Conclusion: This pattern really works it.  You can have so many different looks mixing up the different pieces and changing up the fabric choices that no one would know it’s the same pattern.  Really worth the money.

Gratuitous Katie shot (isn't she the cutest?)

Now I’m on to Thor’s camp shirt.

Happy sewing everyone!

Meet my new boyfriend

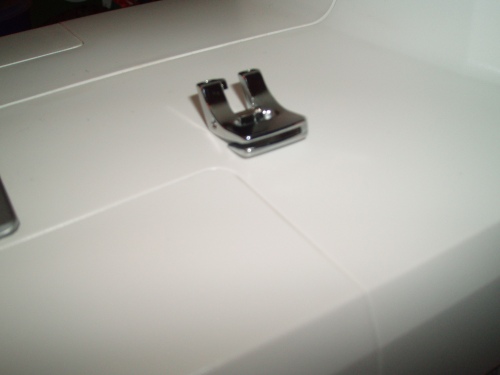
Here he is, my new boyfriend, the gathering foot.  Isn’t he cute?  So sleek and metallic.  He doesn’t argue with you or tell you to go make dinner.  He doesn’t stand you up at a fancy restaurant looking and feeling forlorn.  He just makes beautiful, elegant, evenly placed, sweet, little gathers.  Like these…

Aren’t those the cutest little gathers you ever saw?  Those were my two lines of test gathers.  Thea did show me how to use the gathering foot slit to attach a second piece of fabric to the gathered piece, but it’s a technique I will have to practice for quite a while before I trust my talents on a real garment right now.  But basically the key to using that function of the gathering foot (aka, my boyfriend), is holding both of pieces of fabric firmly, stitching slowly AND, most importantly, every two or three stitches, straighten out the fabric in the slit (as it has a tendency to move to the left).  Do you want to see my boyfriend in action?

I have no idea how my boyfriend works his magic.  None!  All I know is that I love the results and the fact that I don’t have to do two rows of stitching and then gather it evenly myself.  How cool is this????

So I bet you were all holding your breath until I told you which zipper I went with for the dress.  Thank you for all your opinions.  The overwhelming majority of you thought the beige zipper was the best.  A couple chose the pink and one chose the purple.  Most agreed that the bluish purple one was too blue.  And most agreed that as it was an invisible zipper, that the color didn’t really matter.  Thea thought the beige would be best.  I have to note, that Carolyn’s rule of thumb for choosing zippers is to choose a darker color and she thought the purple was the best.  I will admit to doubting Carolyn’s advice as I was worried the purple was too dark for the print part of the bodice and that you would see its shadow.  Well, I sewed the beige zipper in last night and….

I don’t like it.  Also my zipper insertion is not quite perfect.  So I think I will rip it out (not literally of course) and put in the purple one and hopefully the insertion this time will be perfect.  I just didn’t like how the beige would peek out occasional from the field of purple on the skirt section which runs the majority of the length of the zipper.

So before I leave you for the day, here’s a sneak peek of the dress ruffles with beautiful little gathers.  Did I mention my boyfriend made this?  😉  

I am almost done.  Just need to reinsert the magenta/purple zipper, hem the bottom ruffle, serge the seam allowances and finish the lining on the bodice.  I actually think that’s all doable in an evening, but I am known for having unreasonable expectations, so who knows if it will be finished tonight or not.  I hope so though — I have more SFO (Sewing For Others) to do. 

Happy sewing and gathering everyone!

I’m in love!

Yes, you heard it here first.  I am officially in love.  With whom you ask?  With what is the more a propos question actually. 

I have just discovered the gathering foot which came with my sewing machine.  How awesome is the gathering foot people?!?!?!  OMG.  I love it!!!!!!!!  No need to baste two lines of stitching in order to gather.  No uneven gathering when you’re finished.  Just beautiful dainty little gathers (sorry no pictures).

I. LOVE. IT.

This particular gathering foot allows you to sew the gathered fabric onto another piece of fabric at the same time through a slit in the foot, but I was not able to get that function working very well.  I have a lesson with Thea tonight, so hopefully she can help me out with that.  If I were able to use that function, it would speed up the construction of this dress tenfold. 

On another note, as you know, I am working on a different variation of the New Look 6821 pattern this time.  Reading the instructions this time around is definitely easier.  However, I am still stumped by one step, as I was when I made that first top for my niece.  For each tier of the dress skirt, you’re instructed to make a hem.  Why?  Putting a hem on each tier makes the tier stiff in that area, it destroys the drape of the skirt.  Is it because they assume you only have a sewing machine and no serger so they’re giving you an alternative for a clean finish on the inside?  Do they want that section of the skirt stiffer? I don’t get it?  Another question for Thea I guess.  Last time, I slavishly followed the directions and added the hem, but I didn’t like how it interfered with the drape of the top.  This time, I am questioning it.  This time my dress will have drape AND look just as pretty inside as it does outside.

Happy gathering to you all!