Category Archives: Sew Alongs

Pattern Review: Simplicity 2311

S2311


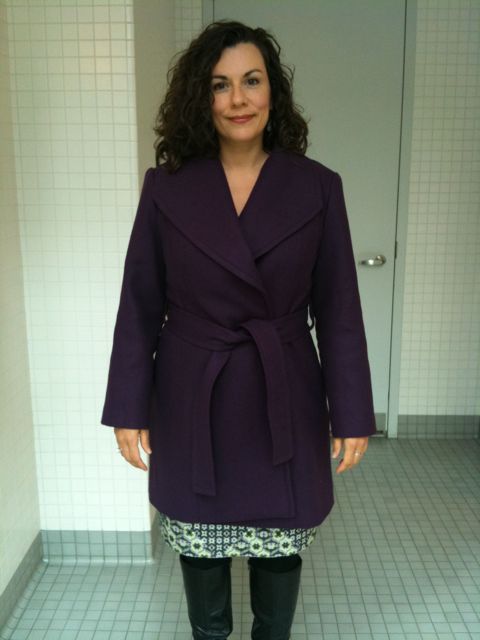
Here’s my pattern review for Simplicity 2311, my beloved purple coat pattern.  I’m officially in love.  🙂  

Pattern Description:  Misses’ Coat in two lengths with collar, sleeve and belt variations.  I made Coat B in the shorter length with the tie belt and wide collar.  I did not include any buttons as my fabric was grabby and the belt was sufficient to keep the coat closed.

Pattern Sizing:  14-22.  I made the sz 14 and found it very true to size with little fitting adjustments needed.

Did it look like the photo/drawing on the pattern envelope once you were done sewing with it?  Yes!  Yes!  Yes! (aside from the different color fabric)

Were the instructions easy to follow?   The instructions were easy to follow if you read carefully.  I found myself skipping on ahead thinking I understood everything perfectly.  It really pays to read and follow along one or two sentences at a time before moving on to the next step.

What did you particularly like or dislike about the pattern?  I LOVED the pattern; it is drafted so well.  The collar did not need any pad stitching to retain its shape.  My teacher said that most RTW collars don’t have any pad stitching, especially when using a fusible interfacing, and I took the excuse and ran with it; the collar came out great. 

The princess seams and CB seam allowed for great fitting opportunities.  I love the multiple opportunities for top stitching, which takes this coat from plain jane to a gorgeous model in heartbeat.  My Emerald 183 has a special topstitching stitch that made my topstitching look so professional.  I recommend loading up on matching thread if you plan to topstitch most of the seams.  I used 3 and a half spools of Gutterman thread for this project.  Top stitching accuracy is easy, if you take it slow. 

FYI: I did not find there to be excess ease in the sleeve head.  Yes, you had to gather, but with a wool fabric, I would expect that.  In fact, I found the amount of ease needed to be gathered quite minimal.  I did not have any problems with puckering nor did I end up with a poofy sleeve.  Love that!

The only dislikes I have, which are minor, are that the hem with the lining attached needs to be tacked to the shell.  That instruction was not included in the pattern sheets.  I think its necessary or else the hem will sag and show the lining.  I will tack my hem down tonight. 

Also, I think some kind of hand stitching in the ditch is needed to join the upper collar/lining/under collar together at the shoulder/neck area so that they act as one piece instead of two pieces that can pull away from each other as you take the coat on and off.  But these are minor points and would probably be obvious to advanced sewists.

Any difficulties encountered?  The most difficult part of this pattern is when you attach the shoulder and collar to the back yoke.  The shoulder and collar form a U when sewn together and sewing that U shape to the squarish yoke is a bit tricky.  You have to pivot at just the right spot making sure not to catch the shoulder in the seam you’re creating.  And then after the pivot, you have to move the collar out of the way to continue.  Just make sure you sew this part slowly and carefully and you will be fine.  I even needed to do one pivot over again, and it was actually easier to do the second time, because the stitching from the first pass allowed me to hold the pieces together better for more accurate sewing.

Fabric Used:  I used an imperial purple wool purchased from FabricMart in Sept 2009 and a silk charmeuse in a coordinating purple color from Metro Textiles purchased in August 2010. 

Both fabrics were a dream to sew.  The wool pressed beautiful.

Pattern alterations or any design changes you made:  The only fitting change I made to the pattern was to sculpt the CB seam to take some of the squarishness out of the fit and give it a more fitted and tapered look from the shoulder blade to waist area (in total I took about .75 inches out tapering to the yoke and waist).  I thought I might need to fiddle with the princess seams in front, but left them as is so I could wear suit jackets underneath if need be.

I did add some interior structure changes to the pattern such as a interfacing all the pattern pieces, and adding a back stay and sleeve heads.  The pattern already called for shoulder pads which I included, but I decided to make my own since I didn’t like the store bought ones that I had bought for this project which were made out of foam.  I just looked at my RTW winter coat to see how its shoulder pads were constructed and did the same.


fused shoulder pad from bottom

Would you sew it again? Would you recommend it to others?  I honestly can say that I would sew this again.  I tend to do only one complicated project a year, so I won’t probably make this again anytime soon, but I love this pattern.  When I make it again, I might place the carriers lower on the coat as I am long waisted.  As they are indicated on the pattern, they fall about an inch or two below an empire waist.  I would like them about an inch lower.  So be sure to check placement for yourself before blindly following the pattern’s placement.

I definitely would recommend this pattern. Maybe not to a beginner as it is a long and involved project (although a beginner could definitely make this pattern; I just think it’s a complicated process to make a coat with many opportunities for frustration), but an intermediate or advanced beginner would definitely enjoy making this pattern.  I think an advanced sewist would enjoy the excellent drafting and fit of this coat and could add more structure and couture details to make it their own.

Conclusion:  Great pattern!!!!  I love my coat and am so proud of the work I put into it and all the interior structure details I included.  I received so many compliments today on my coat.

Sneak peek: Simplicity 2311 Fall Coat

Overall, I am pleased as purple punch with this coat.  I really took my time with the construction.  I love the fabric and color.  I love the pattern, Simplicity 2311; it’s really well drafted and the instructions are excellent!  I love the topstitching.   I went through 3 and a half spools of Gutterman thread, but it was sooo worth it.  With my structural additions of shoulder pads, sleeve heads, and interfacing, it really does feel like a real coat! 

After wearing it to work today, I might add some more hand stitching to the hem of the coat and maybe hand stitch in the ditch around the collars and shoulders where I am able to meld the two layers (the under collar and the upper collar) together better so they move as one.

The only thing that could be improved on this coat is a personal label.  I would love to order some, but just can’t decide on how my label should read.  Sew A Beginner is too cumbersome (and not really accurate anymore).  Sewn by Elizabeth seems so loving hands at home-y.  I need something with a little more oomph and style.  Any suggestions?

Full review of this awesome pattern to come in the next couple of days.  I need to take some more interior photos.

Happy sewing everyone!!!!

Look Ma, should-a-ma-pads!

Yesterday I boldly stated that I would not be pad stitching my lapels.  Anita C commented that I might want to reconsider that decision.  So, with an entire evening to myself dedicated to sewing, I decided to do a little research.  I took out all my books that had the slightest mention of jackets and coats and looked through them.  Interesting things of note:  not one book called it pad stitching.  One called it slant basting.  The only book I owned with great instructions was the Reader’s Digest sewing bible.  So I thought about it long and hard.  I knew if I went ahead with the pad stitching I would be adding on one or two days of more construction to my already late coat.  I put on my shell one more time to check the drape of the interfaced undercollar.  I looked in the mirror and…

It looked fine.  I called Carolyn and asked her opinion.  And she said to ditch the pad stitching.  Since I was leaning in that direction already, I decided to let it go.

I was almost to the point where I needed to add shoulder pads.  I had bought some from P&S Fabrics, my neighborhood sewing stuff store last week. 

P&S shoulder pad

I knew at the time of purchase that there was something off about these pads.  The insert was made of foam and the outside was made of some synthetic fabric.  It just seemed too poofy and retained its shape too well.  I have niggling feeling that this shoulder pad will not decompose for a millenia it’s so unnatural. 

Anyhoo, I snuck a peek at my RTW winter coat to see how big its shoulder pads were.  And I found out some very interesting things.   It’s shoulder pads were made of four layers of cotton fleece batting that were fused together with no outer fabric encasing them.  They were sewn into armscye/shoulder seam allowance and tacked to the shoulder seam, then the lining was tacked to the pad itself.  Very cool.  The sleeve head was sewn into the same armscye/shoulder seam allowance but on the bottom and was made of polyester fill batting.  I thought to myself.  I can do that and got out my measuring tape.

The measurements of my winter coat’s shoulder pads were pretty much dead on for the P&S shoulder pad, even down to the thickness, but I liked the feel and malleability of the winter coat shoulder pads so much more.  I happen to have cotton fleece batting in my stash from when I made my one and only quilt.  I just used that and measured out all the pieces of the winter coat shoulder pads and steam a seamed them together.  And presto change-o, I had me some should-a-ma-pads!

Interior of shoulder pad

fused shoulder pad from top

fused shoulder pad from bottom


Isn’t that cool?!?!  I forgot to take pictures of my sleeve heads, but they’re just rectangular pieces of polyester fill batting measuring about 8 inches by 2.5 inches.

I worked on my sleeves next last night.  One detail that I absolutely adore about this pattern is the ease provided for the elbow at the back of the sleeve.  That is sooo cool.  Love it.   Here’s a pic of my unattached sleeve with ease stitches already gathered for ease of insertion (see the elbow ease added to the left of the seam allowances?  Despite the gathers shown there, there was no puckering at the seam).

I cannot wait to work on my coat again tonight.

Happy sewing everyone!

Retrofitting

I have been getting some unexpected but welcome sewing time this week.  Not much, but enough to make some incremental yet gratifying progress on my fall coat.  I was able to cut out the interfacing and fuse it to my sleeves on Monday as well as cut out my back stay.  Last night I was able retrofit my back stay into the shell of my coat. 

I say retrofit the back stay because, if you will kindly recall, I have already constructed the shell of my coat without installing the back stay along the way.  Someone forgot to sew it in.  I’m not going to name any names, but Elizabeth that person just completely forgot about the back stay because I she was so excited about sewing my the luscious purple wool.  I knew I wanted to incorporate a little structure into my coat as I wanted it to be a little more substantial than my trench coat last year.  However, that doesn’t mean I am going to pad stitch the lapels.  I’m not going crazy here, I mean sheesh!  😉  

I bet you’re wondering how you retrofit a back stay.  And I bet you’re wondering how many times I can say retrofit a back stay in this post.  Hahaha!  I thought about it for a while and then I thought, why not ask on Pattern Review.  Nancy K answered me right away.  She suggested that I sew the back stay onto the seam allowances of my shell.  A simple yet elegant solution to a knotty problem. 

So I got to work.  I cut out the back stay by combining the pattern pieces of the back yoke and the back, overlapping 5/8ths at the seam.  I cut the stay from two inches below the armscye and used my french curve to angle up to the CB fold ever so gently.  Et voilá a back stay was born!  I used the cotton flannel for the stay that I was originally going to use for interlining the coat.  I decided against that because I am lazy wanted a more transitional fall coat rather than a winter coat.  Then I staystitched the neck and armscye of the stay and pinned it to the back of my shell.  I carefully stitched the stay to the seam allowances of my shell, only once sewing it to the actual back for a few inches.  Of course I spent some quality time with my seam ripper at that point.  Fun times I tell you, taking out stitches from wool.  Fun times indeed.

That’s the stage where I remain today my friends.  I will reconvene with the sewing committee (aka my Emerald 183) tonight and see where the evening takes me.  I can’t wait!!!!  Of course as the weather is wont to do, it will be dipping into fall temps on the morrow, so I am feeling a lot of pressure  motivation to finish this coat pronto!

*crossing fingers for some good progress tonight!*

Happy sewing everyone!

Make way for progress

Good morning everyone!

Yesterday, I was gifted with rare, uninterrupted daytime sewing time by a friend who took Jack off my hands for a few hours.  Wow!  You can get soooo much done during the day when you are fresh and don’t have to deal with sub-par lighting.  I almost completely constructed the shell (minus the facing).  Saturday night, I fused my little interfacing heart out with Kashi’s interfacing.  I had enough for everything but the sleeves, so I will use Pam Erny’s for the sleeves, because I received my order last Thursday.  In retrospect, I guess I could have waited for my order to arrive, but then I wouldn’t have all that nice doubleknit now would I?  😉  

I thought I’d share with you a little trick I picked up on the interwebs… I think it was from R0bin’s blog, A Little Sewing on the Side.  She interlined her winter coat with hymo and to reduce bulk at the darts, she cut the excess fabric from the dart of her fashion fabric after sewing the dart, and she just cut the hymo on the dart legs before sewing it to the fashion fabric.  Et voilá!  So while I forgot to cut the excess fabric from the dart of my fashion fabric, I did remember to cut the dart legs on my interfacing.  So when I was ready to fuse, I just brought the sides of the dart on the interfacing together as if it was sewn and fused it to the fabric that way.  It worked like a charm.  See the picture below for how I cut out my interfacing.  Using the pattern pieces, I just lifted up the edges of the pieces to cut inside the cutting line so that each interfacing piece would be slightly smaller than the fabric piece.  That way, I would reduce bulk and reduce the chances of fusing my ironing board! 

And here’s all my pieces (minus the sleeves) interfaced and ready to be sewn.  Now isn’t that a pretty picture???

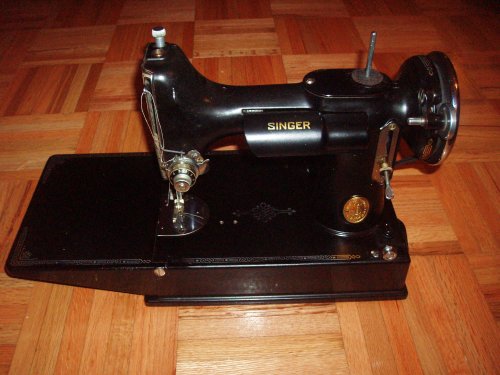
So, as I mentioned before, I had a lot of time to sew yesterday.  I completed the outer shell construction during the day and last night I made the tie belt.  I did a lot of top stitching.  A. LOT.  I love it.  On Carolyn’s recommendation, I used the special topstitching stitch on my Emerald 183 (remember, I am not using my “new” Singer Featherweight 221 yet until I get the kinks figured out).  I love this stitch!  Basically, it’s a straight stitch that’s slightly longer and is sewn twice, side by side, so that it’s slightly wider and longer looking, making for a beautiful topstitch.  I practiced different ways to topstitch on scraps before I actually did it on my coat.  BTW, I highly recommend that; I always practice my stitches for every new piece of fabric I sew.  That way there’s no nasty surprises during construction.  I tried two threads through the needle with an even longer stitch, but the stitches weren’t consistent.  My only wish for the special topstitching stitch would be the option to make it longer than 3.0 which is the max length setting on my machine.  I think the topstitching would look even better at 3.5.  But I still love the way my topstitching looks now, so I’m a happy camper. 

So tonight, I will fuse my sleeves, re-cut my lining back pieces (remember the dreaded grease ring?) and continue constructing my coat.  By my calculations (time you think it will take you to finish x 3 = actual time to finish), I might be able to finish this coat by Weds night.  That is, if I put in three solid evenings of at least 4 hours of sewing time each night.  Remember, I’m a slow sewist.

Wish me luck!

Slow down, you move too fast

Haha!

Thank you to everyone who participated in yesterday’s poll and for sharing your great advice. A lot of the advice was to tell me to slow down and to go with the process. I will definitely do that. The overwhelming voting result was to interface. I put in an order with Pam Erny’s interfacing supply site. But I just found out it won’t arrive here until Thursday. I can’t wait that long people to work on my coat.

Coat update: I cut out the lining two nights ago using cans from my pantry as weights instead of pinning the silk. This method worked great until I realized that one of the cans had oil or grease at the bottom which stained through the pattern onto both layers of silk of the back pattern piece. Needless to say, I was pretty shredded about this.

Canning

Long story short: I braved the torrential rain and tornado warnings today to go uptown to Kashi’s Metro Textiles in the garment district for a little retail therapy. I went because I was on a mission for interfacing, but thought I could stop at Kashi’s too. I went to Kashi’s first actually and ended up staying there the entire time. I knew he sold muslin, so I asked him if sold interfacing. He answered what kind; I knew right then and there I wasn’t going anywhere else. He gave me a medium weight fusible interfacing that I think will be great for my jacket for $2/yd. Carolyn had put a bug in my ear about his double knits, so I bought the black and brick-red for my collection. I already had the dark charcoal from the NY Shopping day at the end of August. I also bought one yard of the silk charmeuse so I can recut the back lining without a grease stain, thank you very much! But the piece de resistance was the Ralph Lauren wool suiting in a lovely dark charcoal in a great medium weight with a great drape. Did I mention it was great? Lurve it! I bought 3 yds of that as I wasn’t sure what I wanted to make with it. Mmm mmm good!

T to B: RL Wool, silk charmeuse lining, red d-knit, black d-knit, interfacing

FYI: Kashi will provide a swatching service every three months of all his new arrivals. Call him to sign up! Also, he has tons of new fabrics in right now. It was difficult to be focused while I was there today. 😉

My plans for tonight? Testing my interfacing, recutting the back lining and whatever else I can get done. Wish me luck!

What are your plans for the evening?

Muslin-y Pictures of S2311

Last night’s session with Thea was very successful.  I continue to be excited about this coat.  I just adore this pattern.  Did I mention that it is well-drafted???  And the collar/lapel is just about as perfect as can be.  LOVE. THIS. COAT.

So, I realized some errors I had made, but it’s all good.  No animals were harmed in the making of this muslin.  😉   I forgot I had changed the seam guide on my Featherweight from 5/8ths to 1/2 inch, so all my seam allowances were an 1/8th off. 

Oh, and I figured out why my bobbin thread kept breaking.  Now this is just a theory as I have not really researched it, but I think the needle position must be in its highest position when you pull out your work.  I think the way the machine works is that having the needle position high changes the way the bobbin releases the bobbin thread.  Oh maybe I’m on crack here, but it’s just a theory.  I experimented last night with keeping the needle up at its highest position whenever I removed my work after a seam and I had no problems whatsoever with the bobbin thread all night.  So, I think I’m on to something here.  However, this mild success in using the Featherweight did not convince me to use it for this coat.  I am still going to use my Emerald 183.  I think I need to practice on the Featherweight with less complicated, less important projects first before I sew something like a coat.

Thea helped me fit my coat.  She agreed with me that the fit was basically fine but I could use some shaping in the back to remove some of the bulk there.  The pattern provides a center back seam, but there is not much if any shaping in it, so we added about a 3/4 inch of shaping out from the waist tapering to the hem and yoke.  It looks great now.  We inserted the sleeve pretty easily.  Thankfully there is not an excess amount of ease in the sleeve cap, so very little easing was required.  There was also easing for the elbow which I love.  Gives great shaping to the line of the arm as well as being practical for something pointy like an elbow.  I should mention that I was mistaken about the pattern calling for sewing on the sleeves in the flat.  I just misread them because they have you jump around the instruction sheets from Coat A to Coat B instructions. 

Thea also helped me figure out how to attack the back yoke to the front and collar better.  The pattern itself is missing some markings, so that was part of my problem. The other was not know how to properly sew a squarish u-shaped piece to a straight piece.  I will explain that later.  Ingenious method though. 

Without further ado, here are the pictures of the muslin on me!  I wore a suit jacket to fill out the coat a bit.  I am really pleased with the fit and look of this coat and can’t wait to start cutting out the purple wool.  Please ignore the goofy faces.

Note: the muslin is really stiff. the wool has a softer drape.

Again, the back will be smoother in the softer wool

Happy sewing everyone!

S2311 muslin

There are two things I want to discuss today folks.  So, buckle up! 

First, my Simplicity 2311 muslin for the sewalong.  Here’s a refresher on what the finished coat looks like (top left, the short camel version).  

S2311

I cut a straight sz 14 in heavy weight muslin (think of it as almost like painting canvas).  I found this weight to be extremely helpful to give an accurate read of how the coating would drape if a bit ravelly.  It took me forever last night to get to a point where I could try on the muslin (more on why later).  Essentially I got to the point where you attach the sleeves.  I believe they instruct you to sew them on in the flat as opposed to in the round.  But it was late and I wanted to see the fit, so I skipped that and basted the side seams.   

The verdict?  I.  LOVE.  THIS.  COAT.  I love the wide lapels.  I love the princess seams in front.  The back needs some fitting but luckily enough there’s a CB seam to play with.  I think I might take some bulk out of the shoulder blade area through to the waist, but that’s about it. This coat is going to rock!!!  I was scared of the princess seams, but they were really easy to sew.  I didn’t need to clip anything to get them to lay flat.  Weird!  The collar and lapel have a great shape and lie around my neck and shoulders beautifully.  And I didn’t even do the inside facing/over collar yet.  This is a really well-drafted pattern.   

I’ve decided that I won’t interline this coat.  I’m intending it to be a fall coat, something transitional and more like an accessory rather than true outerwear.  So, even though I bought cotton flannel for it, I am just going to use the purple wool coating and silk charmeuse lining for this coat.  But I could totally see myself making the longer version for a more substantial winter coat next year.   

I wish I had a picture of me wearing the muslin, but I was too tired and not camera ready last night, so here’s a totally craptastic shot with my iphone to tide you over.  


Thea is coming over tonight to help me fit the back and show me how to sew the back to the front better.  I had major problems sewing that part last night and just did a down and dirty job of it in the muslin to see how it looked on.   

And speaking of problems…  I had an awful time using my Featherweight last night.  AWFUL!!!  I almost dragged out my Emerald 183 from retirement.  I couldn’t get the bobbin to wind correctly and smoothly so my bobbin thread kept getting stuck and then breaking.  I have no idea what I’m doing wrong.  One time when it broke, something jolted the needle thread tension discs and now they are really loose.  I hope I didn’t break my “new” Featherweight.  I guess the honeymoon is over.  😦   As a matter of fact, I am probably going to un-retire the Emerald 183 to sew my final coat.  I don’t want to slow down the making of this coat due to machine temperamentality.  

Happy sewing everyone.

Lots to Show and Tell

I’m back from the wilds of the Midwest and have lots to report.  I met my new niece Chloe who’s cute as a button.  Jack fell in love with her and was so sweet with her.  He loved caressing her little head.  So cute to see him be so tender.  🙂 

As for those of you asking for pictures of the dress in action at the wedding (ahem, Karen), sorry but no actions shots were taken.  I just was not in a dancing mood I guess, and I felt shy about asking anyone to take a picture.  Here’s my take on how the dress “wore” though.  I’m stealing the interview idea from Tasia

How did the dress look?  It looked pretty good standing still and as I was running. 

What do you mean by “standing still” and “running”?  Well, when I stood talking to people it looked great.  It was also fine as I was running to the wedding after the taxi driver dropped me off at the opposite end of the pier.  I had to sprint about two football lengths in 7 minutes with another wedding attendee.  Both of us looked mahvelous!  😉  

So how did it look sitting?  Funny you should ask actually, as that was the part with which I was most dissatisfied.  When I sat down at the wedding ceremony, my dress rode up so high pooling at my waist and thighs, almost 3 inches of my lining was left exposed for all to see.

Why on earth did it ride up so high???  Well, I suspect the underlining was the culprit.  I used silk organza because I was being all fancy.  The last time I underlined (the Christian LaCroix skirt), all I had on hand was cotton batiste, which worked, but this time I was prepared with yards and yards of silk organza.  As most of you know, silk organza has a stiff hand, which helps enormously with preventing SBS (Saggy Bottom Syndrome otherwise known as bagging out) and wrinkling.  It also has the added effect of giving the fashion fabric more body.  In the case of my Vera Wang fabric, too much body, as the brocade had body already, just needed the protection against SBS.  I should have used cotton batiste in retrospect.  *sigh*   Live and learn I guess…

Any other things you liked or disliked about this version of B5147?  I’m so glad you asked.  Dislikes: If you’ll recall, I altered the armscye to cut in towards the chest.  Boy was that a big oops and I will be putting that back in.  Now everyone has the viewing pleasure of the fleshy area between my arm and chest.  Isn’t that a great visual?  Bet you didn’t know that area could even be fat.  Likes: Love the scoop neck.  Not too deep but just deep enough.  I also pegged the skirt near the knees and really like that silhouette.  And I loved the sheathier look of widening the fisheye darts in the front of the dress; they were much more figure flattering.  I will definitely keep those changes for future iterations if there are any.

Will you make any more B5147’s?  Hmmm… Not sure.  My teacher Thea thinks that I can get a much more flattering fit with less fiddling around with a princess seamed sheath dress, so I am going to try another dress soon.  I’m considering the Simplicity Amazing Fit sheath dress, S2648.

What’s next in your project queue?  I am finally getting to my Fall coat for the Trench Sew Along.  I am making another Simplicity pattern, S5380.  I already have my purple wool, bought the purple charmeuse at the PR Shopping day a couple of weeks ago, and today I ran out to buy cotton flannel with which to interline the coat.  Not sure how much tailoring I am going to end up doing.  We’ll see how in depth I’m willing to go later.

**********************************************************************

Ok, enough with the pseudo interview.  Do you want to see pictures of my new baby up close and personal like?  I’m talking about the Singer Featherweight 221 from 1938 that received this past weekend.  Oh boy am I excited and yet a little intimidated.  The directions on how to just thread the machine don’t make any sense to me.  It came with a bunch of feet, most of which I have no idea what they are for.  Can any of you deduce their purposes?

Original manual!!!

My very own buttonholer!!!

Slightly broken zigzagger with inscrutable manual

Here are the feet for which I have no idea of their purposes:

I think this might be a quilting guide but a slightly bent one

a ruffler perchance?

some kind of binder? if so, what kind?

Let me know if you know what feet I actually have.  Can’t wait to start playing with them all.  I am super excited about the Singer Buttonholer!!!

Happy sewing everyone!

Super-duper excited

about my B5147 morph from day into evening-wear project!!!  

So I know Robin’s been experiencing drama here and here with her first version of B5147 and I can’t keep my hands off tweaking the bodice (sounds almost r rated!). But I am excited to report that I have found nirvana with my fit for this bodice.  Here are the changes I made to the bodice to make it more fitting for evening wear (get it?  “fitting”?) AND to be more flattering fit-wise too: 

  • scooped out the neckline by 3 inches to give a more evening look.  I came at this measurement by trying on my silk twill version and measuring down from the existing neckline to where I wanted the evening dress neckline to be.
  • sculpted out the side of the shoulder strap/armscye area to give a more evening look.  Adjusted the width of the back shoulder strap to match the front.
  • widened the top portion of both fisheye darts to pull in the bodice under the girls, thereby giving a more flattering silhouette to the waist of bodice.  I am really proud of this change working out well because I just kind of eyeballed it.  No math involved!
  • increased the bust dart again by 1/4 inch on the top to reduce draglines at the side.
  • added 3/4 inch wedge below the bust dart to restore length to the side seam and maintain integrity of the hip curve after altering the bust dart.
  • pinched out a 1/4 inch of the outer shoulder seam for the front only, tapering to the inner shoulder seam to reduce gaping of the armscye.

B5147 front pattern altered with neck, dart and armscye changes


B5147 back pattern with shoulder strap altered to match front


fisheye dart widened


Bust dart increased and wedge added


I might need to tweak the following on the final dress, but will do it during construction, basting as I go: 

  • take a titch out from the front at the armscye side seam, maybe a 1/4 inch tapering to nothing at the dart to reduce armscye gaping.
  • pinch out the same amount from inner shoulder seam to reduce neckline gaping.
  • straighten up side seam after adding the wedge under the bust dart.

I should have taken a picture of the muslin on me, because I was really happy with the fit, but I didn’t insert the zipper.  I just had Thea pin up the back at the seam allowance to mimic the zipper.  Then I forgot to take a picture after we were done with our fitting.  Sorry!  Suffice it to say, that I am very happy with the fit of this dress now.  And I love that I have an evening version of this sheath dress. 

Unfortunately, I won’t have time to sew until next week as Jack and I have a very full weekend planned.   But at least I have figured out all the major stuff and can just cut and start sewing next week.  I am going to underline the brocade with silk organza as it is quite a loose weave and bags out if you just look or breathe on it.  That will add some time to the process, but it will be well worth it in the end.    

Happy sewing everyone!