Category Archives: Beginner

Super-duper excited

about my B5147 morph from day into evening-wear project!!!  

So I know Robin’s been experiencing drama here and here with her first version of B5147 and I can’t keep my hands off tweaking the bodice (sounds almost r rated!). But I am excited to report that I have found nirvana with my fit for this bodice.  Here are the changes I made to the bodice to make it more fitting for evening wear (get it?  “fitting”?) AND to be more flattering fit-wise too: 

  • scooped out the neckline by 3 inches to give a more evening look.  I came at this measurement by trying on my silk twill version and measuring down from the existing neckline to where I wanted the evening dress neckline to be.
  • sculpted out the side of the shoulder strap/armscye area to give a more evening look.  Adjusted the width of the back shoulder strap to match the front.
  • widened the top portion of both fisheye darts to pull in the bodice under the girls, thereby giving a more flattering silhouette to the waist of bodice.  I am really proud of this change working out well because I just kind of eyeballed it.  No math involved!
  • increased the bust dart again by 1/4 inch on the top to reduce draglines at the side.
  • added 3/4 inch wedge below the bust dart to restore length to the side seam and maintain integrity of the hip curve after altering the bust dart.
  • pinched out a 1/4 inch of the outer shoulder seam for the front only, tapering to the inner shoulder seam to reduce gaping of the armscye.

B5147 front pattern altered with neck, dart and armscye changes


B5147 back pattern with shoulder strap altered to match front


fisheye dart widened


Bust dart increased and wedge added


I might need to tweak the following on the final dress, but will do it during construction, basting as I go: 

  • take a titch out from the front at the armscye side seam, maybe a 1/4 inch tapering to nothing at the dart to reduce armscye gaping.
  • pinch out the same amount from inner shoulder seam to reduce neckline gaping.
  • straighten up side seam after adding the wedge under the bust dart.

I should have taken a picture of the muslin on me, because I was really happy with the fit, but I didn’t insert the zipper.  I just had Thea pin up the back at the seam allowance to mimic the zipper.  Then I forgot to take a picture after we were done with our fitting.  Sorry!  Suffice it to say, that I am very happy with the fit of this dress now.  And I love that I have an evening version of this sheath dress. 

Unfortunately, I won’t have time to sew until next week as Jack and I have a very full weekend planned.   But at least I have figured out all the major stuff and can just cut and start sewing next week.  I am going to underline the brocade with silk organza as it is quite a loose weave and bags out if you just look or breathe on it.  That will add some time to the process, but it will be well worth it in the end.    

Happy sewing everyone!

A Non-Tutorial on Grain and Fit Check

Thea was over this weekend to give me my remedial lesson on how to find the grain in fabric.  Until now, I have just been matching selvedges, working with a lot of knits and just plain hoping my fabric was on grain.  To be honest, things have worked out so far, but I didn’t want to chance ruining my new silk twill border print dress.  I didn’t want to spend all that time making a beautiful garment only to have it twist on me due to being off grain. 

So Thea showed me how to fray the fabric until you find the straight grain all the way up and down the fabric, meaning no threads left that are shorter than the entire width of the fabric.  Even matching selvedge to selvedge, my fabric was off grain by almost  a whole inch on one side!.  That could have put a serious twist in how my dress would have hung on my body and there would have been serious shouting!  😉  

To fray the fabric, you pull threads one at a time from one selvedge to the other side until there are no more threads to pull.  This is an easy method, but it takes a long time…  I think fraying this fabric took me at least a good 1/2 hour, maybe even 45 minutes.  And you have to find the grain for each pattern piece you cut out.  That’s a serious time commitment my friends.  But as I said earlier, it is important to cut out your fabric on grain.  Good prep work in the beginning means smooth sailing and wearing later on, so it’s worth it to put in the effort now and have no regrets later.

There is another method, but it takes some practice.  Snip into your fabric at the selvedge and pull one thread all the way out.  The difficulty with this method is not breaking the thread before you have pulled it all the way out.  Ask me how I know.  🙂   I was discussing it with Claudine over email yesterday and she suggested cutting as you go so if your thread breaks you can find it again.  Great idea!  I will definitely use that helpful hint in the future as this method is way faster than fraying the fabric.  Actually it was Claudine that started me worrying me thinking about grain issues in the first place.  Here’s an example with a pulled thread…

Ok, once you’ve found your grain, you need to adjust your fabric so it’s on grain and then you cut out your fabric!  How do you do that you ask?  Well, you use your handy dandy quilting ruler or some like thing.  Fold your fabric over enough to fit your pattern piece on it and then measure down from the pulled thread or fringe equally all across the width of your fabric pinning as you go to maintain integrity.  It’s as simple as that!

And voila!  You will then have fabric that’s perfectly on grain and ready for cutting!

Now, I need your opinion please.  I pulled a 5 hour sewing sweatshop last night and got a significant amount of my second Butterick 5147 dress done.  I basted the side seams and now need to determine if I need to make any tweaks.  Working with a non stretch fabric is very different for me especially in such a fitted dress.  Wow!  I think it might be too fitted now in the back and waist.  Here are some pictures of it basted and unhemmed.  Please let me know if I need to release the side seams a little. 

Happy sewing everyone!  And happy universal holiday too!  (it’s my birthday today and I’m going to wear my Christian LaCroix skirt)  🙂

Pattern Review – Butterick 5147

Butterick 5147


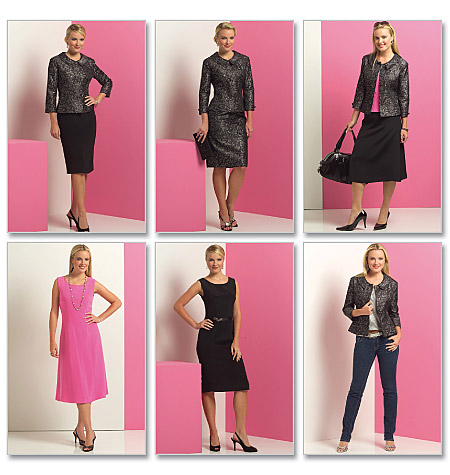
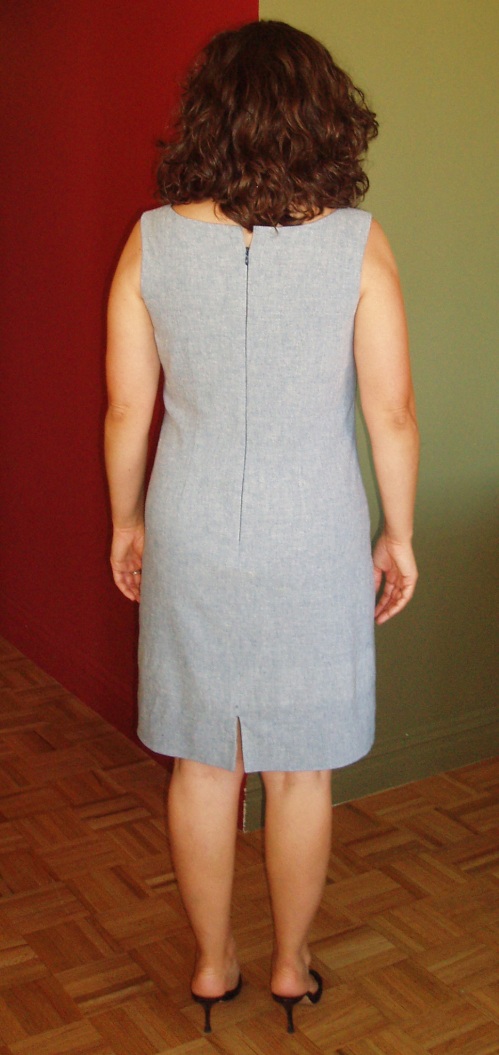
Pattern Description:  Lifestyle Wardrobe: Misses Jacket, Top, Dress, and Skirt. Slim fitting dress C has front and back darts, back zipper and back slit, length is 2 inches below mid-knee.

Pattern Sizing:  BB (8-14) I made the size 14 with some small alterations (see below)

Did it look like the photo/drawing on the pattern envelope once you were done sewing with it?  Yes, but not as close fitting.

Were the instructions easy to follow?  

  • Yes for the most part.  I liked the order of construction they set out as it provides a beautiful clean finish on the inside.  However they do not tell you to stay stitch the neck and my neckline stretched out.  I should have listened to my inner sewing voice and put in stay stitching.  
  • For the fish eye darts, I recommend starting the stitching line in the middle of the dart rather than at one of the two ends (thanks to my commenters for this tip!).  This allows for more accurate sewing at both ends of the dart for a beautiful taper resulting in no bubble at the tips.  Don’t forget to make your stitch length smaller at the ends of the darts! 
  • The instructions for finishing the slit with the lining and dress hem joined together are great!  I didn’t understand them at first by just reading them, but if you follow them step by step, you’ll understand.  I am visual person, so reading wordy stuff doesn’t always make directions apparent for me.  My one caveat about the slit instructions is that you should finish the raw edge of the hem long before you get to this step, like before you start constructing the dress with zigzag stitching or by serging.  Ask me how I know! 
  • One more note:  Understitching the lining of the slit is really hard to do on the machine.  It’s doable but difficult to maneuver all the fabric into just the right position.  It’s far less of a headache to just understitch it by hand and quick too. 

What did you particularly like or dislike about the pattern? 

Likes:

  • I liked that the pattern was pretty true to size according to the measurements given on the pattern envelope. After the 6 inch debacle, it was such a treat not to have a nasty surprise when making the muslin on this dress.
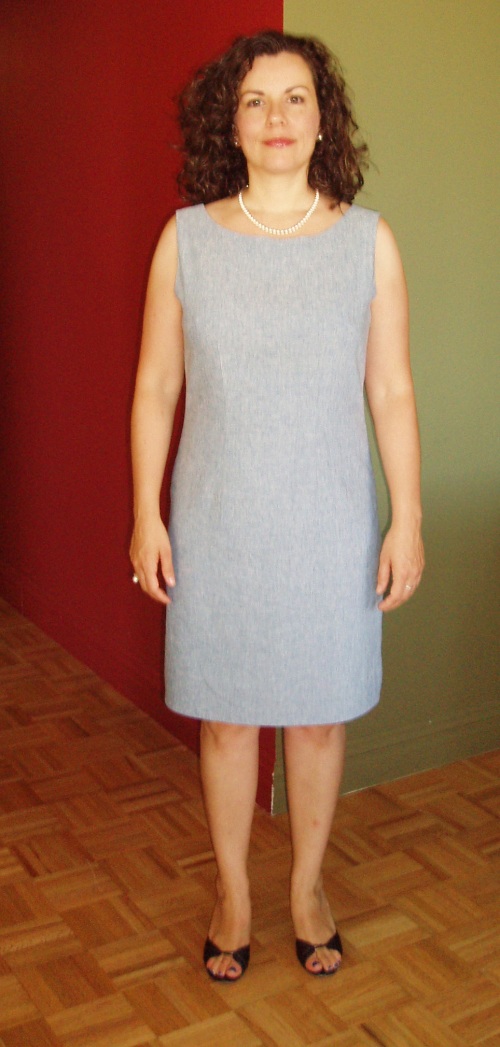
  • Love this sheath dress.  I think it’s very flattering (much more so in real life than in the following pictures) and is such a great staple to have in the work wardrobe.  Depending on the fabric you use, this dress can be a statement piece or an elegant foil for some great accessories.  I think everyone looks well dressed in a well-fitting sheath dress.
  • I love this neckline.  It’s not too high, not too low.  I hate necklines that are high and rest on my clavicles (I feel like I’m being strangled!), so this neckline is just right for me and Goldilocks.

Dislikes:

  • None!

Fabric Used:  I just bought this fabric from Paron’s last weekend.  I am so proud of myself for using it within a week of buying it.  It’s a stretch chambray.  Not to get all philosophical on you, but I liked the juxtaposition of using a traditional work horse fabric for an elegant sheath dress.  I wore it with pearls today and I think by accessorizing the dress like it was made with silk really elevates the fabric from it’s humble origins.  I love chambray; it’s so soft and comfy.  I do have to mention, however, that I am not a fan of stretch wovens so far.  They are a little tricky to work with as they grow as you handle them.  I had to take in the side seams to accommodate the growth during construction, despite having made two muslins beforehand.  Also, the feel of the fabric doesn’t feel as natural as a plain cotton would, a little rubbery.

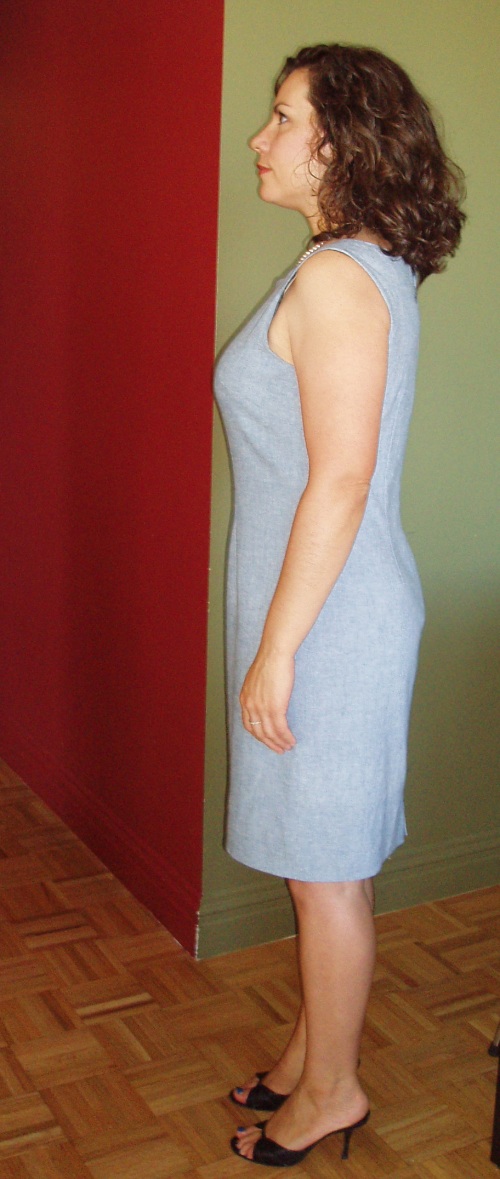
Pattern alterations or any design changes you made:  During the muslin stage, I had Thea help me with fitting, as I mentioned in my last post, the changes we ended up making were not even close to the ones I thought I would make.  I thought all I needed was a swayback adjustment, but we took out an inch from the shoulders of the back pattern piece.  The strange thing about this was that it didn’t significantly change the shape of the armscye AND I didn’t need to add that inch back in at the back hem.  Go figure!  Then added a ¼ inch at the side seams to add a full inch of ease to the dress.  Also, my left hip is not as curvy as my right, so I straightened that curve and took it in another ¼ inch to fit my hip better.  As I mentioned above, my stretch fabric grew with handling so after I basted in the side seams, I had to take in both side seams another ¼ inch again to accommodate the fabric.  The only further changes I might consider making is making it a little more fitted like it seems to be on the pattern envelope.  But I will decide this after wearing it for a full day.  It’s comfortable as is now, but maybe a little more fitted might be even more flattering?  Who knows.  It could just end up emphasizing the pooch and who wants that?  Not me!  I wish I worked with people who sewed, so I could ask their opinion.  *sigh* 

Would you sew it again? Would you recommend it to others?  This dress  was made as part of the Butterick 5147 Dress Sew Along that Carolyn and I started (still going on for another few weeks – please join!)  It was on my list to try as a potential TNT (tried n true) pattern for my work wardrobe.  Since I consider it a success, I will definitely be sewing it again and again.  There are only two pattern pieces and four darts.  Can it get any simpler than that?  I definitely recommend it to others.  I think it will flatter most figures after adjusting for each individual’s fit.  And the directions are great (aside from leaving out a couple of important steps mentioned above).  I definitely think a beginner could handle this pattern if they have a good sewing reference sitting beside them. 

Conclusion:  This dress has become my second TNT in my TNT quest for a work wardrobe.  I love the fit, the elegant silhouette, and the fact that the fabric is the star of this pattern.  You will not look like you are making the same dress over and over if you use vastly different fabrics.  I plan to make this again right away using my new silk twill border print (also bought at Paron’s during the same visit last week).  Can’t wait!!!!!  Also I absolutely adore the jacket included in this pattern.  I hope to make that sometime in the near future.  I have a lot on my plate now, but that jacket is definitely on my horizon.

Now for some pictures…  Thanks to my sister taking them this morning even though she was rushing to get out the door!  This is how I wore my dress at work today.  I don’t have any construction pictures as I didn’t do anything too different or awe inspiring to document them.  Besides, this dress is all about getting the right fit, not how you hand sew the hem. 😉 

I’m going back to remedial sewing school with Thea this weekend and cutting out my precious silk twill under her wise tutelage.  I had some grain issues with my first iteration of this dress and I don’t want to chance ruining my silk twill dress.  Hopefully, by this time next week, I will have another new Butterick 5147 dress to show you all!

Happy sewing everyone!

Muslin Surprise

Thea was over last night and we worked on fitting my muslin for the B5147 dress.  Remember how I said that it probably only needed a swayback adjustment?  Well, I was completely off the mark.

If you will recall, I needed to set in the zipper better, so I basted that in more accurately and tried it on again.  As soon as I saw it on me again, I knew no swayback adjustment was necessary.  Then Thea went to work on helping me fit the muslin.  Here’s what we did:

  • raised the back 1 inch (need to remember to increase the bottom by one inch to compensate)
  • added 1/4 inch at the side seams for a total increase of 1 inch
  • my left hip is much straighter in shape than my right hip so I straightened the curve and took in that side seam a little more because it was pooching out
  • lowered the bust dart about 3/4 inch and changed the angle a little lower as it was too high for my bust
  • raised the hem by about 6 inches (man! this dress is long!)
  • changed the back sleeve shape decreasing it about 3/8 inch
  • decreased the side seam under the arm about 3/8 for a closer fit (might add some back as it’s a little tight across the back)

Here’s what the muslin looks like so far.  We only made the changes to one side of the muslin (my left, your right as you look at the picture), although we let out both side seams and raised the back on both shoulders originally.

It looks pretty good as is now, but I still want to tweak it a little further.  I think I overfitted in some areas and removed too much ease.  While I can still sit down in the dress, it’s a little too fitted looking and for my liking.  Also, I still have drag lines pointing to the bust.  I have solution to that (see below).  So here’s what I have to do next:

  • add an inch to the hem of the back pattern piece to account for raising the back
  • add a complete 5/8 SA to the pattern pieces since I let out the side seam by a 1/4 inch
  • add back in a pinch at the left hip SA due to over fitting
  • add a little less than 1/8 inch to bust dart tapering to the point
  • add back about 1/8 inch to under arm SA to get better ease for the back
  • now that the back is raised, I have to cut down the back neck 1 inch to the original placement

So once I have made all those changes and check the fit one last time, I am ready to use this muslin as my pattern.  Once I’ve made sure all the marks are made, I can cut out my good fabric.  I still haven’t chosen which fabric I will use to make my first iteration of this dress.  So many to choose from!  But that’s a happy problem.  And folks, yes, this will be my TNT sheath dress pattern.  I love it!!!

Thoughts on the fitting process: 

  • I’m really glad that I had Thea to help me fit this dress.  I would never have known to raise the back at all; it would not have occurred to me in a million years.
  • I think you really need a fitting buddy, preferably someone who is knowledgeable, if you’re a beginner like me.
  • the change you need is never the one you think of initially, at least for me.  This is NOT intuitive for me at all.
  • It’s almost never just one change.  One thing leads to another to another.  😉 

But the most important lesson learned?  Fitted garments are flattering, no matter what your shape!

Happy fitting everyone!

2010 Check Up

We’re nearing the end of June and I thought I would see how I am doing with my 2010 goals.  Not so good in some respects and right on target for others.  Here’s my list…

  • sheath dress – not yet attempted
  • blazer/jacket – not yet attempted
  • use sweater knits for a cardigan sweater set – not yet attempted
  • welt pockets – not yet attempted (sensing a trend here)
  • find some TNT’s like Carolyn – attempted and successful with the pencil skirt only so far
  • perfect my invisible zipper – I’ve done two or three and so far with dubious perfection
  • more lined skirts – I’m lining all my skirts, but have plans to make unlined skirts for the summer soon.
  • a tailored shirt – I made the camp shirt for Thor which had some tailoring, but have not yet attempted one for myself.
  • make a charmeuse or chiffon blouse – too scared to work with the fabric so far
  • participate in at least 1 Pattern Review contest – maybe the LBD contest???
  • make at least 25 garments (one of which should be a complex pattern like the trench coat) – I’ve made 13 garments so far this year.  Yippee!!!!


With my sister’s “lemonade” skirt to be completed this week,  I am on track for completing 25 garments by the end of the year.  I can’t believe it almost.   I really want to make a sheath dress for my cousin’s wedding this summer but am still dithering about which pattern to use.  The blazer/jacket will be taken care of in the Trench Sew Along II; I am making a fall coat out of some purple wool I bought last year.  I am dying to make cardigans, so hopefully that will get knocked off the list.  And as you all know, I am really trying to find some TNT patterns for my work wardrobe, so I hope to definitely accomplish that this year. 

So, all in all, I think I am doing ok with my plans for the rest of the year.  This list was a wish list.  If I don’t get to everything, so be it.  I’m not going to whine about it later.  Ok, maybe I will but it won’t last long I promise. 

Anyhoo, how are you doing with your goals for the year (if you had any)?  Tell me!

Happy sewing!

Pattern Review: Burda 5-2010-105

I have a fire lit under me of late.  All I want to do is sew.  Did I mention that I’m obsessed?  Tonight I’m taking a little break to write the review for the Burda 5-2010-105 dress.  Here’s what I just posted to Patternreview.com…

Pattern Description:  From Burda: “Ute obviously looks happy in her all-round jersey dress! It is so easy-care and uncomplicated that she can easily play with Willi while wearing it.  The cleverly cascading bodice is gathered by elastic at the waist and the cool shade of blue make it suitable for evening as well.”  From Elizabeth: “Drapey jersey dress with elasticized waist and fitted skirt.”

Pattern Sizing:  Burda sizes 36-44.  I made the size 38 with some modifications (see below).

Did it look like the photo/drawing on the pattern envelope once you were done sewing with it?  For the most part it did.  I think my bodice could have been longer and my neckline was definitely different.  Also, I shortened the skirt, and obviously my fabric choice was different as well.

Were the instructions easy to follow?  Yes, surprisingly for Burda.  But this was just a one dot difficulty, so I guess it would be hard to be inscrutable at this level. 

What did you particularly like or dislike about the pattern?  I loved the simplicity of the pattern and the graceful folds in the bodice.   I did not like that the measurements for the skirt were for someone who has no hips or thighs whatsoever.   More on that later.

Fabric Used:  A gorgeous rayon-lycra knit in a blue ombre from Metro Textiles in NYC.

Pattern alterations or any design changes you made:
I changed the neckline a little as I don’t like a neckline that’s too high.  I feel as if I am being strangled if anything lies on my clavicles.  I just traced a curved line lower than the original neckline about an inch and half lower.   I could have made it a little bit lower, but like it at this level now too. 

I made the skirt per the measurements given in the instructions for sz 38 (20 inches, which includes SA’s) and it was so tight you could see the outlines of my internal organs.  The vision I created in this tight skirt brought new meaning to the term camel toe.  Who knew camel toes were even possible in skirts?!?!  (Sadly no pictures survived from this stage of construction – must have been a freak accident.)  So, I added 1.5 inches to each panel, front and back and all is now right with the world and also g rated.  Oh and I shortened the skirt to above the knee as I think it looks more current.

I did not finish the neckline with a facing as directed.  Just lazy I guess.  I just turned over the edges and stitched it down with a narrow zigzag stitch.  Am I happy with it?  Not really.  The unfinished SA’s keep flipping out.    Am I going to redo it?  No.  My perfectionism only goes so far.  Ok, now that I’ve said that, my OCD might kick in and I might unpick those stitches and finish it differently somehow.  But it’s a 50/50 chance at this point.

As I do not have access to Burda’s much beloved Vilene Bias Tape, I used a knit interfacing that I cut myself using the sleeve pattern as a guide.  If you do this as well, please make sure that you cut it slimmer than the sleeve hem allowance as I did not.  Why, you ask?  Well, because I didn’t do that, if one looks inside my sleeves, one can see said interfacing.  So, please don’t look inside my sleeves. 

Also, I did not twin needle anything.  My fabric did not like the twin needle I used.  Admittedly, it was not a stretch twin needle, but I could not purchase one on the fly and really wanted to finish my dress.

The most significant change I made was to add a lining to the skirt.  Per Trena’s advice in her review (she added a lining after the fact) so I added mine during construction.  All I did was baste the lining to the fashion fabric right sides together, graded the SA, sewed the skirt/lining to the bodice right sides together, pressed the SA up towards the bodice, and then finally sewing the SA to the bodice as a casing for the elastic.  This made for a very clean interior.  But adding the lining created a heavier skirt, so I highly recommend using a wider elastic than Burda recommends.  I used a 1/2 inch elastic.  It worked perfectly for the weight of the skirt.  Adding a lining to such a close fitting jersey skirt has a smoothing effect for lumps and bumps, not to mention your undergarments, so I would definitely not go without lining this skirt or wearing a slip.

Would you sew it again? Would you recommend it to others?  While I love my dress, I am not sure I will sew it again as it is such a distinctive silhouette.  Also, I am in a sewing for work phase and this dress is a little too MILF-like for a staid high finance office atmosphere.  I had hoped to be able to wear it to the office, but my arbiter of style (aka my sister) said it was too casual for the office (that’s code for, “the ASSets on your balance sheet are showing too much”). 

If I were to make this dress ever again, I would make only one more change to the pattern.  I would make the bodice about 1.5 to 2 inches longer as it appears that the Burda model has more drape over the elasticized waist than I do.  I am still finding my bearings regarding what kinds of alterations I need to make on a regular basis.  Obviously I am long waisted as is evidenced by the last few patterns I’ve made.  I wish I was also long legged, but, alas, that is not the case.

I would definitely recommend this pattern to any level of sewist.  I think the pattern is easy enough for beginners, but that the resulting dress will appeal to advanced sewists as well.  I definitely suggest adding a lining and checking that the measurements work for you and your body. 

And now for some pictures of the dress on me.  I actually think the dress is much more pretty and flattering in person.  The fabric and drapey-ness don’t come across well in these photos.

As a PS, I made lemonade out of the too tight skirt that I constructed originally following the Burda measurements (with a lining I might add indignantly).  I am making it into a skirt for my sister on whom it fits beautifully.  She and I have such different figures, i.e., she’s a lot thinner than I am.  I am so glad that this beautiful ombre fabric will not be wasted.  And I know she will love the skirt.

Conclusion:   Great pattern, easy to sew, very current but classic.  Make this dress!  You won’t be sorry.  Great date night dress.  I hope I get a chance to wear it on a date really soon.   😉

Birthday Dress Pattern Review

Since Haley had her birthday this weekend, received her presents, and opened them.  I can  now show you pictures of the finished dress.  However, I forgot to take interior construction pictures before I wrapped and sent it off, so my apologies for the dearth of those photos.

By all accounts, Haley loves her dress and she looks so pretty in pink.

Construction notes:  I used no pattern for this dress.  With the help of my teacher Thea and some measurements of a RTW dress that Haley already owned, we drafted a pattern for this dress.  The bodice of the RTW wear dress was 18 inches in circumference and the straps were 2 inches in from the sides.  Since elastic thread for shirring cuts the width down by 1/2 I started with 2 pieces of the floral fabric (front and back) 19 inches wide each (1 inch added for SA’s).  I pressed the top of the bodice under twice and used the elastic on top of the hem to secure and start the shirring at the same time.  I shirred for about 7-8 times around until it looked right in length from top to bottom.  I seamed and gathered the solid pink band using my gathering foot, remember my new boyfriend?  In retrospect, I realized that I had forgotten to tighten my stitch tension, so the gathers are not as gathered, but I still like it.  It’s subtle.  Then I added the lace at the bottom.  I bought the lace in Philly when I was there for PR Weekend.  Doesn’t it just take this simple dress to a whole new level?  It’s definitely “one more louder.”  I must give full credit to Thea for turning the straps for me.  I have been very frustrated with my turner, but she seemed to have no problem whatsoever with it.  Hmmm…  I attached the straps and this dress was done!  Very simple.  I constructed the entire dress (minus attaching the straps) in one evening.  I can see a sweatshop in my near future making little girl dresses.  😉  

And here’s little Haley in her dress.  Isn’t she super duper cute?

In other sewing news, I finished my Burda dress and love it.  Lots to tell about that little adventure, but I must save it for another post.  Not sure if it’s work wearable though.  It might be a little too sexy momma for the office.  I’ll have to ask my sister’s opinion.

Happy sewing everyone!

Obsession

Ok.  I think I need help. 

Hi, my name is Elizabeth and I am a sewing addict.  Seriously.  It’s all I think about ever.  Every minute of the day.  When I’m at work, I would rather be at home sewing.  Work is getting in the way of my sewing.  It’s really starting to bother me.  I’m almost beginning to wonder if I should make a career change.  But what would I do?  I’m not good enough at sewing to be paid for it and I’m really slow.  Hmmm….  Must think about this some more.

Anyway, I took a nap with Jack today and I dreamt about making a jersey skirt with a shirred waist.  I had seen one earlier in the day and loved it.  After the nap, I thought about the Burda dress that’s been on my mind off and on for the last two months.  It’s 105 from May, 2010. 

I’ve had this beautiful ombre knit from Metro Textiles in my stash for a few months that I have had no idea how to use.  It’s been killing me because I just adore this ombre thing that’s been around for awhile.  Wouldn’t this dress look beautiful in an ombre????

Now I just need to decide how to place the ombre.  Should I have it start with the lighter blue at the shoulders going to the darker blue at the waist?  And if I do that how should I do the skirt?  I want the darker blue to make me look slimmer, but wonder if having light blue at the knees would look funny. 

What if I have the change of color go from left to right instead for the bodice only and then have it change from top to bottom on the skirt?  But then I still have to decide about the light blue at the knees issue.

Thoughts anyone?

Reframing


I’ve been ruminating again on process.  How sewing is all about process.  How I abhor process and yet keep picking activities where process is the main theme.  And it got me to thinking about how I would rather skip from A to Z without learning about all the letters between.  Z being an expert sewist who makes no mistakes and never has a wadder. 

Although I intellectually understand that mistakes are learning experiences, I still want to be the person who never makes a mistake.  The one who never creates a wadder. 

But what if we reframe the term wadder so that it has a positive meaning rather than a negative one.  What if we thought of wadders as badges of honor.  As proof that we have learned something along the way.  As proof that we took some risks, that we had faith in our abilities.  I look at Carolyn who recently stepped out of her TNT comfort zone and tried a new pattern.  She didn’t like her first dress with this new pattern (although I thought it looked fab), but she’s already changed the pattern and is going to try it again. 

I have always feared failure and wadders, sewing ones or otherwise.  You see, I’m a perfectionist.  Perfectionists don’t like mistakes.  I once told a mentor of mine that I couldn’t possibly be a perfectionist because I wasn’t perfect yet.  As soon as the words left my mouth, I realized that I was one.  Don’t get me wrong, I am not a perfectionist in every part of my life.  I do pick and choose my battles.  High on my list is loading the dishwasher perfectly, but my apartment is far from neat.  I will settle for a zipper slightly off at the top, but not at the bottom.  I will jury rig a lining so that it won’t show below the hem of the fashion fabric, but take a finished garment completely apart to fix it. 

But what does perfectionism do for you?  For me?  Nothing good.  The bad it creates (anxiety, fear, disappointment), cannot be good for me.  In fact, it’s what holds me back.  It’s why I am so slow to start each new project.  It’s why I procrastinate.  It’s why I hired my teacher Thea.  I wanted her there for every project, each step of the way, so I wouldn’t ever have a wadder. 

What is there to be afraid of though?  Am I going to let my perfectionism or negativism stop me from learning?  From progressing from a beginner level to a couture level (who knows if I will ever get to that level, but I will keep trying)?

So, I am going to reframe my sewing world.  I am going to be positive.  I am going to embrace wadders for what they are, as pieces from which I learn a lot, like what not to do or how to do it better. There’s enough negativity inherent with sewing when you throw body image into every aspect, from fitting your patterns to what size you are in pattern sizing.  Why make a learning experience a negative thing? 

What do you think?  This is the question of the day.  Should we reframe the term wadder?  What should we call it?

Happy wadding everyone!

What I did on my summer vacation

Warning:  Really long and picture heavy post.  

As I mentioned in my last post, I am on vacation this week.  I always take the week of Jack’s birthday off and my parents come and visit.  We’ve had a great time so far.  Me especially.  I took advantage of every down minute I had to work with my wondrous new fabric from Elliott Berman (Lindsay T did an excellent review of this store).  I visited their showroom last Friday with Lindsay T, Carolyn, and Allison.    

at Mood fabrics

At Elliott Berman

I walked out with this beautiful, beautiful fabric by Christian LaCroix.  It’s the most expensive fabric I’ve bought to date.  Now I know a lot of sewists save their expensive fabrics for special projects, but I knew right away what I was going to make with this fabric, a pencil skirt.  This fabric needed a simple pattern that would showcase its beauty and a pencil skirt with no waistband fit the bill perfectly.  And wouldn’t you know, but I just so happen to have a pencil skirt pattern ready to go, Simplicity 2452.  

If you will recall, I wanted to tweak the pattern a bit the next time I made it, so I went ahead and added my tweaks.  I changed the side zip to a center back zip.  I changed the vent to a slit.  And then I….  

Wait, are you sitting down?  

Ok, I. DRAFTED. MY. OWN. FACING.  Did you hear that?  I drafted my own facing.  No really, I did.  Ordinarily, I would pester or hound email Thea or Karen for advice on how to do a facing.  Or I would google it for hours on end.  But not this time.  I had a deadline —  a family dinner at a French restaurant on Wednesday night.  Come hell or high water I was going to wear my Christian LaCroix skirt to that dinner.  So, I just did it.  No ambivalence.  No over thinking the problem or task at hand.  I just drafted a facing.  I laid out my skirt (at this point it was mostly constructed and I am slightly going out of order here in the telling of this tale, but that’s my prerogative, isn’t it?) and flattened it out as much as possible.  I traced the top of the skirt onto pattern paper and cut it out.  I meant to make a two inch facing, but forgot to include one of the seam allowances so it ended up being a 1.5 inch facing.  Hey, cut me some slack!  This was my first time drafting anything.  Sheesh!  I chose to add a facing to this pattern as I didn’t really like the twill tape method that I used (per the instructions) in my last skirt.  Let me tell you folks… The facing is a superior method.  My skirt feels so nice on and really sturdy.  I interfaced it as well so it’s really substantial; that waist is not gonna stretch out.  No way!  

self drafted facings

finished facing

For the other beginners out there who have no idea how to draft or prepare lining patterns, I will explain how I went about creating the lining for this skirt.  If I wasn’t adding a facing, I would just used the skirt pattern pieces and be done with it.  But I since I did add a facing, I had to deduct area of the facing from the area of the lining.  I thought about using the same method of laying out my skirt shell and copying it with tracing paper, but with the darts, it was already a 3D garment.  So what I ended up doing was the following (I didn’t have time to research another way, so if there is a better method out there please let me know):  I constructed the lining the same as the skirt, including the stay stitching and all the darts.  Then I sewed another line of stay stitching 3 inches down from the top of my prepared lining.  Once that was done, I cut a 1/2 inch above that.  That way I included my seam allowance and it was exactly where the facing left off.  When I sewed them together, they matched flawlessly.  Ta-da!  

I did ask Lindsay T for some advice in handling this fabric as I know she’s had a lot of experience with fancier fabrics and she had seen and felt the fabric in person.  She suggested that I underline it with organza.  I didn’t have any organza or time to shop for it.  So I punted and used some ivory cotton batiste I had on hand.  I cut it out exactly like the skirt pieces, no added width.  I didn’t know at that point that I could have french seamed at the same time as underlining; I found that out after I google for underlining tutorials.  Laura Lo has a great tutorial (and can I just take a minute to say how much I really miss her blog.  I love her sense of style and the great tutorials she provided and, most of all, seeing all the beautiful clothes she made).  Since my fabric was real ravelly, I knew I was going to serge the SA’s anyway.  So I serged them together with the batiste.  One note: I did construct the underlining separately from the fabric before basting.  And I pressed the darts the opposite direction of the fashion fabric.  


Another thing that I had to differently for this special fabric was I had to thread trace the darts as chalk or tracing paper would not work on this weave.   This worked really well, but was time consuming.   

darts are thread traced

Basically this skirt was easy to sew, but with the underlining, the facing and lining, I added a lot steps to the process.  I think with all the hand sewing I did (basting the underlining, attaching the lining to the zipper, tacking down the lining to the slit, hand sewing the hem, etc) I have over 20 hours clocked in on this skirt.  But I love it.  This is my princess skirt.  I feel so pretty wearing it.  It feels substantial.  It is the most professional garment I have made yet and I am really proud of it.  

Now for some more pictures…  

Front

The only cutting error I made was on the front, but it’s really minor and I think only other sewists will notice.  I was so careful to cut on one of the lines of the pattern for the hem, but didn’t notice or line up the diamonds in the center of the skirt.  I was more careful with the back.   

back

On Monday, I dragged took Jack to P&S Fabrics in search of suitable matching lining for my skirt.  He was a good sport about it.  I bought a lot of lining actually as it was only $2.50/yd there.  I only bought 1 yd of the lilac though as I thought I wouldn’t probably use it again.  I found some lilac stretch lace in my lace stash; it was a perfect match.  I’ve always admired Carolyn’s lace hems for her linings and wanted to try it out.   I love it and will definitely do it again and again!

lining with lace hem

I used an invisible zipper and inserted it perfectly on the first try.  I hope I’m not jinxing myself for future zippers.  My only difficulty is getting the top to be even.  Hmm… not sure what’s going on with that.  The fabric lines up beautifully though and there’s no puckering at the base, so I am happy with it.  

invisible zipper with hand stitched lining

invisible zipper, check out that fabric matching!

I forgot to mention that I used the “wrong” side of the fabric.  While I adore the much more silvery “right” side, it was just a little too blingy for every day use.  Since I want to be able to wear this to work, I used the side that had more black showing than silver.  *Sigh*  

Are you sick of the pictures yet?  

hand sewn hem

Slit interior, lining is tacked onto the fashion fabric

And now for some pictures of the skirt on me, courtesy of my sister.  Thanks Mer!  


If you’re still here after this long post, thank you!  I am so excited about this skirt.  It has a lot of firsts in it for me:  

  • Drafting!  Wow, still can’t believe I pulled this one off.
  • Underlining
  • Lace hem
  • Working with very fancy fabric

Thank you’s are warranted for Lindsay T, Carolyn, Karen and of course, where would I be without my fantastic teacher, Thea.  Thank you all for your patience and for sharing your expertise with me.  

I did wear my skirt to dinner this past Wednesday and love it.  I am going to wear it to Jack’s bday party too, inappropriate  though it might be for a 3 yr old gymnastics party.    😉   

Not sure what I’m working on next, still basking in the glow of this project.  Happy sewing to you though!