Monthly Archives: July 2010

Still here (small update)

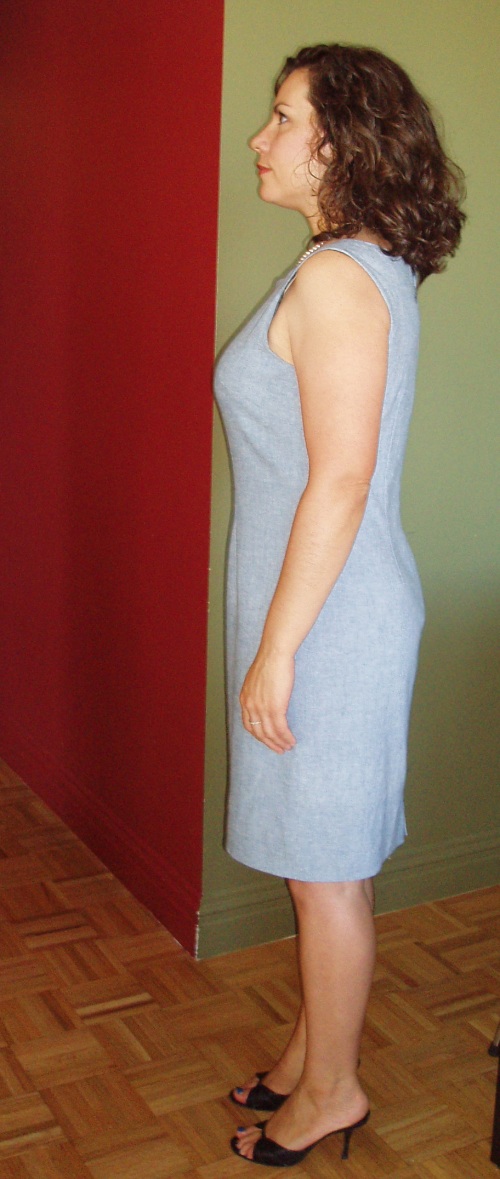
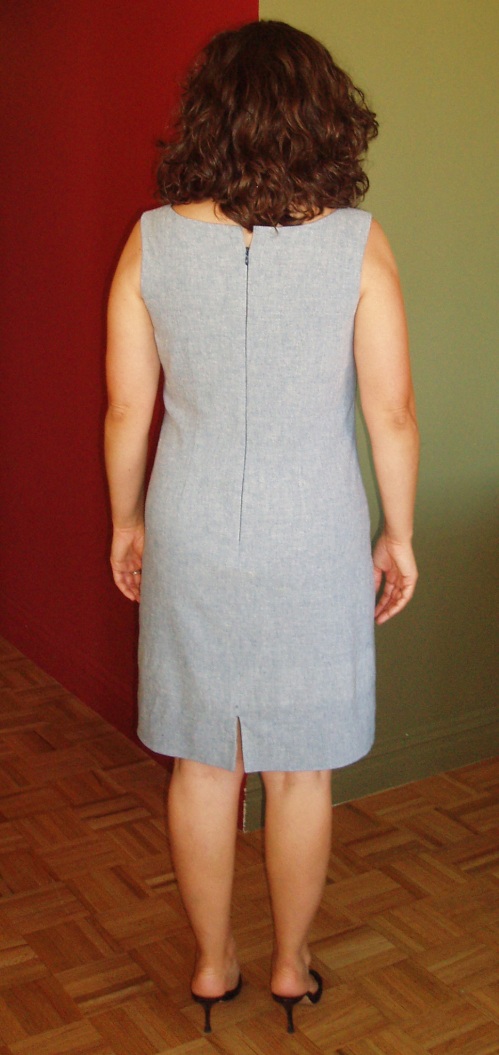
but not much more progress yet.  After I posted the in progress pics of the second B5147 sheath dress, I changed the darts a little, pulling up about 1cm from below the dart and incorporating it within.  That took care of the bust drag lines.  Then I jiggered the side seams until it seemed right.  I really like the fit on this dress.  Not too tight, not too loose.  I’d like it even better if I didn’t have a pooch, but oh well.  I have about an evening’s worth of work left on this dress before I wear it. 

BUT, it is/was my birthday week and now I have a friend staying with me until Tuesday.  It’s not looking good for this little dress to be finished by Monday.  But you never know. 

Until then, happy sewing everyone!

ETA: Thank you for all the wonderful birthday wishes!!!

A Non-Tutorial on Grain and Fit Check

Thea was over this weekend to give me my remedial lesson on how to find the grain in fabric.  Until now, I have just been matching selvedges, working with a lot of knits and just plain hoping my fabric was on grain.  To be honest, things have worked out so far, but I didn’t want to chance ruining my new silk twill border print dress.  I didn’t want to spend all that time making a beautiful garment only to have it twist on me due to being off grain. 

So Thea showed me how to fray the fabric until you find the straight grain all the way up and down the fabric, meaning no threads left that are shorter than the entire width of the fabric.  Even matching selvedge to selvedge, my fabric was off grain by almost  a whole inch on one side!.  That could have put a serious twist in how my dress would have hung on my body and there would have been serious shouting!  😉  

To fray the fabric, you pull threads one at a time from one selvedge to the other side until there are no more threads to pull.  This is an easy method, but it takes a long time…  I think fraying this fabric took me at least a good 1/2 hour, maybe even 45 minutes.  And you have to find the grain for each pattern piece you cut out.  That’s a serious time commitment my friends.  But as I said earlier, it is important to cut out your fabric on grain.  Good prep work in the beginning means smooth sailing and wearing later on, so it’s worth it to put in the effort now and have no regrets later.

There is another method, but it takes some practice.  Snip into your fabric at the selvedge and pull one thread all the way out.  The difficulty with this method is not breaking the thread before you have pulled it all the way out.  Ask me how I know.  🙂   I was discussing it with Claudine over email yesterday and she suggested cutting as you go so if your thread breaks you can find it again.  Great idea!  I will definitely use that helpful hint in the future as this method is way faster than fraying the fabric.  Actually it was Claudine that started me worrying me thinking about grain issues in the first place.  Here’s an example with a pulled thread…

Ok, once you’ve found your grain, you need to adjust your fabric so it’s on grain and then you cut out your fabric!  How do you do that you ask?  Well, you use your handy dandy quilting ruler or some like thing.  Fold your fabric over enough to fit your pattern piece on it and then measure down from the pulled thread or fringe equally all across the width of your fabric pinning as you go to maintain integrity.  It’s as simple as that!

And voila!  You will then have fabric that’s perfectly on grain and ready for cutting!

Now, I need your opinion please.  I pulled a 5 hour sewing sweatshop last night and got a significant amount of my second Butterick 5147 dress done.  I basted the side seams and now need to determine if I need to make any tweaks.  Working with a non stretch fabric is very different for me especially in such a fitted dress.  Wow!  I think it might be too fitted now in the back and waist.  Here are some pictures of it basted and unhemmed.  Please let me know if I need to release the side seams a little. 

Happy sewing everyone!  And happy universal holiday too!  (it’s my birthday today and I’m going to wear my Christian LaCroix skirt)  🙂

Pattern Review – Butterick 5147

Butterick 5147


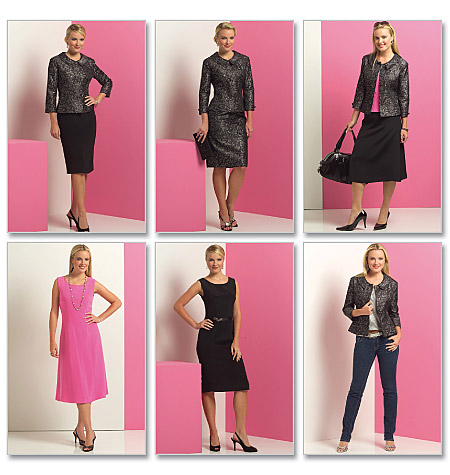
Pattern Description:  Lifestyle Wardrobe: Misses Jacket, Top, Dress, and Skirt. Slim fitting dress C has front and back darts, back zipper and back slit, length is 2 inches below mid-knee.

Pattern Sizing:  BB (8-14) I made the size 14 with some small alterations (see below)

Did it look like the photo/drawing on the pattern envelope once you were done sewing with it?  Yes, but not as close fitting.

Were the instructions easy to follow?  

  • Yes for the most part.  I liked the order of construction they set out as it provides a beautiful clean finish on the inside.  However they do not tell you to stay stitch the neck and my neckline stretched out.  I should have listened to my inner sewing voice and put in stay stitching.  
  • For the fish eye darts, I recommend starting the stitching line in the middle of the dart rather than at one of the two ends (thanks to my commenters for this tip!).  This allows for more accurate sewing at both ends of the dart for a beautiful taper resulting in no bubble at the tips.  Don’t forget to make your stitch length smaller at the ends of the darts! 
  • The instructions for finishing the slit with the lining and dress hem joined together are great!  I didn’t understand them at first by just reading them, but if you follow them step by step, you’ll understand.  I am visual person, so reading wordy stuff doesn’t always make directions apparent for me.  My one caveat about the slit instructions is that you should finish the raw edge of the hem long before you get to this step, like before you start constructing the dress with zigzag stitching or by serging.  Ask me how I know! 
  • One more note:  Understitching the lining of the slit is really hard to do on the machine.  It’s doable but difficult to maneuver all the fabric into just the right position.  It’s far less of a headache to just understitch it by hand and quick too. 

What did you particularly like or dislike about the pattern? 

Likes:

  • I liked that the pattern was pretty true to size according to the measurements given on the pattern envelope. After the 6 inch debacle, it was such a treat not to have a nasty surprise when making the muslin on this dress.
  • Love this sheath dress.  I think it’s very flattering (much more so in real life than in the following pictures) and is such a great staple to have in the work wardrobe.  Depending on the fabric you use, this dress can be a statement piece or an elegant foil for some great accessories.  I think everyone looks well dressed in a well-fitting sheath dress.
  • I love this neckline.  It’s not too high, not too low.  I hate necklines that are high and rest on my clavicles (I feel like I’m being strangled!), so this neckline is just right for me and Goldilocks.

Dislikes:

  • None!

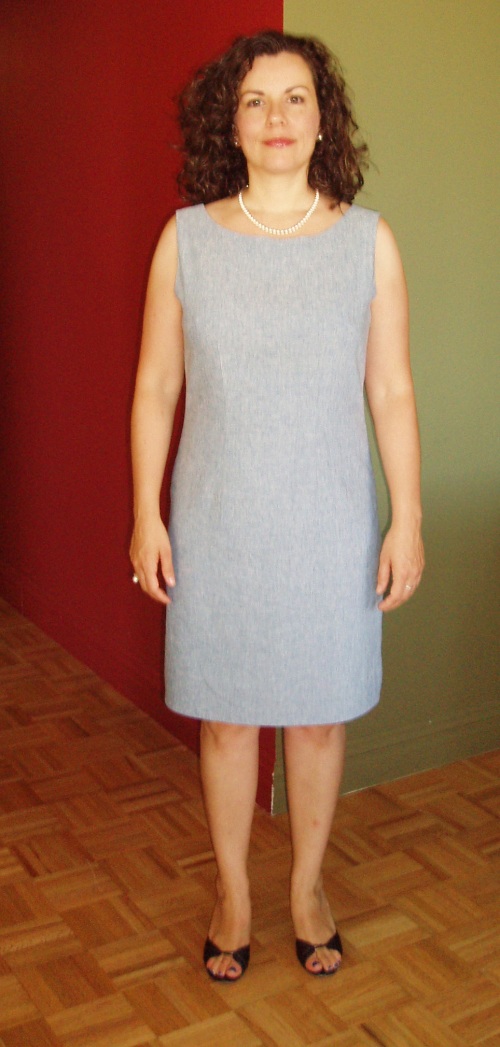
Fabric Used:  I just bought this fabric from Paron’s last weekend.  I am so proud of myself for using it within a week of buying it.  It’s a stretch chambray.  Not to get all philosophical on you, but I liked the juxtaposition of using a traditional work horse fabric for an elegant sheath dress.  I wore it with pearls today and I think by accessorizing the dress like it was made with silk really elevates the fabric from it’s humble origins.  I love chambray; it’s so soft and comfy.  I do have to mention, however, that I am not a fan of stretch wovens so far.  They are a little tricky to work with as they grow as you handle them.  I had to take in the side seams to accommodate the growth during construction, despite having made two muslins beforehand.  Also, the feel of the fabric doesn’t feel as natural as a plain cotton would, a little rubbery.

Pattern alterations or any design changes you made:  During the muslin stage, I had Thea help me with fitting, as I mentioned in my last post, the changes we ended up making were not even close to the ones I thought I would make.  I thought all I needed was a swayback adjustment, but we took out an inch from the shoulders of the back pattern piece.  The strange thing about this was that it didn’t significantly change the shape of the armscye AND I didn’t need to add that inch back in at the back hem.  Go figure!  Then added a ¼ inch at the side seams to add a full inch of ease to the dress.  Also, my left hip is not as curvy as my right, so I straightened that curve and took it in another ¼ inch to fit my hip better.  As I mentioned above, my stretch fabric grew with handling so after I basted in the side seams, I had to take in both side seams another ¼ inch again to accommodate the fabric.  The only further changes I might consider making is making it a little more fitted like it seems to be on the pattern envelope.  But I will decide this after wearing it for a full day.  It’s comfortable as is now, but maybe a little more fitted might be even more flattering?  Who knows.  It could just end up emphasizing the pooch and who wants that?  Not me!  I wish I worked with people who sewed, so I could ask their opinion.  *sigh* 

Would you sew it again? Would you recommend it to others?  This dress  was made as part of the Butterick 5147 Dress Sew Along that Carolyn and I started (still going on for another few weeks – please join!)  It was on my list to try as a potential TNT (tried n true) pattern for my work wardrobe.  Since I consider it a success, I will definitely be sewing it again and again.  There are only two pattern pieces and four darts.  Can it get any simpler than that?  I definitely recommend it to others.  I think it will flatter most figures after adjusting for each individual’s fit.  And the directions are great (aside from leaving out a couple of important steps mentioned above).  I definitely think a beginner could handle this pattern if they have a good sewing reference sitting beside them. 

Conclusion:  This dress has become my second TNT in my TNT quest for a work wardrobe.  I love the fit, the elegant silhouette, and the fact that the fabric is the star of this pattern.  You will not look like you are making the same dress over and over if you use vastly different fabrics.  I plan to make this again right away using my new silk twill border print (also bought at Paron’s during the same visit last week).  Can’t wait!!!!!  Also I absolutely adore the jacket included in this pattern.  I hope to make that sometime in the near future.  I have a lot on my plate now, but that jacket is definitely on my horizon.

Now for some pictures…  Thanks to my sister taking them this morning even though she was rushing to get out the door!  This is how I wore my dress at work today.  I don’t have any construction pictures as I didn’t do anything too different or awe inspiring to document them.  Besides, this dress is all about getting the right fit, not how you hand sew the hem. 😉 
I’m going back to remedial sewing school with Thea this weekend and cutting out my precious silk twill under her wise tutelage.  I had some grain issues with my first iteration of this dress and I don’t want to chance ruining my silk twill dress.  Hopefully, by this time next week, I will have another new Butterick 5147 dress to show you all!

Happy sewing everyone!

Some progress

I made some good progress on my first iteration of Butterick 5147 this week.  I cut into the stretch cotton chambray and started sewing it.  Since I noticed that the neck was looking a little on the gapey side, I basted the side seams to check the fit of the dress.  Intellectually, I know that different fabrics will behave differently with the same pattern, but the reality of it still annoys me a little bit.  I would like one thing in life to be a little predictable please! 

I remembered to make the left hip side seam a little straighter on the curve having used tracing paper to copy both seam lines (the straighter for the left side and the curvier for the right side) on my muslin pattern piece.  That side fit perfectly.  Yeah!   But, surprisingly, I needed to reduce the right side as well.  Go figure.  I guess this stretch woven needed a little negative ease for this pattern.  Live and learn I guess. 

Trying it on, I was pleasantly surprised with how this dress looks.  It looks just like a real dress!  It always seems like a miracle when something I sew actually looks like it’s supposed to look.  So funny.  I just don’t trust my skills yet.  And there’s something about the process where it’s hard to see the forest for the trees.  You’re concentrating on this tiny detail like the bust dart and worry that it’s too pointy, and then you try it on and the whole is more than the parts.  A minor miracle.  I love it!

See for yourself; some in progress shots of the as yet unfinished dress (again fuzzy pictures — stupid camera)…

I still have to do the following before I can wear this dress to work:

  • sew the back seam of the lining
  • attach the lining to the zipper
  • hem the lining and the dress (not sure if I am going to hem the dress by hand or not)

I am pleased with the fit of the dress, aside from the neck gaping issues which cannot be helped at this stage of the game.  I have minimal drag lines at the bust.  And the dress is comfortable to wear and sit in; so the ease is spot on.  It wears very differently than the muslin though, in a good way. 

I am dying to try this pattern in a regular woven next.  But I think I need remedial lessons on cutting on grain.  I am booking Thea pronto.  I tried so hard to cut the lining on grain and thought I was successful, but in working with this dress, it became immediately apparent that I did not cut it on grain.  *sigh*  Of all the different tasks one has to do to sew a garment, finding the straight of grain is my least favorite and most time-consuming task.  *double sigh*

Happy sewing everyone!

Accidental fabric purchases

A friend was in town from Canada today and I gave her a tour of the garment district.  Knowing that I will be shopping again soon (fyi, there’s a NYC PR Shopping day on August 28th, check it out!), I was very frugal.  Honest!  I only bought two fabrics, invisible zippers and a separating zipper for Karen.  Oh and I got a twin stretch needle!  Yippee!

For some reason, my pc ate my picture of the stretch cotton chambray I bought and I’m too lazy to take it and download it again (my pc is really old and crotchety, just like me).  This will be used for my first iteration of Butterick 5147.  I finished the second muslin last night and I love it!  Now I just have to decide if I want to use cotton batiste as the lining or not since I want to be able to wash this dress and not dry clean it.  Hmmm….  Game time decision I think.

The second fabric I bought I almost didn’t buy.  It was a little on the expensive side for me at $18/yd, but the cutter game me $2 off per yard, so it was definitely worth it in the end.  It’s a silk twill border print.  It just spoke to me right away.  I am really into silk twills lately.  I just love the hand, the feel, and the drape.  What’s not to like about silk though right? 

But enough of the wordy stuff… Here’s the picture of my latest beautiful fabric.

silk twill from Paron's

Happy sewing everyone!

Muslin Surprise

Thea was over last night and we worked on fitting my muslin for the B5147 dress.  Remember how I said that it probably only needed a swayback adjustment?  Well, I was completely off the mark.

If you will recall, I needed to set in the zipper better, so I basted that in more accurately and tried it on again.  As soon as I saw it on me again, I knew no swayback adjustment was necessary.  Then Thea went to work on helping me fit the muslin.  Here’s what we did:

  • raised the back 1 inch (need to remember to increase the bottom by one inch to compensate)
  • added 1/4 inch at the side seams for a total increase of 1 inch
  • my left hip is much straighter in shape than my right hip so I straightened the curve and took in that side seam a little more because it was pooching out
  • lowered the bust dart about 3/4 inch and changed the angle a little lower as it was too high for my bust
  • raised the hem by about 6 inches (man! this dress is long!)
  • changed the back sleeve shape decreasing it about 3/8 inch
  • decreased the side seam under the arm about 3/8 for a closer fit (might add some back as it’s a little tight across the back)

Here’s what the muslin looks like so far.  We only made the changes to one side of the muslin (my left, your right as you look at the picture), although we let out both side seams and raised the back on both shoulders originally.

It looks pretty good as is now, but I still want to tweak it a little further.  I think I overfitted in some areas and removed too much ease.  While I can still sit down in the dress, it’s a little too fitted looking and for my liking.  Also, I still have drag lines pointing to the bust.  I have solution to that (see below).  So here’s what I have to do next:

  • add an inch to the hem of the back pattern piece to account for raising the back
  • add a complete 5/8 SA to the pattern pieces since I let out the side seam by a 1/4 inch
  • add back in a pinch at the left hip SA due to over fitting
  • add a little less than 1/8 inch to bust dart tapering to the point
  • add back about 1/8 inch to under arm SA to get better ease for the back
  • now that the back is raised, I have to cut down the back neck 1 inch to the original placement

So once I have made all those changes and check the fit one last time, I am ready to use this muslin as my pattern.  Once I’ve made sure all the marks are made, I can cut out my good fabric.  I still haven’t chosen which fabric I will use to make my first iteration of this dress.  So many to choose from!  But that’s a happy problem.  And folks, yes, this will be my TNT sheath dress pattern.  I love it!!!

Thoughts on the fitting process: 

  • I’m really glad that I had Thea to help me fit this dress.  I would never have known to raise the back at all; it would not have occurred to me in a million years.
  • I think you really need a fitting buddy, preferably someone who is knowledgeable, if you’re a beginner like me.
  • the change you need is never the one you think of initially, at least for me.  This is NOT intuitive for me at all.
  • It’s almost never just one change.  One thing leads to another to another.  😉 

But the most important lesson learned?  Fitted garments are flattering, no matter what your shape!

Happy fitting everyone!

Pattern Sale Alert!!!

Joann’s has Butterick patterns on sale for 99 cents apiece starting July 18th through the 24th. 

Butterick 5147

Get thee to Joann’s and buy Butterick 5147 and join our sew along!!!

Muslin Success!

Butterick 5147

Last night I cut out and sewed up my muslin for Butterick 5147.  Obviously I didn’t include a lining for just a muslin.  And I have to say I count this muslin as a success!!!  Sorry, I don’t have pictures yet.  I just did a hasty (read sloppy) zipper insertion, so I need to clean that up before getting a real assessment of the fit.  But…  I think…  All I need is a slight swayback adjustment and maybe some adjustment for the back neck gaping I saw.  Although I will start with the swayback and see if that takes care of the neck gaping, which it could, who knows!

I was so excited at how well this muslin fit that I booked my teacher Thea tonight to help me with the fitting issues.  I will take pictures of before and after so you can see the muslin.

For reference purposes, I am making view C, the black sheath dress in the picture above.  Here’s the line drawing:

B5147 Line Drawing

It has bust darts and fish eye darts at the waist in front and back.  I’ve never sewn fish eye darts before and did not have an easy time sewing them last night.  It was hard to start them off at the right point precisely.  Anyone have any tips? 

So far my verdict on this dress is that it’s a real winner.  I love the neckline (not too high or too low), the shaping is excellent, the ease is spot on (I tried sitting in the dress – no problems), and I think it’s very flattering (even for this post-partum body).  I have to say I was pleasantly surprised.  I really thought fitting this dress would be a nightmare.  I thought I was going to have a nasty surprise on the sizing since I just had the 6 inch debacle last week.  I cut out a sz 14 and don’t need to add any inches anywhere; just take some out of the back for the swayback adjustment.  How cool is that???

I have no idea yet what fabric I am going to use.   I will have to shop my stash.  

I will most likely make my version with a hem above the knees to look more current with how people are wearing skirts/dresses these days.  I have to confess, I feel funny about my knit dresses with hem lengths below the knees now.  I am so excited about this sew along.  If this dress can make a post partum chick look good I think it will make anyone look good.  You have to try it out.  Join us!  The Butterick 5147 Dress Sew Along

Oh and one more thing…  I think this dress is definitely TNT material for me.  This will be a great dress for my work wardrobe.  And it’s soooo easy; only 2 pattern pieces (4 including the lining). 

Happy sewing everyone!

News and a New Sew Along

First, let me tell you what I have been super excited about for a few days now.  I had been thinking about getting a coverstitch machine lately, but they’re crazy expensive and to be honest, I don’t know how much I would really use it.  Also, everyone I have talked to about it has said that you can hem knits using a twin needle.  Even the owner of Sew Fast Sew Easy said that very same thing when I called in asking her about coverstitch machines.  So I guess I am going to table that idea for a while.

But over the last couple of weeks I have been searching Craigslist for sewing machines.  Again, originally for a coverstitch machine, but then I got it into my head that I wanted a Singer Featherweight machine.  They’re portable, they have a great reputation and you can find them used pretty easily.  I found one in the New York area, but they wanted about $275 for it if I remember correctly.  I pestered consulted with Cidell whom I know to love Featherweights.  She said I could definitely find one cheaper and to wait for it.  Cidell also suggested expanding my search to cities where other family members live to see if there were any there.  SHEER GENIUS!!! 

I found one right away where my parents live for just $125.  My mom (Thank you Mom!) checked it out, proclaimed it worthy and got it for me for just $100!!!  The tension was a little tight so good ole mom even took it in for a tune up.  I should have this lovely little machine in my hands in September when Mom and I meet up in the midwest for a family wedding.  I CAN’T WAIT!!!  Do you want to see my cute little Featherweight???  Here she is…

My Brand New Used Singer Featherweight

Isn’t she a beaut?!  She comes with a huge assortment of attachments including a ruffler and a buttonholer.  Mom wasn’t sure what the others were, so that will be fun to investigate when I have them in hot sweaty hands.  Could I possibly use these feet on my Viking machine?????  Does anyone know?  Remember, I have a wish list to fulfill.  She (the machine, not my mom) comes with the original manual and the original registration too.  Can you believe it???!!!  I seriously don’t know how I am going to wait almost two months for her.  *big sigh*

******************************************************************

Butterick 5147

In other sewing news, Carolyn emailed today with a fantastic suggestion, a Butterick 5147 Dress Sew Along!!!!!  How cool is that?  She said she had that pattern in her stash already and wanted to make it too.  I’ve already set up a flickr group for the sew along.  I’m so excited.  I would love for you to join us and to see all the beautiful dresses we make together.  Do you want to join us? 

Here’s how it will work:

That’s it.  How simple is that?  I’m cutting out my pattern tonight!  Hopefully I’ll have the muslin done by this weekend and see what changes I need to make.  Hopefully the changes won’t include the need to add 6 freaking inches to the side seams!!!

Join our Butterick 5147 Dress Sew Along!!!!  Do it!  🙂

My light bulb moment

Or how Carolyn made me come to Jesus.  Carolyn and I were trading emails today about work wardrobes.  I told her that the nude dress she made in recent months was a light bulb moment for me in sewing.  Here I was trying all these patterns with some sort of bling in the details.  Remember my first Burda pattern, the skirt with the drape pleat?  How about my attempt at the Knip Mode skirt (or what Thea called my Crazy Skirt)?  And then Carolyn sews this simple yet elegant and beautiful nude dress.  She looked fantastic, svelte, and so classy.  And oh so perfect for the environment in which we both work, finance.  It was then that I realized I was on the wrong track.  I was being mesmerized by kitschy details when I should be learning how to sew simple and classic things that will work with my real life. 

Then we met up for a fabric lunch at Kashi’s (Metro Textiles) to meet the fabulous Eugenia of Eugenia’s (Fabulous) World of Fashion.  Eugenia is a lovely fellow sewist whose sewing pursuits I have read about for quite a while now.  It was such a treat to meet her since she lives in London, and really, how often does one get to London?  And then a random woman in the store stopped Carolyn (who was wearing her amazing red dress with the racing stripe today!) and it was Opal of Opal’s Passions.  Now I confess, I hadn’t yet come across her blog before, but I am definitely putting it on my google reader list now!  She was wearing that amazing McCalls dress that everyone’s been making lately, M6069.  Now I have to make it too!!!

Here’s one picture, courtesy of Carolyn, documenting our visit (Carolyn is not pictured as she was the one who took the picture.  DUH!).  And yes, apparently I do look that dumpy in person.  Sheesh.  Never wearing that suit again, I can tell you.

The lunch was too short but it was fun.  And productive!  Although I didn’t buy a stitch of fabric (shocking I know!), I left there having been “come to Jesus-ed” by the best of them, Carolyn.  She asked me why I haven’t made any woven dresses and I told her I was scared of fitting them.  And then they all ganged up on me and told me I should get over it and start working on some dresses.  Carolyn and Opal pointed out the obvious that when you make a dress, you have a complete outfit; there’s no need for any other item.  Whereas, if you make a skirt, you have to make a top to go with it. 

Well, I came home all fired up.  I went through all my copious patterns and narrowed it down to three contenders, B5147, B5314, and V8146.

Butterick 5147

Butterick 5314

Vogue 8146


I’d do a poll, but I am already leaning towards B5147 right now.  I think it has all the features I’m looking for: darts for fitting, open collar, but not too daring, and simplicity (the fabric will shine here).  Understated elegance.  And the bonus???  IT’S A LINED PATTERN!!!!  I don’t have to “figure” crap out.  Love. That!

I have some more news, but that will have to wait for another post.  Hahaha!  I’m such a tease.

Happy sewing everyone!  I am about to enter the muslin zone.