Category Archives: Pattern Review

Pattern Review: Simplicity 3584

Here’s my pattern review for Simplicity 3584.

Simplicity 3584

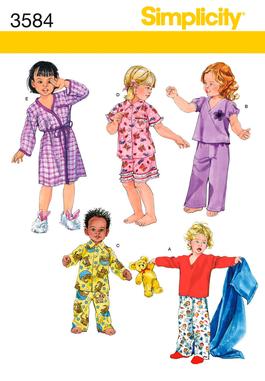
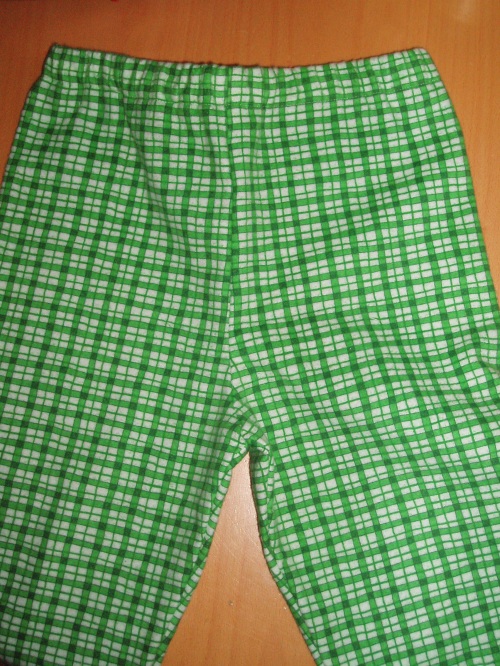
Pattern Description:  Toddler’s Pajamas and RobeI made View C, the flannel pjs.

Pattern Sizing:  1/2, 1, 2, 3, 4 I used the size 3.  The fit was ok.  The pj top could have been longer by an inch or two and the pants were too long.  The hazards of making presents and not being able to fit as you go because they are a surprise. 

Did it look like the photo/drawing on the pattern envelope once you were done sewing with it?  Yes and no.  I didn’t use the button placement markings that came with the pattern.  Instead I used an existing flannel pj top my son had to mark the button placement and I like it better.

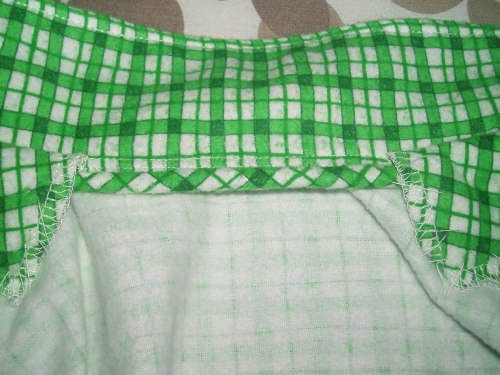
Were the instructions easy to follow?  The instructions were great.  As I have mentioned recently, I am really getting the hang of reading pattern directions now that I am two years into my sewing odyssey.  Again, I warn all sewists no matter how advanced you are, that careful reading always pays off.  They pack a lot of directions into one or two sentences at a time.  So it’s easy to miss something if you’ve never attempted a collar before.  Even with my own careful reading, I made a mistake in how I finished the collar requiring me to make and add bias tape out of self fabric to the interior finish of the collar.

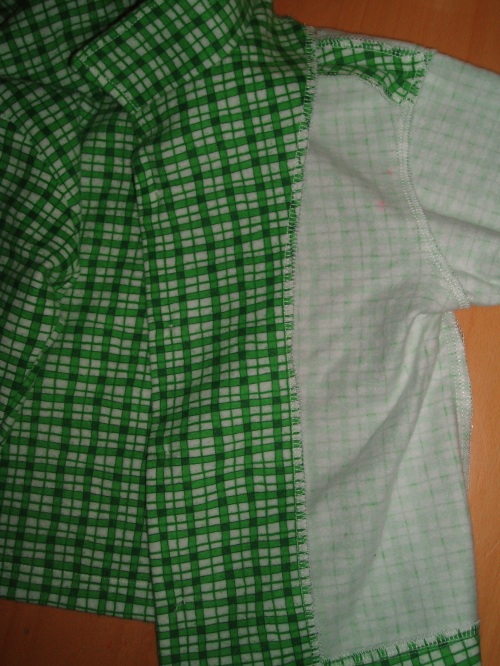
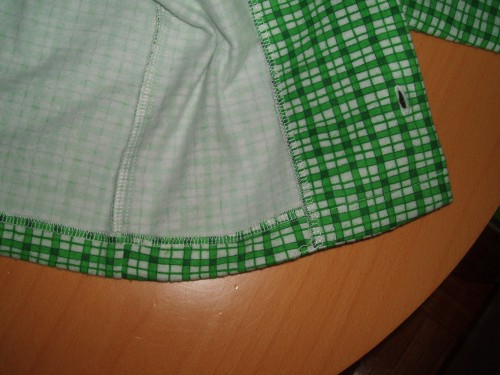
What did you particularly like or dislike about the pattern?  I like how simple the pattern is essentially for a button down pj with collar.  That being said though, it’s still a bit fussy to make, especially if you’re under the time constraints of making an Xmas gift.  I am not sure that not having a collar stand made this easier or not to sew.  I think the end result is not as nice without the stand, but perfectly fine for pj’s and I doubt a non-sewist would notice the difference at all.  The measurements for the waist elastic are way off.  You will need to use your recipient’s waist measurement to approximate the length.  And even then, my elastic was still a little loose.  Also, the facings were too long at the top.  They overshot the shoulder seam entirely, so I had to catch stitch them to the back of the pj shirt (see picture above and below).  Next time, I will check to make sure they line up to the shoulder seam so that I have something to which to catch stitch them.

Any difficulties encountered?  Any difficulties encountered were completely self-inflicted (see note about collar above).  😉   This is a basic pattern.  The only bell & whistle is the pocket (which I placed by lining up the plaid and not using the pattern markings).

Fabric Used:  A gorgeous flannel which had a great hand, was soft and fluffy, nice and thick, and easy with which to work.  I bought it from Fabric.com in November but it has long since sold out.  Sorry!  If I can, I will buy more of it for next year’s pj’s. 

Pattern alterations or any design changes you made:  The only design change I made was the button placement which I mentioned earlier on.  Construction changes were how I finished the interior construction.  I made sure to serge all exposed seams for a nice clean finish.  It looks so nice on the inside.  🙂  

Would you sew it again? Would you recommend it to others?  I will definitely sew it again, making the fit changes mentioned above and being more careful with plaid/stripe matching (my two fronts don’t match up but the side seams do).  It makes such a cute jammie for kids.  I do recommend it for any sewist.  Beginner’s might find it a long and involved project though, but not out of reach skill-wise.  I think, from tracing out the pattern to inserting the elastic on the pants, it took me about 10-12 hours to complete this.  I know I’m slow, but still, that’s a long project for just one Christmas gift.  But don’t say I didn’t warn you when you embark on this pattern. 

Conclusion:  Super cute jammies!  I am very proud of this project.

Handsome Thor

Pattern Review: Simplicity 2311

S2311


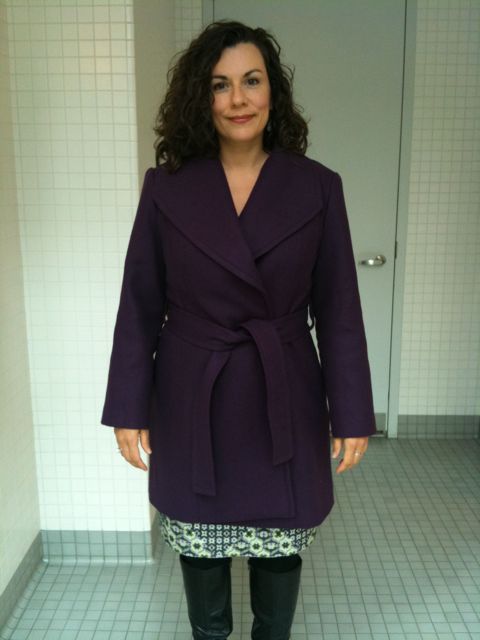
Here’s my pattern review for Simplicity 2311, my beloved purple coat pattern.  I’m officially in love.  🙂  

Pattern Description:  Misses’ Coat in two lengths with collar, sleeve and belt variations.  I made Coat B in the shorter length with the tie belt and wide collar.  I did not include any buttons as my fabric was grabby and the belt was sufficient to keep the coat closed.

Pattern Sizing:  14-22.  I made the sz 14 and found it very true to size with little fitting adjustments needed.

Did it look like the photo/drawing on the pattern envelope once you were done sewing with it?  Yes!  Yes!  Yes! (aside from the different color fabric)

Were the instructions easy to follow?   The instructions were easy to follow if you read carefully.  I found myself skipping on ahead thinking I understood everything perfectly.  It really pays to read and follow along one or two sentences at a time before moving on to the next step.

What did you particularly like or dislike about the pattern?  I LOVED the pattern; it is drafted so well.  The collar did not need any pad stitching to retain its shape.  My teacher said that most RTW collars don’t have any pad stitching, especially when using a fusible interfacing, and I took the excuse and ran with it; the collar came out great. 

The princess seams and CB seam allowed for great fitting opportunities.  I love the multiple opportunities for top stitching, which takes this coat from plain jane to a gorgeous model in heartbeat.  My Emerald 183 has a special topstitching stitch that made my topstitching look so professional.  I recommend loading up on matching thread if you plan to topstitch most of the seams.  I used 3 and a half spools of Gutterman thread for this project.  Top stitching accuracy is easy, if you take it slow. 

FYI: I did not find there to be excess ease in the sleeve head.  Yes, you had to gather, but with a wool fabric, I would expect that.  In fact, I found the amount of ease needed to be gathered quite minimal.  I did not have any problems with puckering nor did I end up with a poofy sleeve.  Love that!

The only dislikes I have, which are minor, are that the hem with the lining attached needs to be tacked to the shell.  That instruction was not included in the pattern sheets.  I think its necessary or else the hem will sag and show the lining.  I will tack my hem down tonight. 

Also, I think some kind of hand stitching in the ditch is needed to join the upper collar/lining/under collar together at the shoulder/neck area so that they act as one piece instead of two pieces that can pull away from each other as you take the coat on and off.  But these are minor points and would probably be obvious to advanced sewists.

Any difficulties encountered?  The most difficult part of this pattern is when you attach the shoulder and collar to the back yoke.  The shoulder and collar form a U when sewn together and sewing that U shape to the squarish yoke is a bit tricky.  You have to pivot at just the right spot making sure not to catch the shoulder in the seam you’re creating.  And then after the pivot, you have to move the collar out of the way to continue.  Just make sure you sew this part slowly and carefully and you will be fine.  I even needed to do one pivot over again, and it was actually easier to do the second time, because the stitching from the first pass allowed me to hold the pieces together better for more accurate sewing.

Fabric Used:  I used an imperial purple wool purchased from FabricMart in Sept 2009 and a silk charmeuse in a coordinating purple color from Metro Textiles purchased in August 2010. 

Both fabrics were a dream to sew.  The wool pressed beautiful.

Pattern alterations or any design changes you made:  The only fitting change I made to the pattern was to sculpt the CB seam to take some of the squarishness out of the fit and give it a more fitted and tapered look from the shoulder blade to waist area (in total I took about .75 inches out tapering to the yoke and waist).  I thought I might need to fiddle with the princess seams in front, but left them as is so I could wear suit jackets underneath if need be.

I did add some interior structure changes to the pattern such as a interfacing all the pattern pieces, and adding a back stay and sleeve heads.  The pattern already called for shoulder pads which I included, but I decided to make my own since I didn’t like the store bought ones that I had bought for this project which were made out of foam.  I just looked at my RTW winter coat to see how its shoulder pads were constructed and did the same.


fused shoulder pad from bottom

Would you sew it again? Would you recommend it to others?  I honestly can say that I would sew this again.  I tend to do only one complicated project a year, so I won’t probably make this again anytime soon, but I love this pattern.  When I make it again, I might place the carriers lower on the coat as I am long waisted.  As they are indicated on the pattern, they fall about an inch or two below an empire waist.  I would like them about an inch lower.  So be sure to check placement for yourself before blindly following the pattern’s placement.

I definitely would recommend this pattern. Maybe not to a beginner as it is a long and involved project (although a beginner could definitely make this pattern; I just think it’s a complicated process to make a coat with many opportunities for frustration), but an intermediate or advanced beginner would definitely enjoy making this pattern.  I think an advanced sewist would enjoy the excellent drafting and fit of this coat and could add more structure and couture details to make it their own.

Conclusion:  Great pattern!!!!  I love my coat and am so proud of the work I put into it and all the interior structure details I included.  I received so many compliments today on my coat.

Quick post with pictures

I am jammed for time here.  I would love to wax poetic about the PR Shopping day this past weekend.  To tell you how awesome it was to meet Robin IRL.  How great it was to see old friends.  But let me get straight to the goodies, because time is short here at Chez Elizabeth.

Our group was so large, we had to split into two groups for the first two stores which opened specially for us, Metro Textiles and Elliott Berman.  I spent most of my fabric budget at these stores. 

At Elliott Berman I bought a Missoni sweater knit which will become a fall tunic (pattern TBD) and a beautiful silk (TNT sheath dress anyone?).

Elliott Berman

Then I really went wild at Metro Textiles.  Kashi had so many great fabrics.  I bought this gorgeous, I mean gorgeous wool silk boucle in gun metal grays and he had a matching silk charmeuse.  I also bought a metallic gray knit for a date night top. 

Metro Textiles

Closeup of boucle

Then I couldn’t pass up this wool knit in purple, my favorite color.  And who could leave there without the ubiquitous border knit?!

Metro Textiles

Let’s not forget the silk charmeuse (on the right in the picture below) to line my fall coat and my first double knit for a, wait for it, sheath dress. I have a feeling one never forgets their first double knit.  *sigh*  On the left, is my only fabric from Parons, a mauve tweed.  I heart tweed. 

Parons and Metro Textile

By the time we reached Parons I think we were all fabric fatigued.  But it was a fun day.  Again, so glad that so many people came to shop from locales far and wide. 

And, now I know you were all wondering if I finished my dress for my cousin’s wedding which is this weekend.  Well….

I did.  I’ll do a full review of all the alterations I made when I am back from the Midwest, but for now…  Here are some pictures to tide you over.

Hope you all have a great week and Labor Day weekend!

Let the shopping begin!

Robin just posted our PR Shopping Day schedule on her blog (on August 28th).  Check it out and join us!  I am still in shock that I was able to get Elliott Berman to open for us on a Saturday.

*doing a crazy happy dance*

B5147 – The Silk Twill Edition

I finally finished it!  But boy do I understand UFO’s now.  If you don’t finish it right away, it is likely to languish for an indeterminate amount of time.  It’s not that you don’t love it anymore.  It’s just about lost momentum.  If I hadn’t decided to enter this dress into the Pattern Review/ASE Natural Fibers Contest, I might not have finished this dress for a long time. 

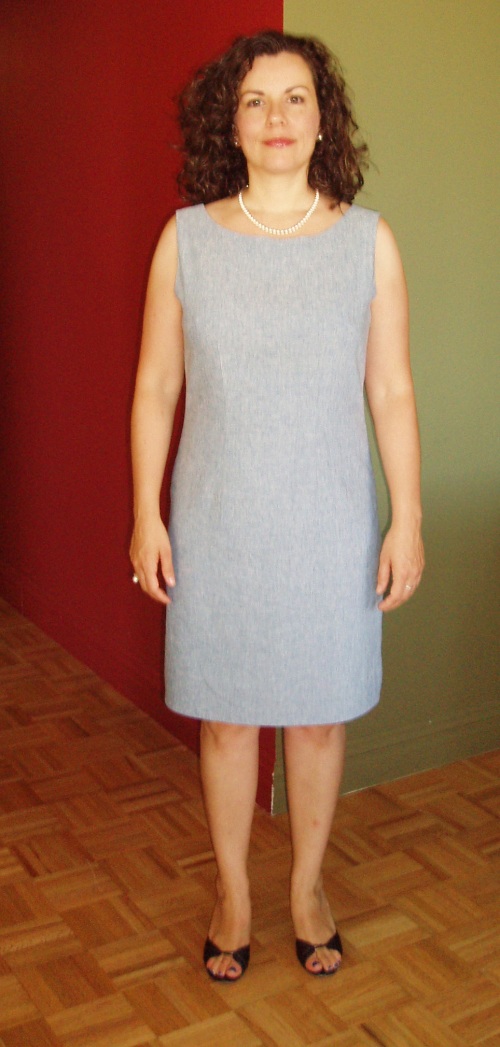
Without further ado, some pictures courtesy of my sister, Meredith.  Although there was a lot of pushing and biting during the photo shoot (our kids, not my sister and me), we managed to get a few shots worth posting.  One note about the pictures first, though, if you will indulge me: I could not get the head on picture to look flattering no matter how I stood.  Trust me when I say that it is much more flattering in person.  Not sure why it looks the way it does.  My sister, a kind soul, said it was the lens she was using. 

No, I did not put in the hook and eye yet.  I hate sewing those on.  But I will.  Maybe…  Someday…  Maybe…  Oh wait, I’m submitting this for a contest.  Ok.  I will.  *shrugging resignedly*

With this version of B5147, I made the following changes:

  • increased the bust dart, at the bottom of it only, by about 1 cm, thereby taking out some (but unfortunately not all) of the drag line that points to the bust area.  Partial success.  May increase the dart more on the next version.
  • I staystitched both the neck and armscye area on both the lining and silk to maintain the shape integrity.  Success!
  • hemmed the lining before finishing the slit lining for a cleaner finish.  Me likey!
  • zig zag finished the silk hem allowance. I thought serging it would be too bulky and show through whenever the dress is pressed.  I thought I would hate the zig zag finish and that it would be inadequate for this fabric, but was pleasantly surprised how well it worked and looked.  An oldie but a goodie method!
  • Again, I hand stitched the hem.  I was worried that even hand stitching would show on this silk twill, but, again, I was pleasantly surprised that it did not.  Yeah!

Some interior pictures… 

finished slit with hand edgestitching and slipstitching

hand slipstitched lining


Now that I have made 3 iterations of this dress (including the muslin), I have some doubts as to it’s viability in my TNT project.  And in case you are wondering at this point, yes, I am very picky. 

Here are my thoughts:

  • even if I adjust the bust dart, I think the shape of the shoulder straps/armscye is wrong for me.  It needs to be a thinner strap on the outside (meaning closest to the arm rather than the body) and/or the armscye needs to be cut in (closer to the body) a bit more.  The shapelessness in that area makes me look larger than I am.
  • the neckline, while being very comfortable for me, is probably not as flattering as it could be.  A V-neck is much more flattering to C-cups and larger as it does away with the “bag o’ boobs” look.

Can I change these things myself?  Maybe.  But, as I have already found out, sometimes you have no idea how a change in one area might affect another completely different area.  And I really don’t want to experiment for months on end.  I’d rather just try to find a sheath dress with the elements I now know that I want and muslin it for personal fit from there. 

What’s next?  I have some baby stuff to make, a dress for my cousin’s wedding, and fall coat.  That’s a lot to accomplish in August, but I gotta try!

Wish me luck!

Paralysis

After professing my love for natural fibers, I came home to sew last night and found myself paralyzed with fear, unable to sew.  I think I talked myself out of finishing my silk twill dress.  Not because I don’t think the fabric won’t be a good boyfriend and behave itself; I think it will.  But because I started thinking about the zipper.  I’ve noticed that the bottom of the zipper in my black and white bamboo skirt and in the stretch cotton chambray version of B5147 protrude a little.  I’m just not sure why.  I can’t figure it out.  And if that happens with this dress I will be very upset.  I don’t want any major flaws.  Little ones I can take because I doubt a non-sewist would notice those, but a pokey zipper?  I think everyone will notice that. 

*sigh*

I think I just have to get over this.  It doesn’t help that I’ve lost momentum on this dress since I last worked on it.  That stupid birthday week and my friend visiting put some distance between me and my dress.  In this case, distance does not make the heart grow fonder.  😉  

I have a work event tonight, so I won’t be able to work on the dress until Thursday night.  Oh, and Robin just reminded me of the natural fibers contest going on now at PatternReview.  Doing a PR contest was one of my goals for 2010.  I’m pretty excited about entering this dress into this particular contest.  The deadline is August 10th.  I definitely can make that.  Maybe this is just the kick in the pants that I need to finish this dress.  Yeah!

In other sewing news, I finally picked out my pattern for the Trench Sew Along!  The new Simplicity Fall line came out and there was a great lined coat in the line up.  I love it!!!  Check out my post at the Trench Sew Along to see the coat.  And if you’re considering making a trench or any kind of coat, please join us (just let me know in the comments and I’ll send you an invite).

Happy fearless sewing everyone!

Pattern Review – Butterick 5147

Butterick 5147


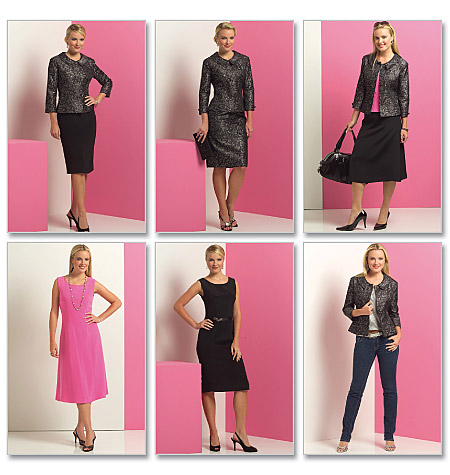
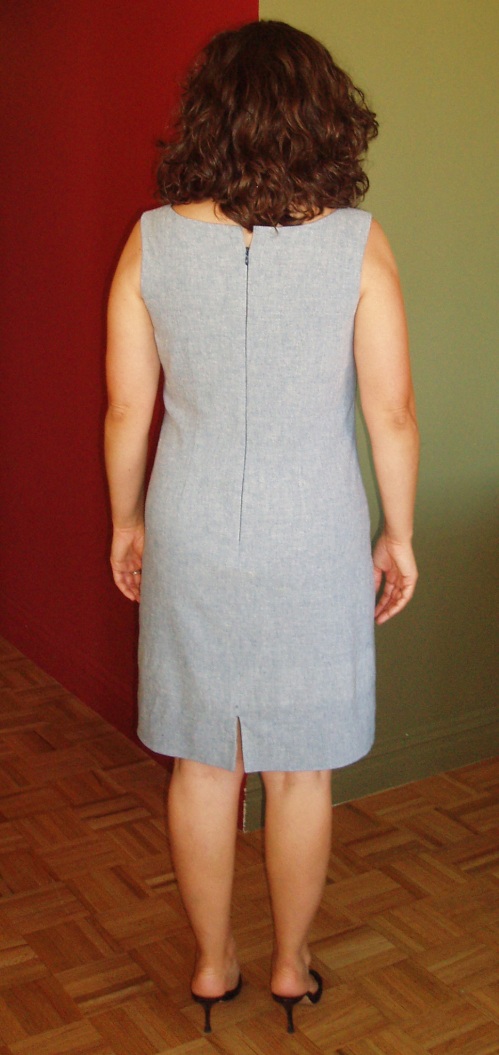
Pattern Description:  Lifestyle Wardrobe: Misses Jacket, Top, Dress, and Skirt. Slim fitting dress C has front and back darts, back zipper and back slit, length is 2 inches below mid-knee.

Pattern Sizing:  BB (8-14) I made the size 14 with some small alterations (see below)

Did it look like the photo/drawing on the pattern envelope once you were done sewing with it?  Yes, but not as close fitting.

Were the instructions easy to follow?  

  • Yes for the most part.  I liked the order of construction they set out as it provides a beautiful clean finish on the inside.  However they do not tell you to stay stitch the neck and my neckline stretched out.  I should have listened to my inner sewing voice and put in stay stitching.  
  • For the fish eye darts, I recommend starting the stitching line in the middle of the dart rather than at one of the two ends (thanks to my commenters for this tip!).  This allows for more accurate sewing at both ends of the dart for a beautiful taper resulting in no bubble at the tips.  Don’t forget to make your stitch length smaller at the ends of the darts! 
  • The instructions for finishing the slit with the lining and dress hem joined together are great!  I didn’t understand them at first by just reading them, but if you follow them step by step, you’ll understand.  I am visual person, so reading wordy stuff doesn’t always make directions apparent for me.  My one caveat about the slit instructions is that you should finish the raw edge of the hem long before you get to this step, like before you start constructing the dress with zigzag stitching or by serging.  Ask me how I know! 
  • One more note:  Understitching the lining of the slit is really hard to do on the machine.  It’s doable but difficult to maneuver all the fabric into just the right position.  It’s far less of a headache to just understitch it by hand and quick too. 

What did you particularly like or dislike about the pattern? 

Likes:

  • I liked that the pattern was pretty true to size according to the measurements given on the pattern envelope. After the 6 inch debacle, it was such a treat not to have a nasty surprise when making the muslin on this dress.
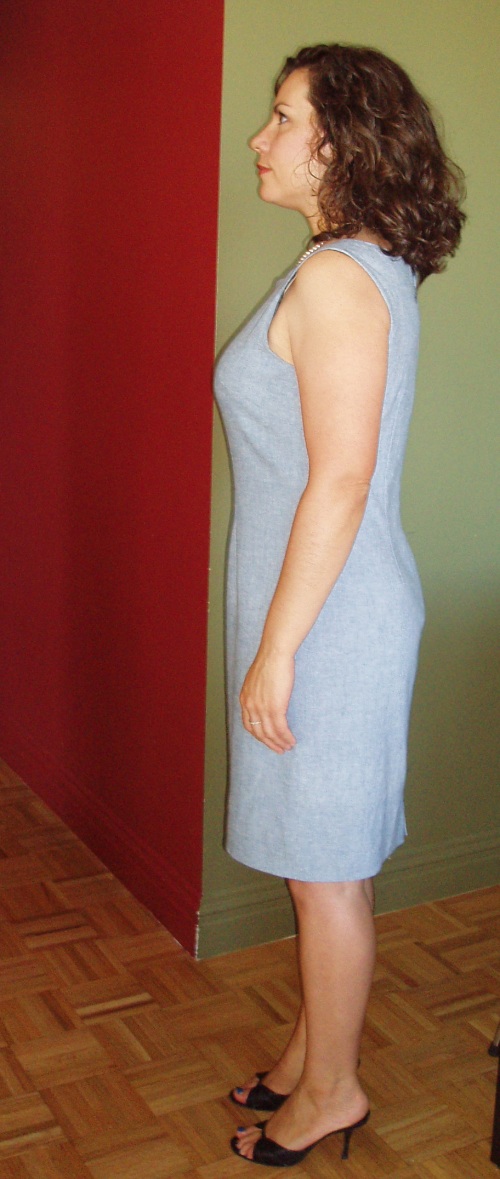
  • Love this sheath dress.  I think it’s very flattering (much more so in real life than in the following pictures) and is such a great staple to have in the work wardrobe.  Depending on the fabric you use, this dress can be a statement piece or an elegant foil for some great accessories.  I think everyone looks well dressed in a well-fitting sheath dress.
  • I love this neckline.  It’s not too high, not too low.  I hate necklines that are high and rest on my clavicles (I feel like I’m being strangled!), so this neckline is just right for me and Goldilocks.

Dislikes:

  • None!

Fabric Used:  I just bought this fabric from Paron’s last weekend.  I am so proud of myself for using it within a week of buying it.  It’s a stretch chambray.  Not to get all philosophical on you, but I liked the juxtaposition of using a traditional work horse fabric for an elegant sheath dress.  I wore it with pearls today and I think by accessorizing the dress like it was made with silk really elevates the fabric from it’s humble origins.  I love chambray; it’s so soft and comfy.  I do have to mention, however, that I am not a fan of stretch wovens so far.  They are a little tricky to work with as they grow as you handle them.  I had to take in the side seams to accommodate the growth during construction, despite having made two muslins beforehand.  Also, the feel of the fabric doesn’t feel as natural as a plain cotton would, a little rubbery.

Pattern alterations or any design changes you made:  During the muslin stage, I had Thea help me with fitting, as I mentioned in my last post, the changes we ended up making were not even close to the ones I thought I would make.  I thought all I needed was a swayback adjustment, but we took out an inch from the shoulders of the back pattern piece.  The strange thing about this was that it didn’t significantly change the shape of the armscye AND I didn’t need to add that inch back in at the back hem.  Go figure!  Then added a ¼ inch at the side seams to add a full inch of ease to the dress.  Also, my left hip is not as curvy as my right, so I straightened that curve and took it in another ¼ inch to fit my hip better.  As I mentioned above, my stretch fabric grew with handling so after I basted in the side seams, I had to take in both side seams another ¼ inch again to accommodate the fabric.  The only further changes I might consider making is making it a little more fitted like it seems to be on the pattern envelope.  But I will decide this after wearing it for a full day.  It’s comfortable as is now, but maybe a little more fitted might be even more flattering?  Who knows.  It could just end up emphasizing the pooch and who wants that?  Not me!  I wish I worked with people who sewed, so I could ask their opinion.  *sigh* 

Would you sew it again? Would you recommend it to others?  This dress  was made as part of the Butterick 5147 Dress Sew Along that Carolyn and I started (still going on for another few weeks – please join!)  It was on my list to try as a potential TNT (tried n true) pattern for my work wardrobe.  Since I consider it a success, I will definitely be sewing it again and again.  There are only two pattern pieces and four darts.  Can it get any simpler than that?  I definitely recommend it to others.  I think it will flatter most figures after adjusting for each individual’s fit.  And the directions are great (aside from leaving out a couple of important steps mentioned above).  I definitely think a beginner could handle this pattern if they have a good sewing reference sitting beside them. 

Conclusion:  This dress has become my second TNT in my TNT quest for a work wardrobe.  I love the fit, the elegant silhouette, and the fact that the fabric is the star of this pattern.  You will not look like you are making the same dress over and over if you use vastly different fabrics.  I plan to make this again right away using my new silk twill border print (also bought at Paron’s during the same visit last week).  Can’t wait!!!!!  Also I absolutely adore the jacket included in this pattern.  I hope to make that sometime in the near future.  I have a lot on my plate now, but that jacket is definitely on my horizon.

Now for some pictures…  Thanks to my sister taking them this morning even though she was rushing to get out the door!  This is how I wore my dress at work today.  I don’t have any construction pictures as I didn’t do anything too different or awe inspiring to document them.  Besides, this dress is all about getting the right fit, not how you hand sew the hem. 😉 

I’m going back to remedial sewing school with Thea this weekend and cutting out my precious silk twill under her wise tutelage.  I had some grain issues with my first iteration of this dress and I don’t want to chance ruining my silk twill dress.  Hopefully, by this time next week, I will have another new Butterick 5147 dress to show you all!

Happy sewing everyone!

Pattern Review – New Look 6901

Pattern Description: Misses Six Sizes in One Just 4 Knits.  Includes one drape neck top and one mock wrap top plus skirt. I made the drape neck top as I have been coveting that kind of top for a long time.

Pattern Sizing: Sizes 8-18, I made the size 12 with a cheater FBA from Debbie Cook’s blog after a disastrously ginormous muslin in a sz 16.

Did it look like the photo/drawing on the pattern envelope once you were done sewing with it? Yes I guess. It’s just an illustration, so you don’t get a real sense of how it fits.

Were the instructions easy to follow? The instructions were pretty easy to understand even for a beginner.

What did you particularly like or dislike about the pattern? I love the drape neck but wonder if it really works for a c cup size or larger. I had difficulty making it work with my girls even after the FBA; it kept draping behind them. Hard to describe though.

Still a little tight at the bust, but acceptable

The pattern has a facing for the back neck which I found really hard to work with. Sewing it completely distorted the neckline on my muslin. So for my final version, I just folded the back neck over and sewed it done. Perfectly serviceable and minimal distortion.

Back neck

The sleeve cap ease is RIDICULOUS. My sewing teacher redrew the sleeve cap for me, but it was still too big when I made the final version. I still needed to ease it in.

Fabric Used: I used a cotton lycra knit from which I have made a dress in the past. I have so much left over that I am using it for knit muslins from now on. I bought it from Gorgeous Fabrics back in the beginning of my on-line fabric days when I didn’t know how much yardage I needed for any given project. Ahh learning curves, love ’em or hate ’em?

Pattern alterations or any design changes you made: For my final iteration, I traced the sz 12 for the neck and torso but moved out 3 sizes at the armscye to a sz 18 for my cheater FBA on both the front and back pattern pieces. While this seemed to help the pulling at the bust in front, it didn’t quite eliminate it altogether.  The rest of the fit was much improved from the ginormous sz 16 muslin I made: much more fitted without being too hoochie mama. Although this top does require a fair amount of sucking in the tummy to maintain a good line.   😉 

front cheater FBA

I used a blind hem stitch on the sleeves (see picture above)  and should have done the same for the hem of the shirt, but instead tried out stitch witchery. What a mess that stuff is. Due to lack of planning, I had some SW scraps on my ironing board and accidentally adhered them to my iron. What a PITA!!!! Anyway, the hem is a little wavy, but seems secure. I don’t know if it will hold up in the wash though. Guess I will find out soon enough. I really need to get on the twin needle band wagon or see if I can find a used coverstitch machined on craigslist.

I already mentioned the sleeve cap alteration and the neck band change I made above.

Would you sew it again? Would you recommend it to others? While I find my final version wearable, I don’t think I will make this again for myself. This drape top does not play well with c cups and above. I might try the mock wrap top version to see how that works though. I recommend this pattern to people with b cups or smaller and you will definitely need to go down 2 sizes from their printed measurement suggestions.  I don’t think this will become a TNT for me.  On to the next pattern…

Conclusion: Cute pattern for smaller busted women. Sizing is ginormous. But instructions are easy to read and understand.

Pattern Review – Simplicity 2452


I just posted my review on PatternReview.com.  Here it is with added pictures of the construction of my skirt. 


Pattern Description: Misses’ jacket with front variations and skirt. I have made just the skirt so far but really like Jacket B and may make that in the future.

Pattern Sizing: 14-22, I made the sz 16 but took in the side seams a bit. I think the sizing on this pattern is pretty true to size. I initially made a 14 out of vanity, but my measurements said to make a 16. 

Did it look like the photo/drawing on the pattern envelope once you were done sewing with it? Yes, but maybe not as form-fitting.

Were the instructions easy to follow? Yes, they were. I guess my ability to translate sewing pattern directions is getting better. 😉

What did you particularly like or dislike about the pattern? I liked the simplicity of the lines of the skirt. I am looking for a simple pencil skirt to use as a TNT skirt for my work wardrobe.

Fabric Used: Wool stretch suiting from Paron’s in NYC — similar to the grey stretch suiting I bought from there as well, but the hand was different from the grey. The brown suiting feels a little more synthetic. Not my fave, but fine for this project. And the color fills a major hole in my work wardrobe.

Pattern alterations or any design changes you made: I shortened the skirt by 1.25 inches. The pattern calls for a 1.25 inch hem allowance but that covered my knee. I have noticed that hemlines have been creeping up lately and wanted to be in synch with everyone else at my workplace. I personally think a hemline below my knee is more flattering as my thighs and knees are a little chunky, but thought I should try out the shorter length and see how I felt. I think I will keep it at the shorter length; it feels more current and less school marmish.

As for sizing, I basically made a skirt that was between a sz 14 and sz 16 based on the fact that my sz 14 muslin was too tight in a rather compromising way. I pinned out the extra width on the skirt of the sz 16 at the side seams and altered the pattern to match, about 1/4 inch on each side for a total of an inch decrease on the circumference of the skirt.

I added a lining to this skirt even though the pattern is for an unlined skirt. Rant: I understand pattern companies needing to attract new sewists by offering easy, unlined patterns but I think they’re doing a disservice to us instead. Just because we are beginners, doesn’t mean that we don’t want a finished look and a complete garment. The frustrations we endure trying to add the elements of a garment they leave out actually deter us from having a great experience. For instance, due to the vent on this simple pencil skirt, I couldn’t just drop in a lining. Why? Because you have to construct the vent of the fashion fabric at the same time as the lining so that the individual vents work together, not separately or against each other. I did not know this and constructed my vent of the skirt separately from the lining and they fought each other. I had to unpick them both and resew them, together this time, to get the vent to work properly as walking ease as intended.  

Vent from right side

Vent from inside with lining attached


Check out that vent!

Would you sew it again? Would you recommend it to others? I am not sure if I will sew this skirt again, but mostly as a matter of taste. After making this skirt, which has no waistband, I think I know now that I prefer a waistband. I found using grosgrain ribbon (the pattern calls for twill tape, but I didn’t have any on hand) very fiddly. And I think I used the wrong size ribbon as it stuck out higher than it was supposed to, but doesn’t really show up on the finished garment when you wear it. If I were to make it again, I will insert the zipper at the center back as I think that kind of insertion is easier as it is not on a curved seam. I am not sure why, but after a day of wearing my skirt, the zipper has creeped higher than the waist band. Strange. 

sticky uppy zipper, hmmm....

Zipper inside with lining slipstitched to it

Conclusion: Good, workable skirt pattern. Instructions are good for an unlined skirt. Sizing is pretty true to pattern measurements. It’s a solid pattern, well worth checking out to see if it fits your life/tastes. 

PR Weekend Philly Redux

Still tired, but here are some pictures to sate your curiosity.  Trena, as well as some other bloggers, are writing more substantive play-by-plays of the weekend. 

It was so amazing to meet fellow bloggers and sewists, and to see them wear creations I have seen online and reviewed on Pattern Review live and in person.  I was blown away by the talent and knowledge.  I reunited with Karen, Trena, Cidell, Carolyn and Lindsay T.  Karen was kind enough to host me for the night, or should I say her cats were kind enough to allow me into their home.  I roomed with Connie and we talked until the wee hours. 

The Kenneth King class was amazing.  I was pretty intimidated by the topic but it was surprisingly easy to embellish.  As usual, he was a hoot with tons of funny stories.  Again I have to say that he is an amazing teacher; very patient, not condescending, and great at explaining all the steps involved. 

Kenneth King


Kenneth King at work


Noile and Trena working away


My table, Kyle to the left there


The museum was amazing.  My favorite garments were the 1870’s Worth dress and the Fortuny dress.  I couldn’t believe how close we could get to the garments.  It was so cool to see all the hand stitching and construction details. 

Worth Dress Evening Bodice


Worth Dress Day Bodice


Detail of Worth Dress Skirt


Fortuny Dress


The dinner was so much fun.  We had an impromptu fashion show where almost everybody got up to talk about their garment or accessory.  There were some amazing dresses and bags.  I believe Connie’s bag won a PR contest last year.  It’s gorgeous! 

The Saturday shopping day was both fun and overwhelming.  I have never shopped that long for anything in my life, much less fabric.  But, boy am I glad that I did.  Here’s my haul.  We spent the morning at Fabric Row in Philly.  The first store I went to was Albert Zoll.  Claudine and I spent at least 20 minutes trolling the button crate.  And I found covered button kits in various sizes as well as buckle kits.  

Albert Zoll


The next store I went to was PA Fabric Outlet where I found some great lace and trim as well as this beautiful lilac silk linen (for a Chanel like jacket?).  The lace will be used for lining hems and little girl dresses. 

PA Fabric Outlet trim


PS Fabric Outlet silk linen and matching trim


Next stop on Fabric Row was Baldwin.  Really beautiful special occasion fabrics can be found at this store.  I practically ran out the door with this silk metallic linen.  I got it for a steal.  I think this might be the fabric for the dress I’ll wear to my cousin’s wedding this Fall. 

Baldwin


Carolyn and I then took a break for lunch (delish!) and met people up at the bus for our next stop on the shopping extravaganza bus tour, London Textiles, a fabric wholesaler in New Jersey.  It was like shopping with piranhas.  Ok, maybe not exactly like that, but you should have seen the mad dash for the remnant boxes.  It was every woman for herself.  Here’s what I managed to grab for myself.  From left to right: 2 silk remnants for a bias blouse, a really long remnant of silk/cotton linen with white/royal purple threads for a sheath dress and a small remnant of a striped silk/cotton linen project tbd.  Caroline was my buying advisor for all of these purchases.  Thank you Carolyn! 

London Textiles


From NJ we trekked to South Philly to the fabled Jomars.  I was very overwhelmed by the time I arrived here, but Carolyn took me under her wing again.  I bought 9 yards of a navy almost black lining, a cotton linen with woven stripes, a Liberty-esque cotton print, some trim for a belt and a teal t-shirting knit.  No plans yet for any of these items 

Navy Lining from Jomars


Jomar Cache


I have no specific pattern ideas yet as to how I am going to use these fabrics/notions, but I love each and every one of them.  They’re so beautiful.  

Karen and her volunteers did such a wonderful job organizing the weekend and everything went off swimmingly well.  I enjoyed myself so much and loved meeting all of these wonderful women and sharing our love of fabric.  I can’t wait to attend another PR Weekend.  Thank you Karen!!! 

One more noteworthy item:  Cidell was kind enough to offer to bring her Knip Mode skirt with her to the Weekend so I could compare and see where mine was off from the original pattern.  It turns out my front wrap curve is pretty different, so I will have to adjust mine accordingly and see if that helps with my draping problem.  Cidell even let me take her skirt home with me so I can work with it.  How cool is that???????  However, I’m a little bummed out still about the close call with wadderville, so I need to put it aside for a week I think.  

So what’s next you ask?  Well, I think Mama needs a new skirt, don’t you?  I’m thinking an unlined, red stretch cotton pencil skirt would do nicely.  Why, yes I do. 

Happy sewing!