Category Archives: Simplicity

Pattern Review: Simplicity 3584

Here’s my pattern review for Simplicity 3584.

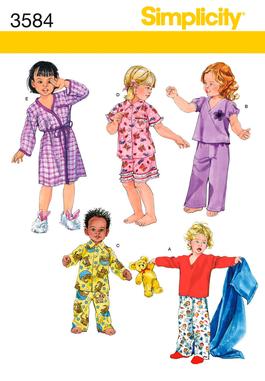
Simplicity 3584

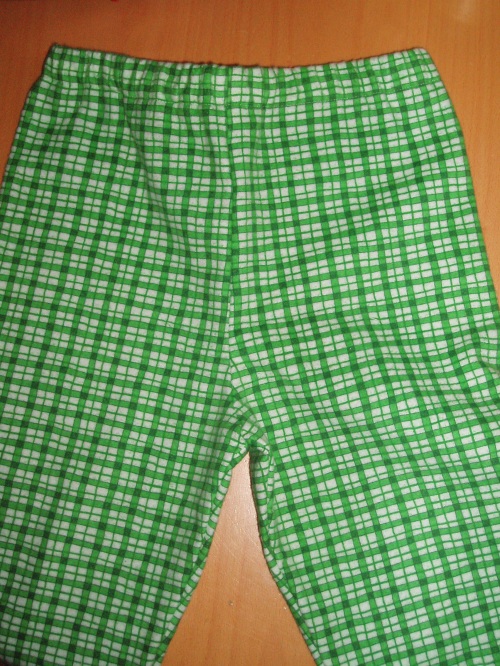
Pattern Description:  Toddler’s Pajamas and RobeI made View C, the flannel pjs.

Pattern Sizing:  1/2, 1, 2, 3, 4 I used the size 3.  The fit was ok.  The pj top could have been longer by an inch or two and the pants were too long.  The hazards of making presents and not being able to fit as you go because they are a surprise. 

Did it look like the photo/drawing on the pattern envelope once you were done sewing with it?  Yes and no.  I didn’t use the button placement markings that came with the pattern.  Instead I used an existing flannel pj top my son had to mark the button placement and I like it better.

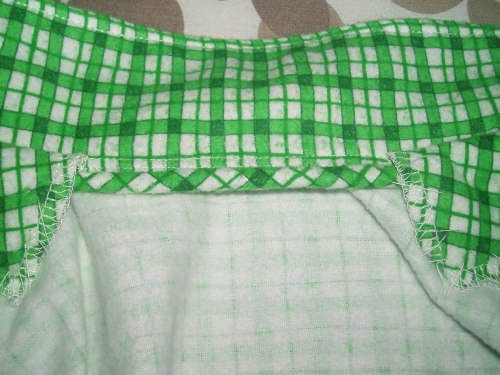
Were the instructions easy to follow?  The instructions were great.  As I have mentioned recently, I am really getting the hang of reading pattern directions now that I am two years into my sewing odyssey.  Again, I warn all sewists no matter how advanced you are, that careful reading always pays off.  They pack a lot of directions into one or two sentences at a time.  So it’s easy to miss something if you’ve never attempted a collar before.  Even with my own careful reading, I made a mistake in how I finished the collar requiring me to make and add bias tape out of self fabric to the interior finish of the collar.

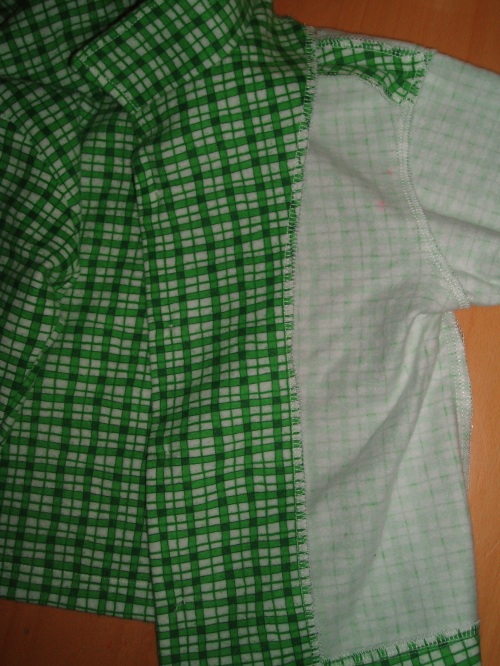
What did you particularly like or dislike about the pattern?  I like how simple the pattern is essentially for a button down pj with collar.  That being said though, it’s still a bit fussy to make, especially if you’re under the time constraints of making an Xmas gift.  I am not sure that not having a collar stand made this easier or not to sew.  I think the end result is not as nice without the stand, but perfectly fine for pj’s and I doubt a non-sewist would notice the difference at all.  The measurements for the waist elastic are way off.  You will need to use your recipient’s waist measurement to approximate the length.  And even then, my elastic was still a little loose.  Also, the facings were too long at the top.  They overshot the shoulder seam entirely, so I had to catch stitch them to the back of the pj shirt (see picture above and below).  Next time, I will check to make sure they line up to the shoulder seam so that I have something to which to catch stitch them.

Any difficulties encountered?  Any difficulties encountered were completely self-inflicted (see note about collar above).  😉   This is a basic pattern.  The only bell & whistle is the pocket (which I placed by lining up the plaid and not using the pattern markings).

Fabric Used:  A gorgeous flannel which had a great hand, was soft and fluffy, nice and thick, and easy with which to work.  I bought it from Fabric.com in November but it has long since sold out.  Sorry!  If I can, I will buy more of it for next year’s pj’s. 

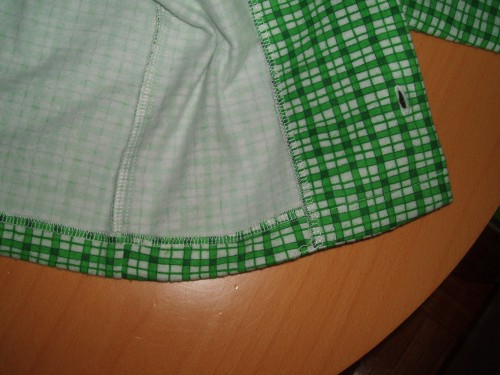
Pattern alterations or any design changes you made:  The only design change I made was the button placement which I mentioned earlier on.  Construction changes were how I finished the interior construction.  I made sure to serge all exposed seams for a nice clean finish.  It looks so nice on the inside.  🙂  

Would you sew it again? Would you recommend it to others?  I will definitely sew it again, making the fit changes mentioned above and being more careful with plaid/stripe matching (my two fronts don’t match up but the side seams do).  It makes such a cute jammie for kids.  I do recommend it for any sewist.  Beginner’s might find it a long and involved project though, but not out of reach skill-wise.  I think, from tracing out the pattern to inserting the elastic on the pants, it took me about 10-12 hours to complete this.  I know I’m slow, but still, that’s a long project for just one Christmas gift.  But don’t say I didn’t warn you when you embark on this pattern. 

Conclusion:  Super cute jammies!  I am very proud of this project.

Handsome Thor

Merry Christmas!

I meant to post this jammie picture yesterday, but, as you can imagine, the day was busy with opening presents, putting said presents together, and cooking. 

Jammipalooza 2010 was a great success.  The kids loved their pj’s and they looked so cute in them.  See for yourselves…

L: Jack in KS3510, M: Katie in NL6638, R: Thor in S3584

I will have reviews up for these pjs later today and tomorrow.  I hope you all had a great holiday.  I’ll be back later with the dets.

On the mend…

Well folks, I’m finally on the mend.  It only took two days off of work and sleeping off some of my sleep deficit for my immune system to kick in finally. 

I kept a steady stream of movies in the dvd player and Nick Jr on the tv for Jack today while I sewed (ah the luxuries of single parenting).  But I am still super behind in my Xmas sewing.  It took me 10 straight hours of  sewing to complete the flannel pj’s for my nephew Thor.  I used Simplicity 3584, the bottom left, View C. 

Simplicity 3584

Overall it’s a decent pattern.  There was only one small drafting error that I encountered.  It was the facing, which extended far too long.  In retrospect, I could have cut it off to match the shoulder seam, but I had tunnel vision at the time and now it’s too late.  Oh well.  I think the pattern is pretty simple; there’s no collar stand after all.  But I think it’s a little too intense or long of a project for Xmas jammies.  The top has so many details that are fussy, like the collar (despite no collar stand) and the pocket.  I’m on the fence as to whether the cut on facing is time saver or not. 

The jammies are definitely cute, but a lot of work.  And with my time constraints now, I am switching gears now and using last year’s knit jammies pattern, Kwik Sew 3510.  The only change I’ll make is to lengthen the torso on the tops. 

Kwik Sew 3510

Apologies, but I can’t show you the flannel pj’s until after Xmas.  My sister might check out my blog and I want it to be a surprise. 

I hope everyone’s Xmas sewing is going well. 

PS: I am so behind on reading blogs right now.  I have over 300 waiting for me on google reader right now, at least 90 of which are saved ones on which I need to comment.  There’s just too little time in the day.

Deer in headlights

I bet you’re wondering how my dress is coming along. 

Umm…. 

Well….

I did make the 2nd muslin on Tuesday night.  I cut it out and sewed it.  In one night.  That’s a record for me.  I usually sew slower than a snail.  If you’ll remember, I had the great idea to make it a size smaller in real muslin, because the sz 14 in a stretchy knit was gargantuan.  Folks, that sz 12 would have made a hoochie mama blush.  I could barely get it over my hips and you could forget about ever zipping it up the back.

It’s not all bad though, for two good realizations came out of this process:

  1. I could reasonably be assured that I can go ahead and make this in a sz 14 in my double-knit fabric and just baste the side seams, fitting as I go.
  2. This dress is gorgeous. 

I absolutely adore this dress.  The cut is very flattering.  I love the pleats going up the bodice, so cute and flattering at the same time.

Now, about those princess seams…  I tried the “clipping the curve” method to get the princess seams not to pucker and gather as I sewed them, but it did not work.  I think the curved part is just too deep a curve.  I might have to flatten that curve a bit.

And my only worry about going straight to the fashion fabric is that I have not muslined the sleeves at all yet.  I’m just going to treat it like I treat making a left hand turn against on-coming, close my eyes, hit the pedal and just go for it.  😉  

image from xraynova.com

Ok, here’s the confession part of the post:  I was going to cut my double-knit last night, but I suffered from the deer in headlights syndrome.  I pre-treated it and it came out all lovely and soft and beautiful and I just got scared to cut into it.  So I did my Xmas cards and laundry instead.  But tonight is another sewing night my friends and this hoochie mama needs a new dress!  I think this might be a two or three night process.  I might get this dress done over the weekend.  We’ll see.  I’m not making any promises. 

One quick question:  I can get kind of obsessive over things at times (shocking to you, I know), and I can’t stop thinking about color blocking.  Do you think I could use a different color knit for the center of the dress (i.e. betweeen the princess seams) or just leave well enough alone and make it in just one color?  Here’s a picture of the envelope to refresh your memory.

Simplicity 2337

Happy sewing everyone!

Good news and Bad news

First the bad news:  I have to make another muslin.

Now the good news: I get to make it in a size smaller!!!

Last night I pushed through and finished a down and dirty muslin of S2337.  For a refresher, here’s the pic.

Simplicity 2337

Since I am making the dress using double-knit fabric, I had the hare-brained idea bright idea to use a stretch fabric.  However, did I use a similar knit fabric to what I will actually use for the final dress?  NO!  I used some leftover fabric that was too stretchy and too thin for this dress.  Live and learn, I guess.

There is no photographic evidence of this muslin.  I know you all want to see how hideous it was, but I was lucky that my camera battery was dead.  I made a sz 14 suspecting that I would need to move up to the sz 16 since I have gained weight recently.  So in my infinite wisdom, I thought I should sew just 1/2 inch side seams instead of 5/8ths giving me another inch all around.  The end result was hideously big. 

Of course I will need to make another muslin, gratefully in a sz 12 this next time, in real muslin.  I think this dress will be flattering once it’s in the right fabric and not giantess-sized, but it’s so hard to tell in its current drapey, stretchy, too big state. 

I can say with great confidence though that the neckline is Burda low.  In fact, I think you could see my belly button from space it’s so low.  Not sure how I’ll rectify that yet. 

Although I am bummed I have to make another muslin, thereby slowing my process down even more, I am glad to have vanity sizing and am excited to work on a new project again.  It’s been so long since I worked with a knit, it almost feels like an alien fabric in my hands.  I do love the stability of wovens, I have to say.

One note re: the drafting.  The princess seams on this bodice are a little tricky.   The side panel bust curve is really curvy, but the front panel to which it is sewn is not that curvy, so that creates lots of puckers, especially in an unstable fabric like a stretchy knit.  I will have to see how it works in a woven fabric first before I decide what method with which to tackle them once I start working with the double-knit.

Long story, short: More muslining tonight!

On my way

Simplicity 2337 won out as my favorite but not for the reasons you might think.  Yes, it won yesterday’s poll as the hands down favorite.  But, again, that’s not why I chose it.  As I was sitting watching zombies last night (love that show), I perused the pattern pieces of the patterns I had on hand, having not received my package from ButtMcVogue yet.  So that left me with V8529, S2648, S2337, and B5522. 

Originally I was just going to go with B5522, because I just adore those sleeves.  I decided against that one though ultimately due to the shapelessness of the dress (not wanting to make this a long drawn out muslining process to get a good look and fit) and because I had read on reviews of this pattern that the sleeves are pretty fiddly.  I want a somewhat simple and fast project.

Someone had made a comment about double-knit not being really drapey.  So that took V8529 out of contention as the drape cowl is a major component of the design.  I know Carolyn said that it was drapey enough, but I don’t want to chance it.  Plus, I don’t like that CF yoke seam.  I looked at the pattern piece itself and I can see why they put a CF seam there, but think you can still jigger it to work on the fold. 

Then I seriously considered S2648 because I just adore the versions that Eugenia made, but two things deterred me.  As I mentioned yesterday, it doesn’t have long sleeves and it had many more pattern pieces than the other Simplicity pattern.  I know I could stick some other pattern’s sleeves on S2648, but I am not experienced to know if any old sleeve will work with any old armscye.  And, again, since I want this to be a relatively painless process before I move on to Xmas gift sewing, I just don’t want to fool with things endlessly.

Simplicity 2337

I thought S2337 would be complicated pattern just looking at the pattern envelope.  View A (top right) has pleating, a crossover bodice and cuffed sleeves.  But when I looked at the pattern pieces involved, it’s really a simple dress.  I read over the instructions and I didn’t see anything I didn’t understand at first glance, so the simplicity of the pattern (pun intended, hahaha) won me over. 

My only concern is this is an unlined pattern with facings.  I am wondering if I want to line it without facings.  Would that be simpler?  How do I line the pleated half of the bodice?  Should I pleat the pattern piece tissue and make the lining from that?  Here’s the line drawing.

What do you think I should do?  Lining or facings?  I think lining is nicer, but it might be a pain to reinvent the wheel.  But I am scared that the facings will constantly flip out as I know they are wont to do.  *sigh*  Nothing is ever cut in dried in sewing, is it?

So I cut my muslin last night and am ready to sew it tonight.  I cut out a 14, but suspect that I am now a 16.  I hope not, but we’ll see. 

Happy sewing everyone!

Pattern Review: Simplicity 2311

S2311


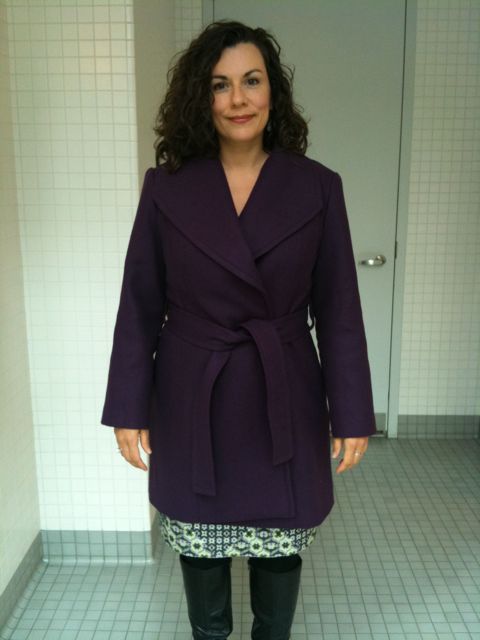
Here’s my pattern review for Simplicity 2311, my beloved purple coat pattern.  I’m officially in love.  🙂  

Pattern Description:  Misses’ Coat in two lengths with collar, sleeve and belt variations.  I made Coat B in the shorter length with the tie belt and wide collar.  I did not include any buttons as my fabric was grabby and the belt was sufficient to keep the coat closed.

Pattern Sizing:  14-22.  I made the sz 14 and found it very true to size with little fitting adjustments needed.

Did it look like the photo/drawing on the pattern envelope once you were done sewing with it?  Yes!  Yes!  Yes! (aside from the different color fabric)

Were the instructions easy to follow?   The instructions were easy to follow if you read carefully.  I found myself skipping on ahead thinking I understood everything perfectly.  It really pays to read and follow along one or two sentences at a time before moving on to the next step.

What did you particularly like or dislike about the pattern?  I LOVED the pattern; it is drafted so well.  The collar did not need any pad stitching to retain its shape.  My teacher said that most RTW collars don’t have any pad stitching, especially when using a fusible interfacing, and I took the excuse and ran with it; the collar came out great. 

The princess seams and CB seam allowed for great fitting opportunities.  I love the multiple opportunities for top stitching, which takes this coat from plain jane to a gorgeous model in heartbeat.  My Emerald 183 has a special topstitching stitch that made my topstitching look so professional.  I recommend loading up on matching thread if you plan to topstitch most of the seams.  I used 3 and a half spools of Gutterman thread for this project.  Top stitching accuracy is easy, if you take it slow. 

FYI: I did not find there to be excess ease in the sleeve head.  Yes, you had to gather, but with a wool fabric, I would expect that.  In fact, I found the amount of ease needed to be gathered quite minimal.  I did not have any problems with puckering nor did I end up with a poofy sleeve.  Love that!

The only dislikes I have, which are minor, are that the hem with the lining attached needs to be tacked to the shell.  That instruction was not included in the pattern sheets.  I think its necessary or else the hem will sag and show the lining.  I will tack my hem down tonight. 

Also, I think some kind of hand stitching in the ditch is needed to join the upper collar/lining/under collar together at the shoulder/neck area so that they act as one piece instead of two pieces that can pull away from each other as you take the coat on and off.  But these are minor points and would probably be obvious to advanced sewists.

Any difficulties encountered?  The most difficult part of this pattern is when you attach the shoulder and collar to the back yoke.  The shoulder and collar form a U when sewn together and sewing that U shape to the squarish yoke is a bit tricky.  You have to pivot at just the right spot making sure not to catch the shoulder in the seam you’re creating.  And then after the pivot, you have to move the collar out of the way to continue.  Just make sure you sew this part slowly and carefully and you will be fine.  I even needed to do one pivot over again, and it was actually easier to do the second time, because the stitching from the first pass allowed me to hold the pieces together better for more accurate sewing.

Fabric Used:  I used an imperial purple wool purchased from FabricMart in Sept 2009 and a silk charmeuse in a coordinating purple color from Metro Textiles purchased in August 2010. 

Both fabrics were a dream to sew.  The wool pressed beautiful.

Pattern alterations or any design changes you made:  The only fitting change I made to the pattern was to sculpt the CB seam to take some of the squarishness out of the fit and give it a more fitted and tapered look from the shoulder blade to waist area (in total I took about .75 inches out tapering to the yoke and waist).  I thought I might need to fiddle with the princess seams in front, but left them as is so I could wear suit jackets underneath if need be.

I did add some interior structure changes to the pattern such as a interfacing all the pattern pieces, and adding a back stay and sleeve heads.  The pattern already called for shoulder pads which I included, but I decided to make my own since I didn’t like the store bought ones that I had bought for this project which were made out of foam.  I just looked at my RTW winter coat to see how its shoulder pads were constructed and did the same.


fused shoulder pad from bottom

Would you sew it again? Would you recommend it to others?  I honestly can say that I would sew this again.  I tend to do only one complicated project a year, so I won’t probably make this again anytime soon, but I love this pattern.  When I make it again, I might place the carriers lower on the coat as I am long waisted.  As they are indicated on the pattern, they fall about an inch or two below an empire waist.  I would like them about an inch lower.  So be sure to check placement for yourself before blindly following the pattern’s placement.

I definitely would recommend this pattern. Maybe not to a beginner as it is a long and involved project (although a beginner could definitely make this pattern; I just think it’s a complicated process to make a coat with many opportunities for frustration), but an intermediate or advanced beginner would definitely enjoy making this pattern.  I think an advanced sewist would enjoy the excellent drafting and fit of this coat and could add more structure and couture details to make it their own.

Conclusion:  Great pattern!!!!  I love my coat and am so proud of the work I put into it and all the interior structure details I included.  I received so many compliments today on my coat.

Sneak peek: Simplicity 2311 Fall Coat

Overall, I am pleased as purple punch with this coat.  I really took my time with the construction.  I love the fabric and color.  I love the pattern, Simplicity 2311; it’s really well drafted and the instructions are excellent!  I love the topstitching.   I went through 3 and a half spools of Gutterman thread, but it was sooo worth it.  With my structural additions of shoulder pads, sleeve heads, and interfacing, it really does feel like a real coat! 

After wearing it to work today, I might add some more hand stitching to the hem of the coat and maybe hand stitch in the ditch around the collars and shoulders where I am able to meld the two layers (the under collar and the upper collar) together better so they move as one.

The only thing that could be improved on this coat is a personal label.  I would love to order some, but just can’t decide on how my label should read.  Sew A Beginner is too cumbersome (and not really accurate anymore).  Sewn by Elizabeth seems so loving hands at home-y.  I need something with a little more oomph and style.  Any suggestions?

Full review of this awesome pattern to come in the next couple of days.  I need to take some more interior photos.

Happy sewing everyone!!!!

Look Ma, should-a-ma-pads!

Yesterday I boldly stated that I would not be pad stitching my lapels.  Anita C commented that I might want to reconsider that decision.  So, with an entire evening to myself dedicated to sewing, I decided to do a little research.  I took out all my books that had the slightest mention of jackets and coats and looked through them.  Interesting things of note:  not one book called it pad stitching.  One called it slant basting.  The only book I owned with great instructions was the Reader’s Digest sewing bible.  So I thought about it long and hard.  I knew if I went ahead with the pad stitching I would be adding on one or two days of more construction to my already late coat.  I put on my shell one more time to check the drape of the interfaced undercollar.  I looked in the mirror and…

It looked fine.  I called Carolyn and asked her opinion.  And she said to ditch the pad stitching.  Since I was leaning in that direction already, I decided to let it go.

I was almost to the point where I needed to add shoulder pads.  I had bought some from P&S Fabrics, my neighborhood sewing stuff store last week. 

P&S shoulder pad

I knew at the time of purchase that there was something off about these pads.  The insert was made of foam and the outside was made of some synthetic fabric.  It just seemed too poofy and retained its shape too well.  I have niggling feeling that this shoulder pad will not decompose for a millenia it’s so unnatural. 

Anyhoo, I snuck a peek at my RTW winter coat to see how big its shoulder pads were.  And I found out some very interesting things.   It’s shoulder pads were made of four layers of cotton fleece batting that were fused together with no outer fabric encasing them.  They were sewn into armscye/shoulder seam allowance and tacked to the shoulder seam, then the lining was tacked to the pad itself.  Very cool.  The sleeve head was sewn into the same armscye/shoulder seam allowance but on the bottom and was made of polyester fill batting.  I thought to myself.  I can do that and got out my measuring tape.

The measurements of my winter coat’s shoulder pads were pretty much dead on for the P&S shoulder pad, even down to the thickness, but I liked the feel and malleability of the winter coat shoulder pads so much more.  I happen to have cotton fleece batting in my stash from when I made my one and only quilt.  I just used that and measured out all the pieces of the winter coat shoulder pads and steam a seamed them together.  And presto change-o, I had me some should-a-ma-pads!

Interior of shoulder pad

fused shoulder pad from top

fused shoulder pad from bottom


Isn’t that cool?!?!  I forgot to take pictures of my sleeve heads, but they’re just rectangular pieces of polyester fill batting measuring about 8 inches by 2.5 inches.

I worked on my sleeves next last night.  One detail that I absolutely adore about this pattern is the ease provided for the elbow at the back of the sleeve.  That is sooo cool.  Love it.   Here’s a pic of my unattached sleeve with ease stitches already gathered for ease of insertion (see the elbow ease added to the left of the seam allowances?  Despite the gathers shown there, there was no puckering at the seam).

I cannot wait to work on my coat again tonight.

Happy sewing everyone!

Retrofitting

I have been getting some unexpected but welcome sewing time this week.  Not much, but enough to make some incremental yet gratifying progress on my fall coat.  I was able to cut out the interfacing and fuse it to my sleeves on Monday as well as cut out my back stay.  Last night I was able retrofit my back stay into the shell of my coat. 

I say retrofit the back stay because, if you will kindly recall, I have already constructed the shell of my coat without installing the back stay along the way.  Someone forgot to sew it in.  I’m not going to name any names, but Elizabeth that person just completely forgot about the back stay because I she was so excited about sewing my the luscious purple wool.  I knew I wanted to incorporate a little structure into my coat as I wanted it to be a little more substantial than my trench coat last year.  However, that doesn’t mean I am going to pad stitch the lapels.  I’m not going crazy here, I mean sheesh!  😉  

I bet you’re wondering how you retrofit a back stay.  And I bet you’re wondering how many times I can say retrofit a back stay in this post.  Hahaha!  I thought about it for a while and then I thought, why not ask on Pattern Review.  Nancy K answered me right away.  She suggested that I sew the back stay onto the seam allowances of my shell.  A simple yet elegant solution to a knotty problem. 

So I got to work.  I cut out the back stay by combining the pattern pieces of the back yoke and the back, overlapping 5/8ths at the seam.  I cut the stay from two inches below the armscye and used my french curve to angle up to the CB fold ever so gently.  Et voilá a back stay was born!  I used the cotton flannel for the stay that I was originally going to use for interlining the coat.  I decided against that because I am lazy wanted a more transitional fall coat rather than a winter coat.  Then I staystitched the neck and armscye of the stay and pinned it to the back of my shell.  I carefully stitched the stay to the seam allowances of my shell, only once sewing it to the actual back for a few inches.  Of course I spent some quality time with my seam ripper at that point.  Fun times I tell you, taking out stitches from wool.  Fun times indeed.

That’s the stage where I remain today my friends.  I will reconvene with the sewing committee (aka my Emerald 183) tonight and see where the evening takes me.  I can’t wait!!!!  Of course as the weather is wont to do, it will be dipping into fall temps on the morrow, so I am feeling a lot of pressure  motivation to finish this coat pronto!

*crossing fingers for some good progress tonight!*

Happy sewing everyone!